Close Menu
  • Gaming
    • Game Guides
    • Codes
    • Game News
    • Game Previews
    • Game Reviews
    • Game Features
    • Game Lists
    • Platforms
      • Nintendo
      • PC
      • PlayStation
      • Xbox
      • Mobile
  • Entertainment
    • Movies
    • Movie Features
    • Movie Reviews
    • TV
    • Reality TV
    • Royals
  • Celebrity
  • Human Interest
  • Astrology
  • Videos
  • More
    • Anime
    • Lists
    • Podcasts
    • Reviews
Facebook X (Twitter) Instagram LinkedIn YouTube
  • About Us
  • Join Our Team
  • Meet the Team
  • Privacy Policy
  • DMCA Policy
  • Contact Us
  • Terms of Use
  • Sitemap
  • Editorial Guidelines
  • Advertising Policy
The Nerd Stash
  • Gaming
  • Celebrity
  • Human Interest
  • Videos
The Nerd Stash
Home»Game Guides»How To Use Photo Mode in Zelda Tears of the Kingdom – Camera Guide

How To Use Photo Mode in Zelda Tears of the Kingdom – Camera Guide

The Legend of Zelda: Tears of the Kingdom features a Camera ability and Photo mode, and it’s used for more than just taking silly selfies…

David RodriguezBy David RodriguezMay 12, 20233 Mins Read
Nintendo via The Nerd Stash
This article is over 2 years old and may contain outdated information.

The Legend of Zelda: Tears of the Kingdom features a Camera ability and Photo mode, and it’s used for more than just taking silly selfies with Link. This anticipated sequel packs many new features and locations to explore, and the game provides very little guidance on your adventure. The Photo mode and Camera are hidden unless you know where to look. This guide will explain how to unlock and use Photo mode in Tears of the Kingdom.

How to Use Photo Mode in Tears of the Kingdom

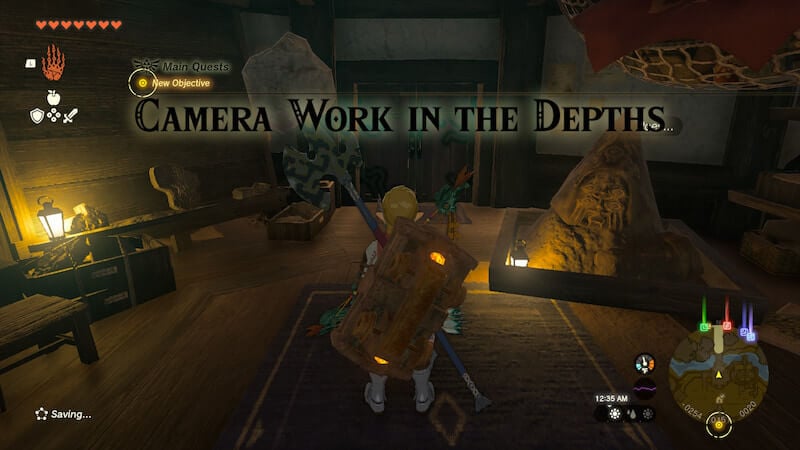
Photo mode isn’t something players can use until you unlock the Camera ability. To do this, head to Lookout Landing after completing the Great Sky Island tutorials. You have to meet with Purah, and she will give you a rundown of the state of the world. After this sequence, head inside her workshop and talk to Robbie. He will bring up his desire to explore the Depths. This will start the “Camera Work in the Depths” questline.

tears of the kingdom photo mode
Nintendo via The Nerd Stash

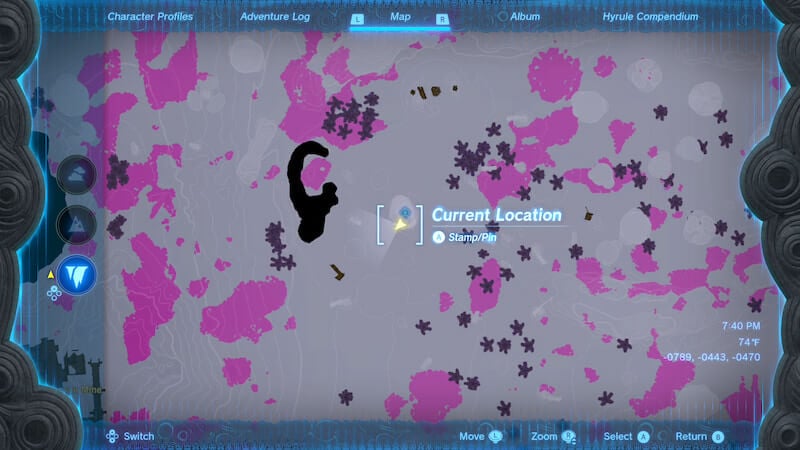
Before you can progress, you have to speak to Purah and unlock the use of Skyview Towers and the Paraglider. This will let you safely land in the Depths. After the quest begins, head South out of town to the Hyrule Field Chasm. Dive in and glide down. Activate the massive Lightroot to get some light. Speak to the researcher nearby. They will mention Robbie has gone deeper into the Depths. Travel West to the coordinates shown in the map below. The coordinates are -0789, -0443, and -0470.

tears of the kingdom map
Nintendo via The Nerd Stash

Once you arrive, activate the Iayusus Lightroot and speak to Robbie. He will unlock the Camera ability on your Purah Pad and give you a tutorial on taking pictures. This is how you unlock the ability to use Photo mode and the Camera in Tears of the Kingdom.

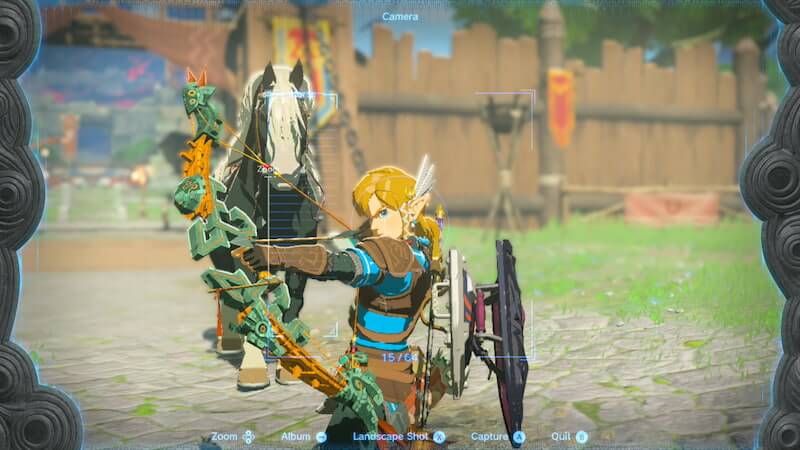
To use Photo mode, activate the Camera ability. Then, look where you want and press A to snap a picture. Every object, person, and creature you snap a photo of will be added to the Hyrule Compendium. If you tap X, you can take a selfie with Link. While in selfie mode, press the left analog stick to make Link pose. Hold ZL to modify each pose.

tears of the kingdom pose
Nintendo via The Nerd Stash

With the Camera in hand, always take it out and snap a quick pic or two of your favorite scenery or dangerous creatures in the open world. Now that you know how to use Photo mode in Tears of the Kingdom, selfie stick to your heart’s content. Stay tuned for more guides right here at The Nerd Stash.

Related Topics
Guide Legend of Zelda Tears of the Kingdom
Share. Facebook Twitter LinkedIn Reddit Email
David Rodriguez
  • Website

David Rodriguez has been gaming for 30 years. His written work has also appeared at Opencritic, and Metacritic. Outside of his love for games, you can catch him extolling the virtues of classic action cinema and the elegant class of early 2000s Nu-Metal.

SUGGESTED READS

Avatar TLA Fans Are Finally Getting the Open-World Game They've Been Waiting For: 'We Got Avatar's Creed Before GTA 6'
Game News

Avatar TLA Fans Are Finally Getting the Open-World Game They’ve Been Waiting For: ‘We Got Avatar’s Creed Before GTA 6’

Best Augments in Black Ops 7 Zombies
Game Guides

Best Augments You Need To Fully Research In Call of Duty: Black Ops 7 Zombies

All Steps in the Destiny 2 Renegades Campaign
Game Guides

How To Complete the Renegades Campaign in Destiny 2

Octopath Traveler 0 PS5 Review
9
Features

Octopath Traveler 0 Review – A Tale of Revenge and Restoration

Destiny 2 Renegades Eververse Store Items
Game Guides

All Destiny 2: Renegades Eververse Cosmetics

Destiny 2 Renegades All Season Pass Rewards
Game Guides

All Destiny 2: Renegades Season Pass Rewards

Trending
Avatar TLA Fans Are Finally Getting the Open-World Game They've Been Waiting For: 'We Got Avatar's Creed Before GTA 6'

Avatar TLA Fans Are Finally Getting the Open-World Game They’ve Been Waiting For: ‘We Got Avatar’s Creed Before GTA 6’

Best Augments in Black Ops 7 Zombies

Best Augments You Need To Fully Research In Call of Duty: Black Ops 7 Zombies

All Steps in the Destiny 2 Renegades Campaign

How To Complete the Renegades Campaign in Destiny 2

Octopath Traveler 0 PS5 Review
9

Octopath Traveler 0 Review – A Tale of Revenge and Restoration

The Nerd Stash
Facebook X (Twitter) Instagram YouTube LinkedIn
  • About Us
  • Join Our Team
  • Meet the Team
  • Privacy Policy
  • DMCA Policy
  • Contact Us
  • Terms of Use
  • Sitemap
  • Editorial Guidelines
  • Advertising Policy
© 2025 The Nerd Stash. All Rights Reserved.

Type above and press Enter to search. Press Esc to cancel.