Close Menu
  • Gaming
    • Game Guides
    • Codes
    • Game News
    • Game Previews
    • Game Reviews
    • Game Features
    • Game Lists
    • Platforms
      • Nintendo
      • PC
      • PlayStation
      • Xbox
      • Mobile
  • Entertainment
    • Movies
    • Movie Features
    • Movie Reviews
    • TV
    • Reality TV
    • Royals
  • Celebrity
  • Human Interest
  • Astrology
  • Videos
  • More
    • Anime
    • Lists
    • Podcasts
    • Reviews
Facebook X (Twitter) Instagram LinkedIn YouTube
  • About Us
  • Join Our Team
  • Meet the Team
  • Privacy Policy
  • DMCA Policy
  • Contact Us
  • Terms of Use
  • Sitemap
  • Editorial Guidelines
  • Advertising Policy
The Nerd Stash
  • Gaming
  • Celebrity
  • Human Interest
  • Videos
The Nerd Stash
Home»Game Guides»How To Complete the Yura Questline in Elden Ring

How To Complete the Yura Questline in Elden Ring

This journey can get bloody.

Mykel BrightBy Mykel BrightFebruary 29, 20244 Mins Read
yura bloody finger hunter
Image Source: Bandai Namco and Its Shatter (YouTube)

Skip To...

  • Yura Questline Part 1
  • Yura Questline Part 2
  • Questline Part 3
  • Questline Part 4
  • Yura Questline Part 5

Elden Ringย features plenty of main and side quests to keep you busy for hours. In many cases, the optional quests offer just as good of a time withย solid rewards. Case in point: theย Elden Ringย questline with Bloody Finger Hunter Yura. There are just a few parts to complete his tale, and we’ll tackle each one (including the optional ones) so you can score all the rewards by the end.

Yura Questline Part 1

flying dragon battle
Image Source: Bandai Namco and Its Shatter (YouTube) via The Nerd Stash

The first main part of Yura’s questline in Elden Ring is completely optional. But if you’re one of those completionists, you’ll want to finish this anyway. You can break this part down into three sections:

  • Meeting Yura
  • Killing the Dragon at Agheel Lake
  • Returning to Yura for a second time

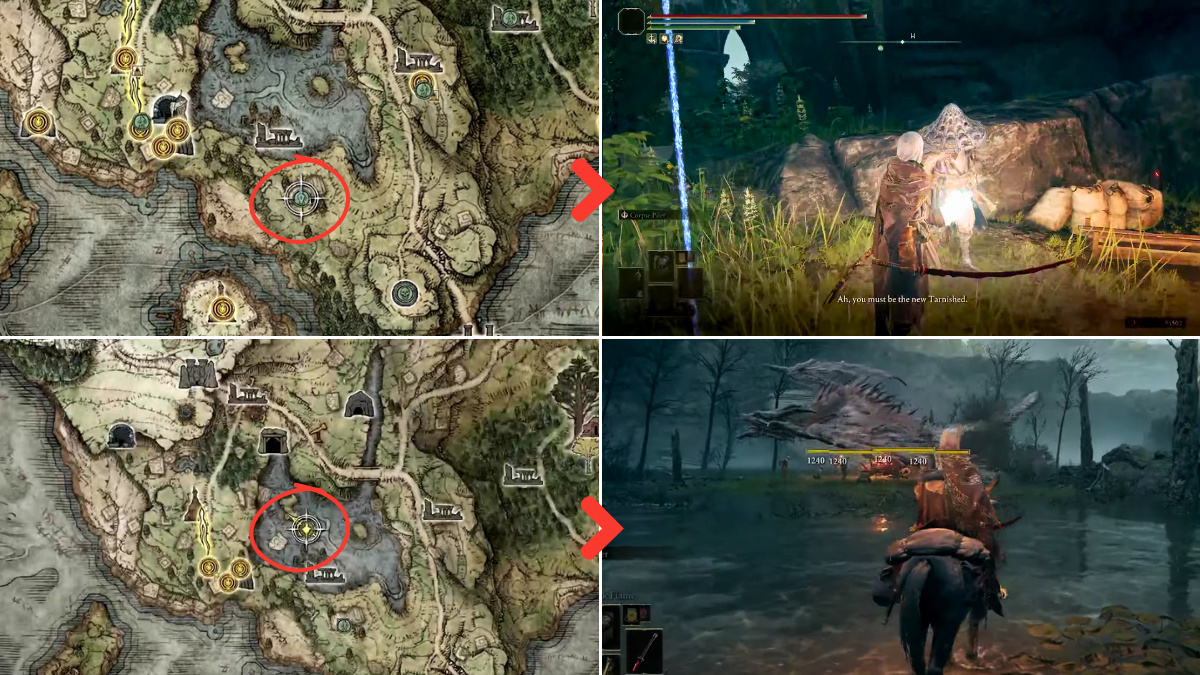
You have a chance to first meet Yura in the northeast section of theย Seaside Ruinsย close to the Site of Grace. Talk to him there and hear his warning to stay away fromย Agheel Lake. Of course, there’s loot found if you slay the Flying Dragon, so that’s a bonus right there. When you’re finished, return to Yura, and he will tell you all about the Church of Dragon Communion.

Related:

How To Respec Your Stats in Elden Ring

Yura Questline Part 2

elden ring bloody finger hunter
Image Source: Bandai Namco and Its Shatter (YouTube) via The Nerd Stash

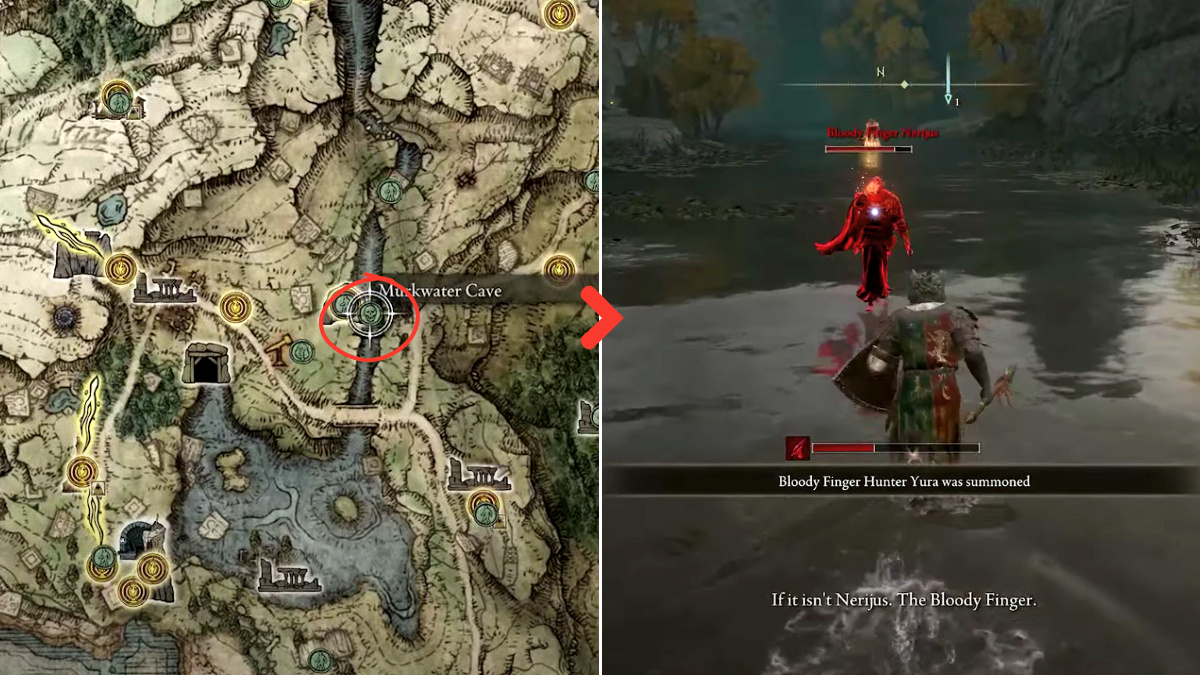
Now, we’re reaching the required sections of Yura’sย Elden Ringย questline, and our resident Bloody Finger Hunter has quite the journey ahead. First, you should plan for a fight. You’re going to head toย West Limgraveย and try to enter theย Murkwater Cave. Before you can do so, there’s an ambush by Bloody Finger Nerijus. Don’t worry if you’re not prepared. After some time, Yura will arrive and help you.

Once that’s done, you can score loot like the Reduvia dagger. Now, this part is optional: if you head north up the river in the same area, you can speak with Yura again.

Questline Part 3

elden ring yura hunter questline
Image Source: Bandai Namco and Its Shatter (YouTube) via The Nerd Stash

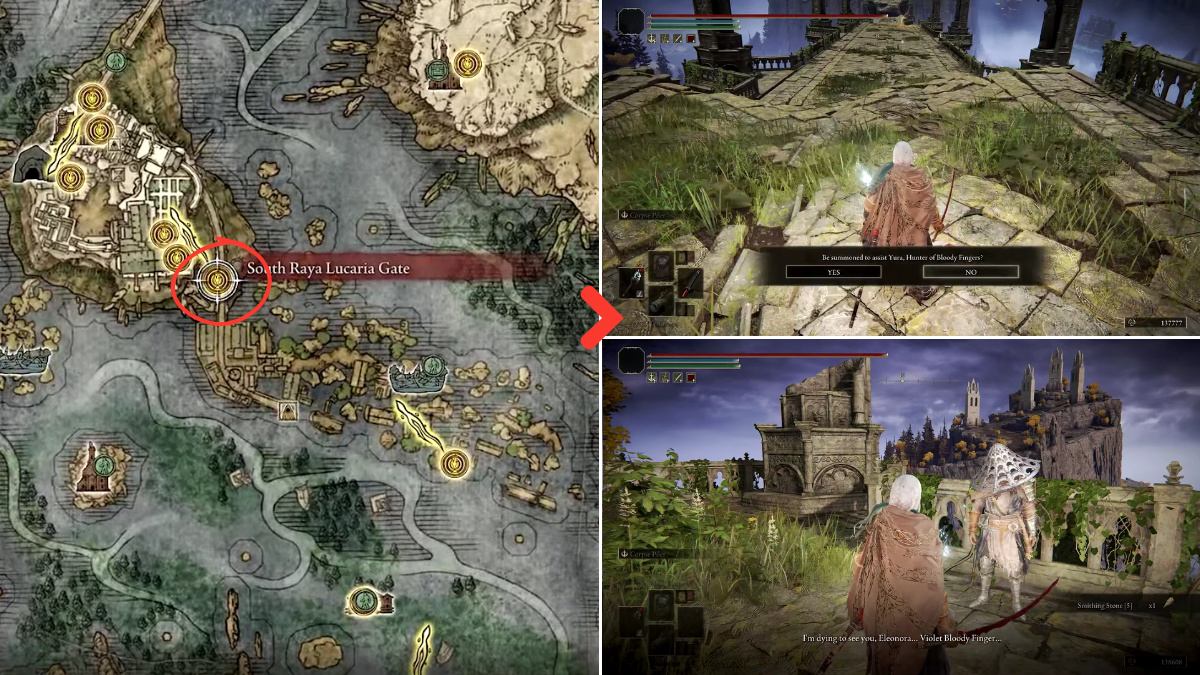
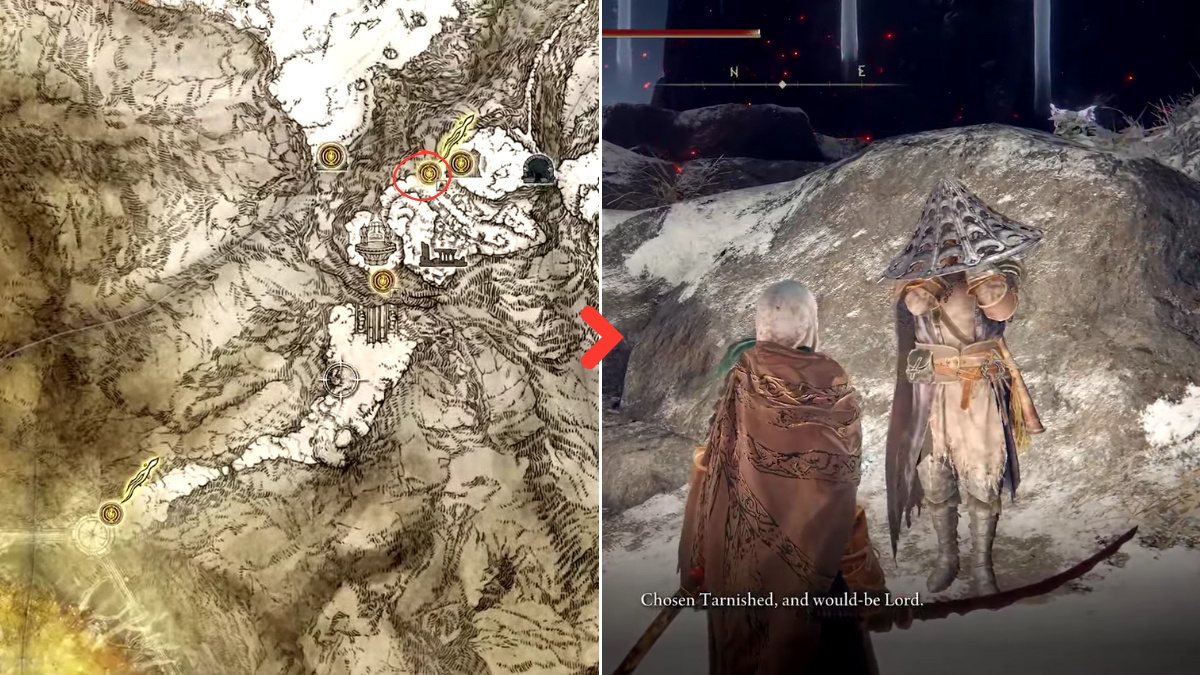
Next up in our Elden Ring questline with Yura is to travel to Liurnia of the Lakes and head to the Academy of Raya Lucaria. You must have a Glintstone Key to enter the building. Use the key at the entrance at the South Raya Lucaria Gate. From there, you can use the nearby Site of Grace. But you want to head north and follow the bridge until you get to the summon sign. Once you interact with it, you’re transported to Yura’s world as he battles Bloody Finger Ravemount Assassin.

When you defeat the enemy, you can earn the Ash of War: Raptor of the Mists. Afterward, you can speak with Yura when you return to learn more lore about the hunter.

Related:

Where To Find the Zweihander in Elden Ring

Questline Part 4

yura bloody finger quest
Image Source: Bandai Namco and Its Shatter (YouTube) via The Nerd Stash

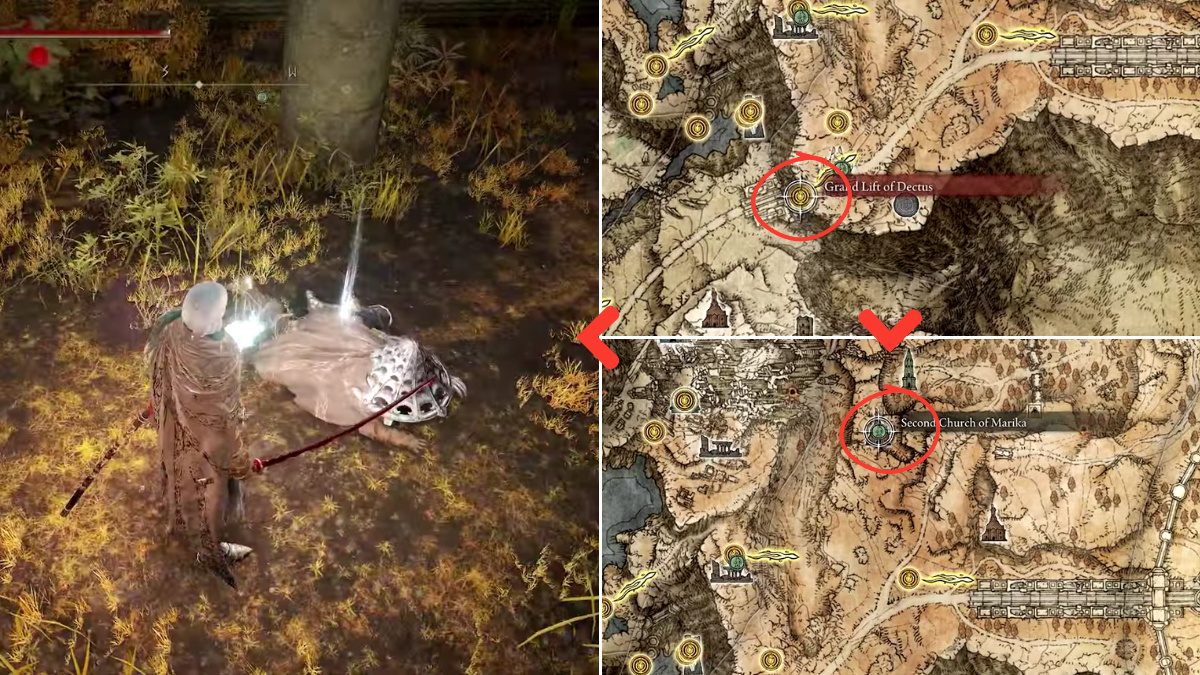
Yura’s reached his end at this point, which means we’re nearly done with the Bloody Finger Hunter’s questline in Elden Ring. We’re going to head to the Altus Plateau and visit the Second Church of Marika. It’s here that we’ll witness Yura dying. After you speak to him and he dies, he drops his katana Nagakiba.

Before you know it, Eleonora, Violet Bloody Finger will spawn in and ruin things. But you do get to test out your newly acquired katana if you wish. Once you defeat her, you can loot Eleonora’s Poleblade as well as a Purifying Crystal Tear.

Related:

10 Best Spirit Ashes in Elden Ring

Yura Questline Part 5

shabriri location
Image Source: Bandai Namco and Its Shatter (YouTube) via The Nerd Stash

For our final journey with Yura’s Elden Ring questline, we’re heading to the Mountaintop of Giants to reach the Zamor Ruins Site of Grace. When you get there, your eyes won’t deceive you: you will see the previously dead Yura standing near the Site. However, that’s just an imposter by the name of Shabriri parading around in Yura’s corpse. You have two options here:

  • Option 1: Speak to Shabriri and agree to receive the Leyndell Flame. If you do, Shabriri will vanish and leave you with Yura’s Ronin Armor set.
  • Option 2: Fight and kill Shabriri. You can still loot the Ronin Armor set.

Either way, you will conclude Yura’s questline with both his katana and his armor set. Of course, you can get these items by killing Yura when you first encounter them and looting the corpse. If you go to the same area at the end, Shabriri will still be there, and you can kill him, too. But doing the questline is far more rewarding.

Elden Ring is available on PC, PlayStation, and Xbox.

Related Topics
Elden Ring Guide
Share. Facebook Twitter LinkedIn Reddit Email
Mykel Bright
  • Website

Since childhood, Mykel has had a passion for writing, drawing, comic books, video games, and all things horror. She finds various ways to blend her loves such as sketching out ideas for potential comics and working out ideas for choice-based visual novels.

SUGGESTED READS

Destiny 2 Weapon and Armor Tiers
Game Guides

How Do Weapon and Gear Tiers Work in Destiny 2: The Edge of Fate

Destiny 2 Edge of Fate Exotic Items
Game Guides

All Exotics in Destiny 2: The Edge of Fate

Destiny 2 Edge of Fate Power Level 200
Game Guides

How To Reach Power Level 200 Fast in Destiny 2: The Edge of Fate

Destiny 2 Edge of Fate World Tier Changes
Game News

Bungie Responds to Community Criticism by Peeling Back Some Destiny 2: The Edge of Fate Secrets

Destiny 2 Weekly Reset Guide: Challenges, Rotations, & Rewards (June 28-May 2)
Game Guides

Destiny 2 Weekly Reset Guide: Challenges, Rotations, & Rewards (July 1 – July 7)

Destiny 2 Edge of Fate Expansion Launch Trailer
Game Features

Destiny 2: The Edge of Fate Just Gave Us a Remedy-like Launch Trailer

Trending
Texas Man records a package thief stealing boxes off the porch

Texas Man Comes up With โ€˜Epicโ€™ Idea To Get Revenge on Porch Pirates: โ€˜This Is Genius’

Florida bride has special moment with two fathers at wedding

Florida Bride’s Father Shocks Guests At Wedding When He Sees Her Stepdad In Crowd: ‘Cries In Daddy Issues’

A picture of the Texas police impersonator.

Texas Police Impersonator Ambushes Couple and Ends Up Crawling For His Life: โ€˜He Literally Turned Into a Wormโ€™

MAGA Supporter With a Megaphone Harasses Safeway Protestors in Colorado

MAGA Supporter With a Megaphone Harasses Safeway Protestors in Colorado: ‘Couldn’t Even Make the Cut for ICE So He Had to Settle For This’

The Nerd Stash
Facebook X (Twitter) Instagram YouTube LinkedIn
  • About Us
  • Join Our Team
  • Meet the Team
  • Privacy Policy
  • DMCA Policy
  • Contact Us
  • Terms of Use
  • Sitemap
  • Editorial Guidelines
  • Advertising Policy
© 2025 The Nerd Stash. All Rights Reserved.

Type above and press Enter to search. Press Esc to cancel.