
The ninth main installment of the Resident Evil series is finally here, and it is much bigger than any of us thought. This time, it features two protagonists: Grace and Leon, each with their own chapters, playstyles, and zones to visit. Since it can be a lot for new players, we’ve made a complete walkthrough of Resident Evil Requiem, showing every puzzle solution, collectible, weapon, and overall guiding you through this new survival horror adventure.
Starting Up
Before delving into the game, there are a few things you need to keep in mind, mainly the camera modes and difficulty modes. As you know, Resident Evil Requiem can be played in a first-person or third-person perspective. Once you fire up the game for the first time, it will recommend doing Grace’s sections in first-person due to the more prominent horror elements and Leon’s in third-person, as they lean a bit more into action-oriented parts. That is how we played it, but you can swap perspectives at any time from the in-game menu.
Another thing you should pick here is your difficulty, and there are three you can choose from:
- Casual: The easiest one with weaker enemies.
- Standard (Modern): Normal difficulty, but with autosaves for both characters.
- Standard (Classic): Somewhere between normal and hard difficulty, with autosaves for Grace being limited and Grace only being able to manually save by using ink ribbons.
What is the Best Difficulty Setting for Resident Evil Requiem?
You can’t go wrong with any of the difficulty options. However, in our case, we played it on Standard (Classic), as it offered a balanced experience between challenge and suspense, and felt like the true Resident Evil experience. Also, our Resident Evil Requiem walkthrough is based on the Standard (Classic) difficulty, so if you’re following it, we recommend selecting this option.
Wrenwood Chapter (Grace)

After a cutscene showing Grace in her office and her boss giving her an assignment to head to a hotel where her mother died, you’ll eventually take control of Grace as she walks in the streets of Wrenwood while looking for the aforementioned hotel. This part serves as a tutorial, and it is pretty straightforward.
Once you start controlling Grace, walk down the street, past the building that’s under construction, and a cutscene will trigger, showing you where to go. Keep following the “Do not cross” tapes on some of the objects around the scene, and you’ll eventually enter the hotel through the back door.
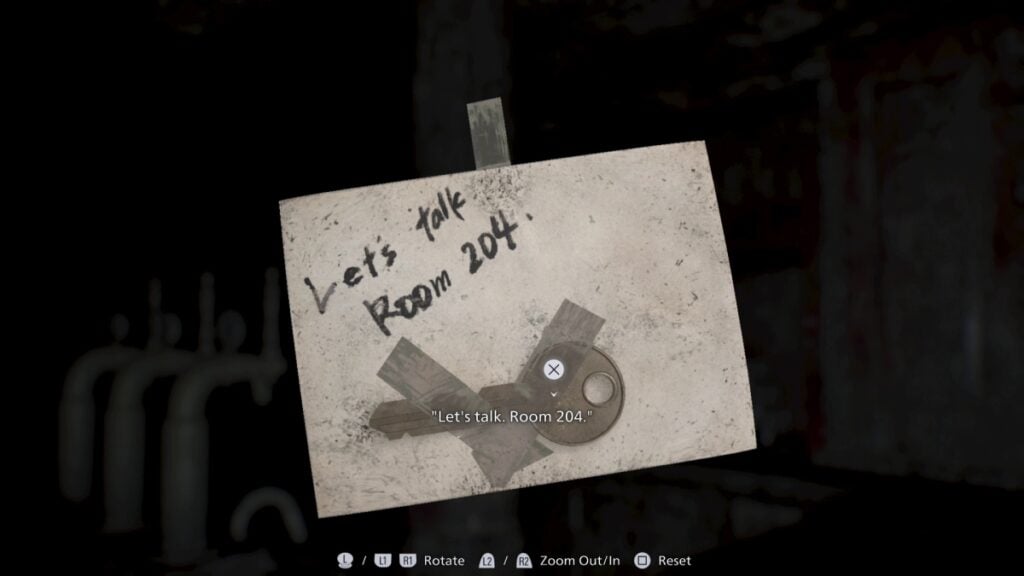
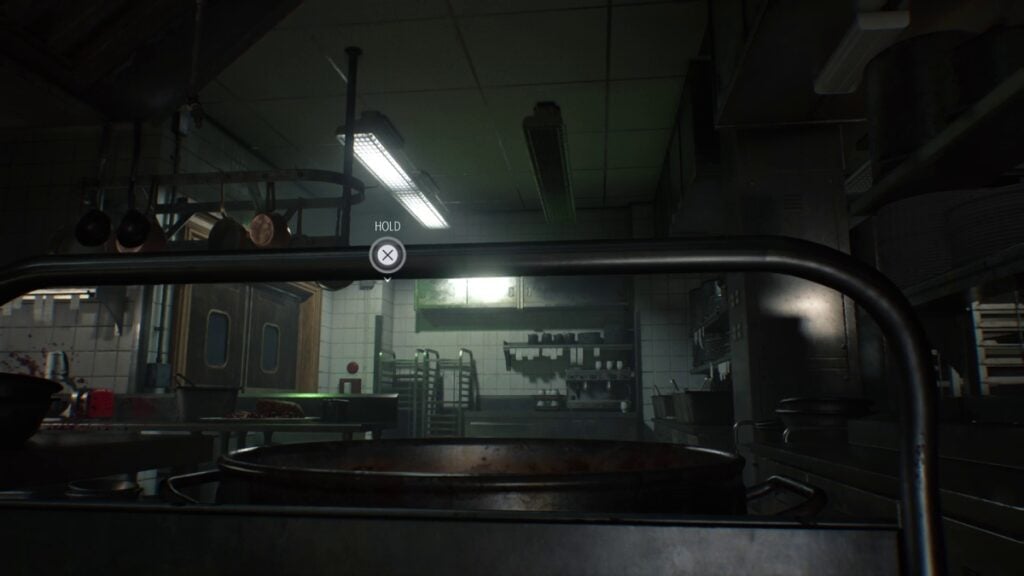
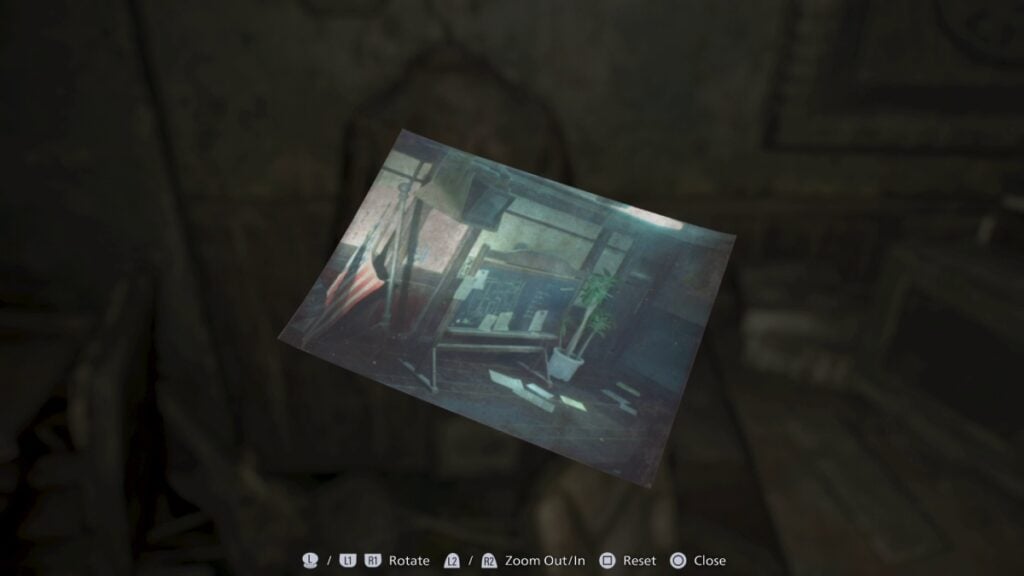
Nothing important here in the kitchen, just a couple of items you can interact with, so keep going through the hotel until you reach the lobby and spot a picture of Grace at the bar. Grab it, flip it, and you’ll see that your next destination is room 204. The picture has the key to this.
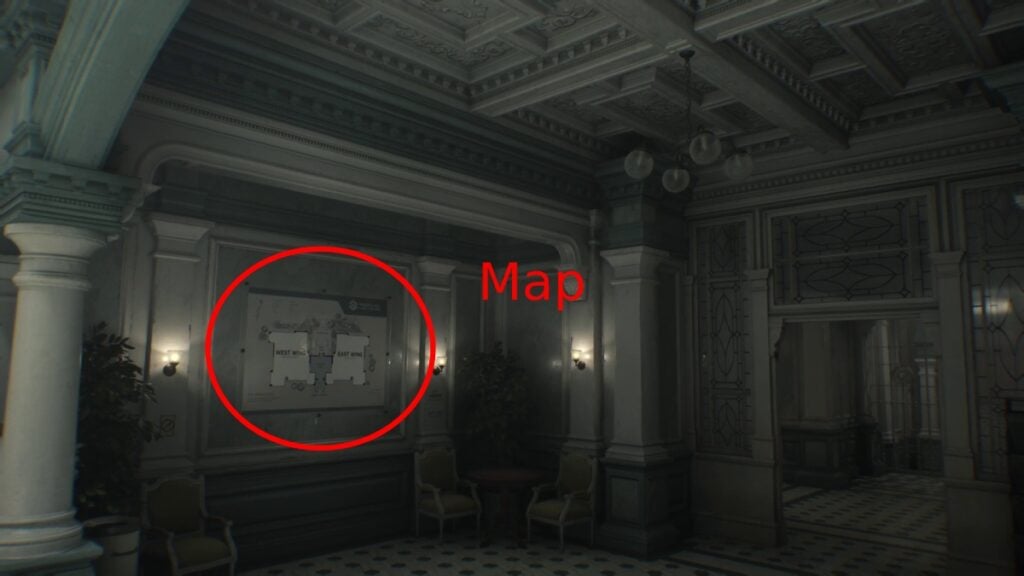
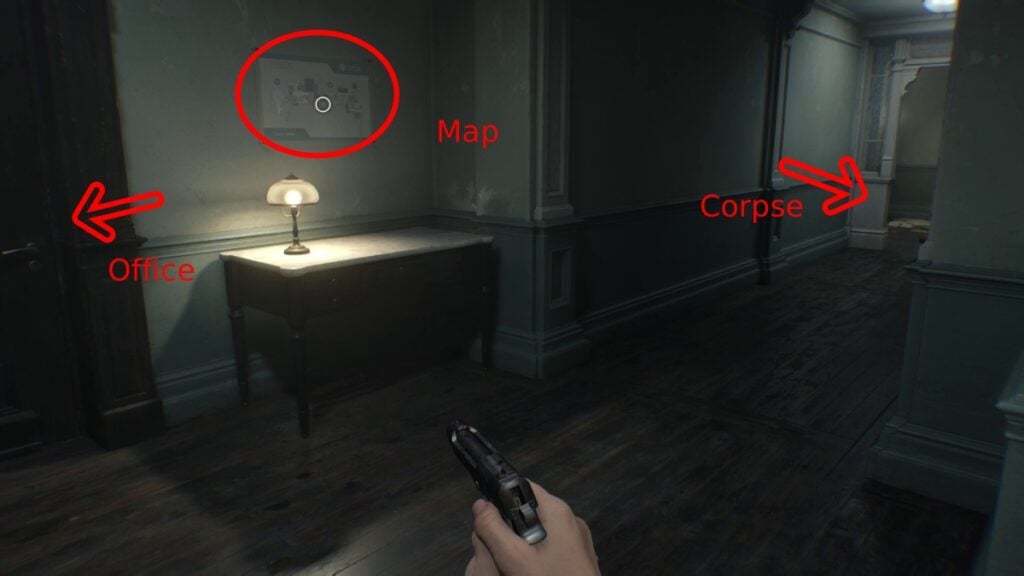
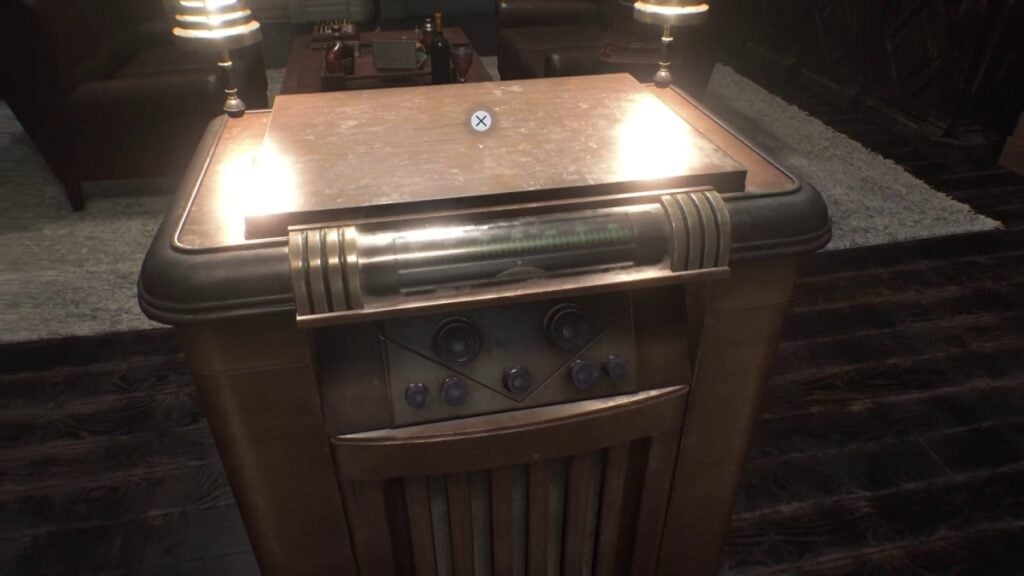
You can explore the ground floor freely. There are a couple of documents you can grab to read and learn more about the hotel, but nothing too important. You’ll want to head to the office, though, as that’s where you’ll get your first map, which you can now browse by pressing the corresponding button (for instance, the touch pad on PS5).
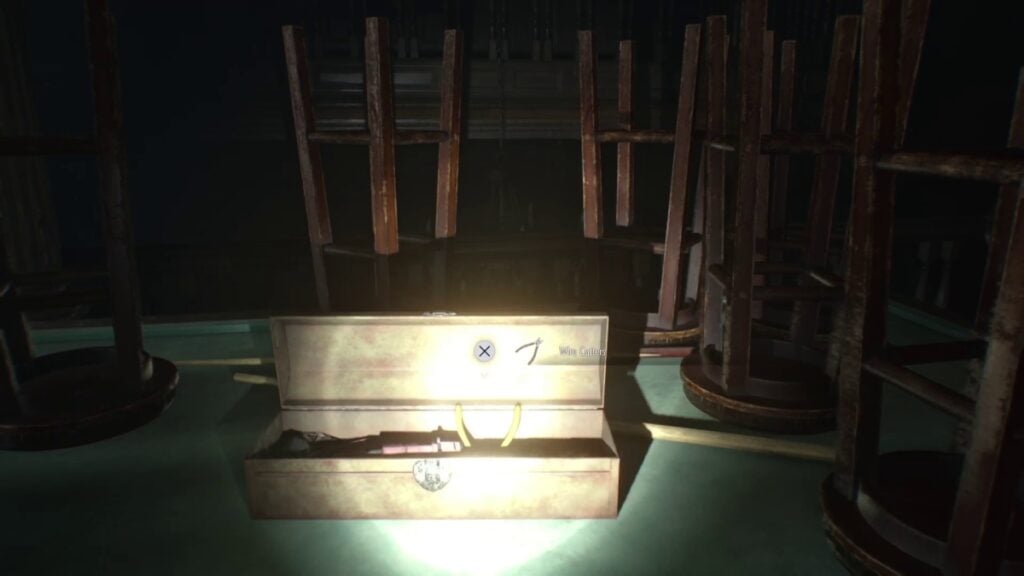
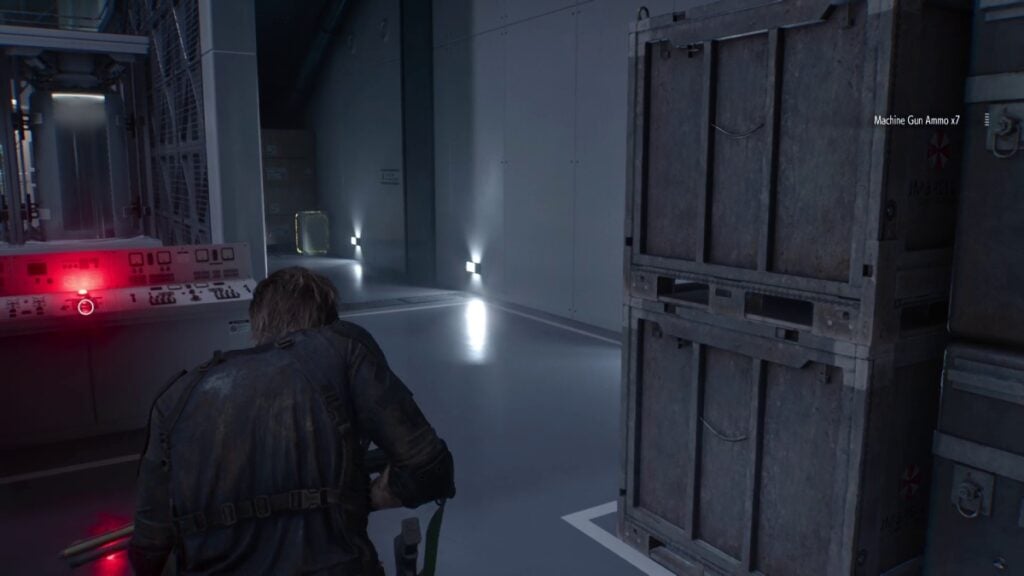
Head upstairs, and you’ll find a locked room that we’ll come back to later. The important item is the wire cutters, which are on top of the pool table. Grab it and cut the wires on the other locked door to progress.
Enter room 204 and interact with the pictures on the table, and you’ll get a long cutscene. You can play through some parts of this cutscene, but it is all scripted, so just keep following the objective until it ends. The important part of this cutscene is where one character hides some documents, so pay attention to that.
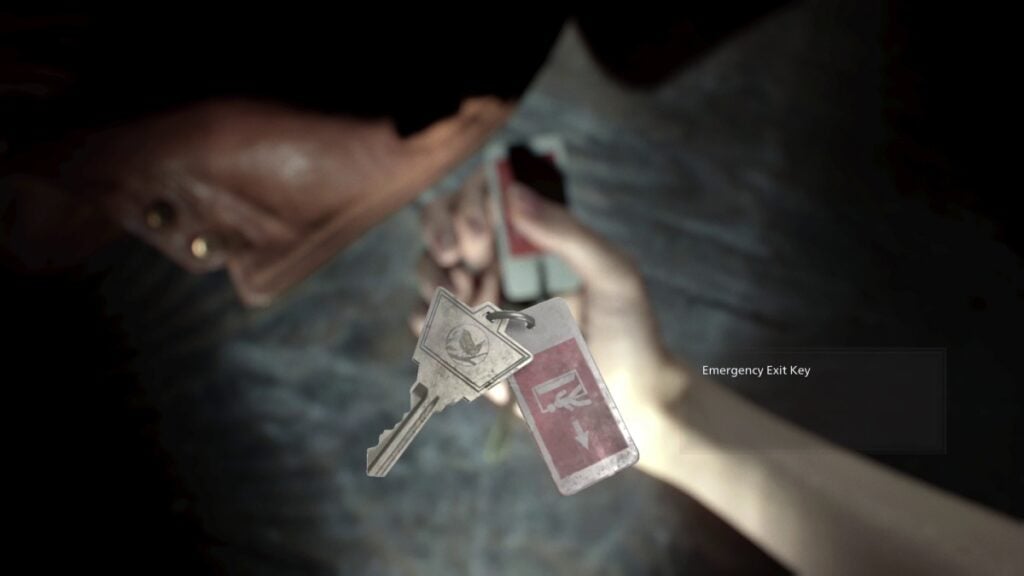
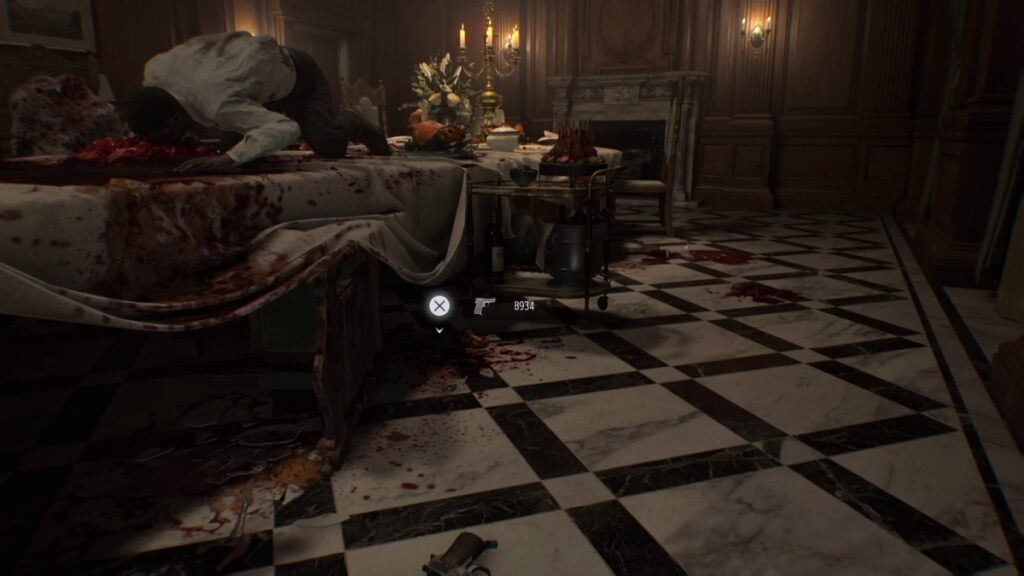
Back to the present, you’ll take control of Grace again, and will now have to go to where you saw the documents in the flashback cutscenes. Grab them, and a short cutscene will trigger, followed by your first official encounter against a zombie. This one’s also scripted, with one quick-time event. Complete it and grab the keys to the locked emergency exit you saw earlier, and head to it.
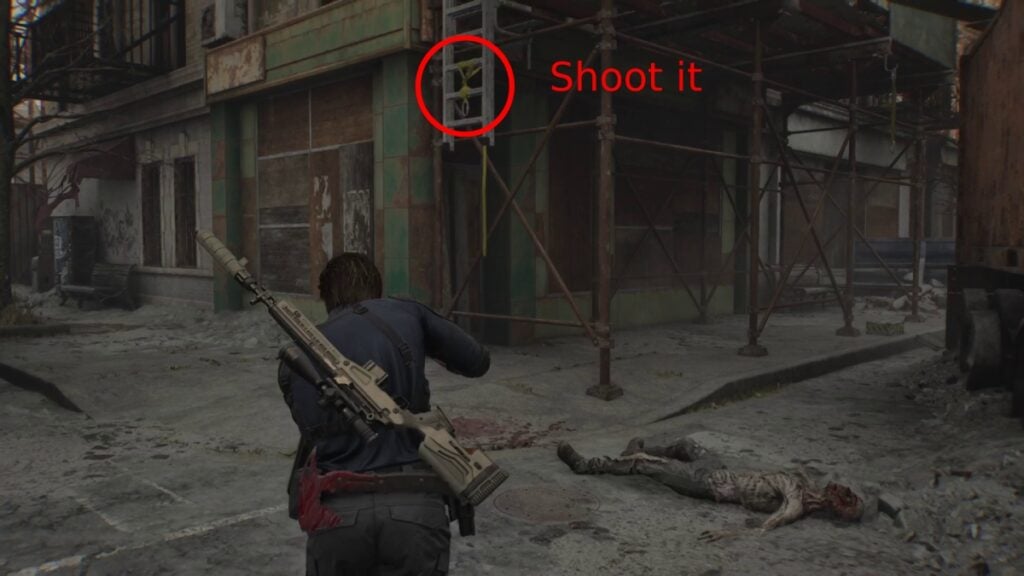
Reach the top floor and enter the room where you’ll meet the game’s baddie: Victor Gideon. Let the cutscene play out, and this will end Grace’s first chapter.
Elbridge Chapter (Leon)
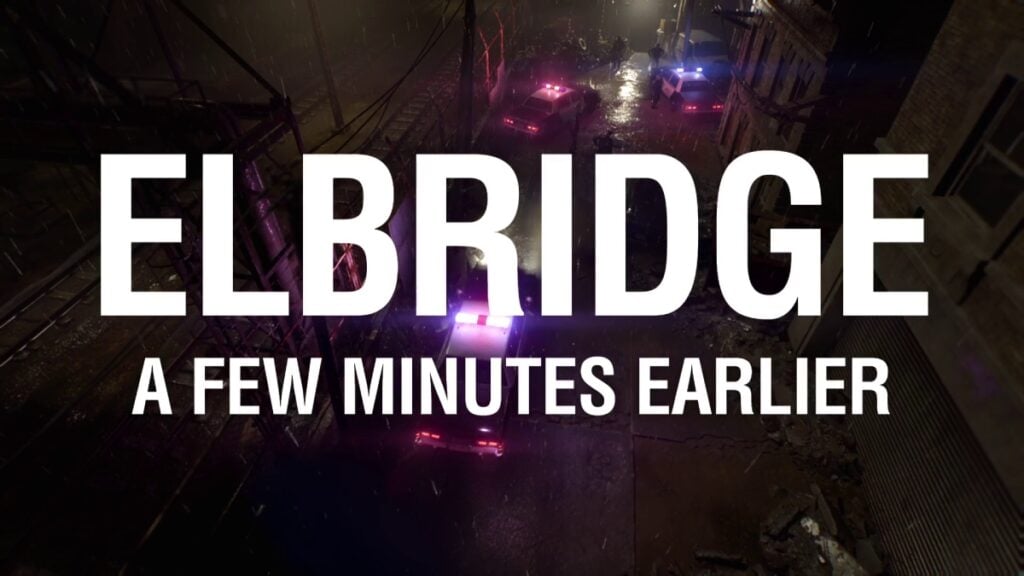
And now our walkthrough shifts to the perspective of the one and only Leon Scott Kennedy, who finally returns in Resident Evil Requiem. Just like Grace’s first chapter, this serves as a tutorial to get a grasp of how Leon’s new abilities and weapons work.
Watch the cutscene until you see Victor carrying Grace out of the building. In true villain fashion, Victor will shoot several civilians with a virus, and it is time for some zombie fighting in the streets. For this installment, Leon has his handgun at first, some healing items, and he’ll eventually pull out the powerful Requiem handgun.
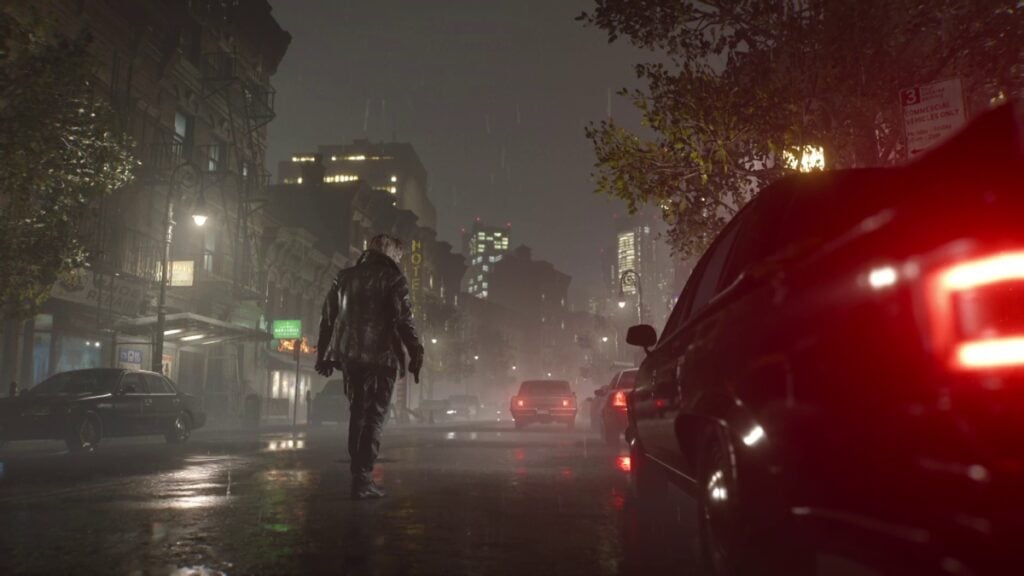
This area is also heavily scripted, so all you have to do is follow the zombies and either shoot them or ignore them. The sequence will end once you reach a specific point in the map.
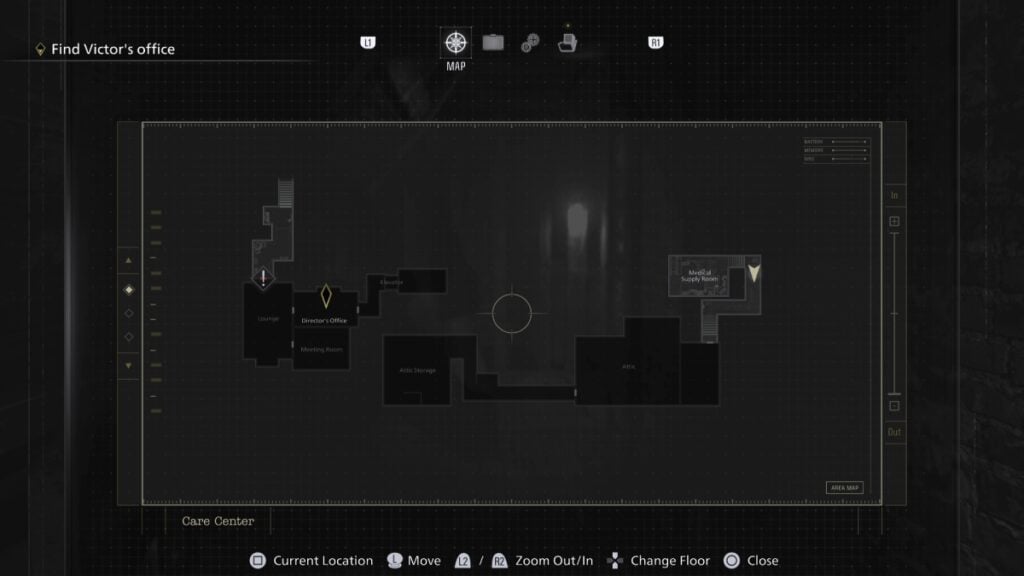
Rhodes Hill Chapter (Grace – Part 1)
And now, the real Resident Evil Requiem walkthrough begins, as here is where we’ll start seeing collectibles, puzzles, enemies, and many more things. As we mentioned before, we did this on the Standard (Classic) difficulty, so we’ll focus on that.
You’ll start the chapter with a long cutscene, where Grace will eventually free herself from the perilous situation she’s in. Once you get to control her, investigate the room, read the files around, and exit through the door.
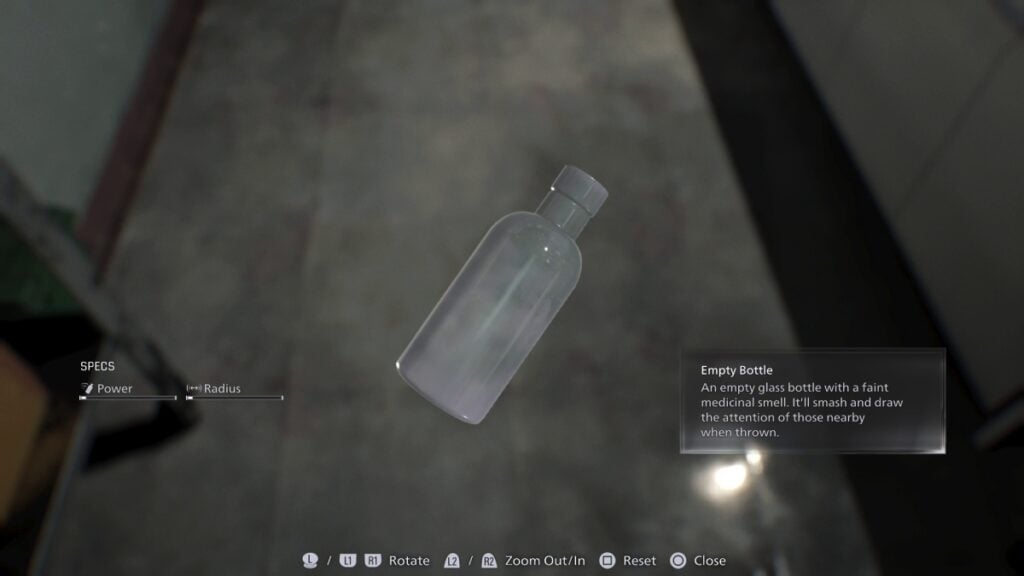
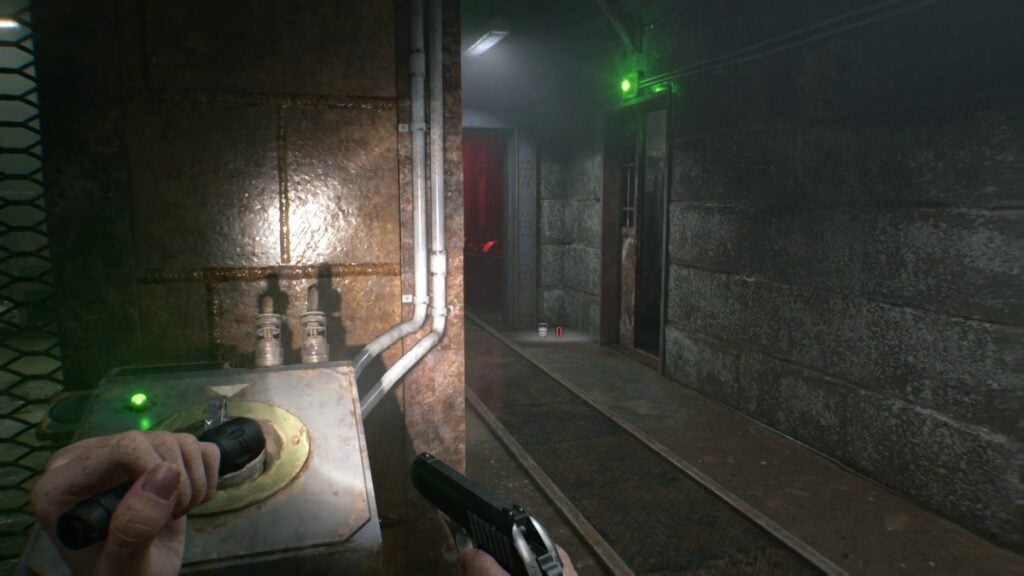
If you head to the door marked with the “Staff Only” sign, you won’t be able to continue, as the game will tell you it is too dark to see. So, return to the corridor with the red light and follow it. You’ll be able to grab some empty bottles on the way.
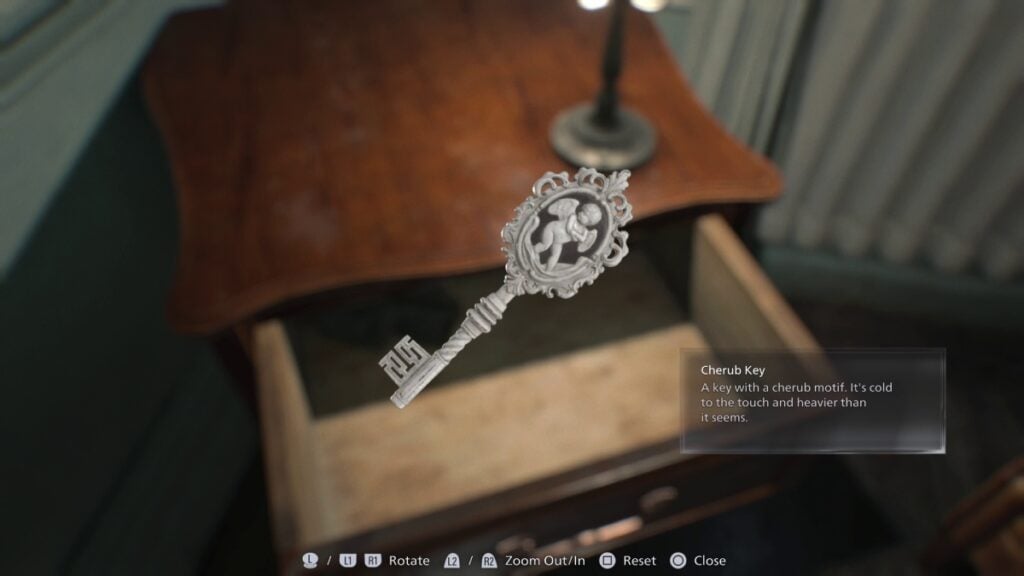
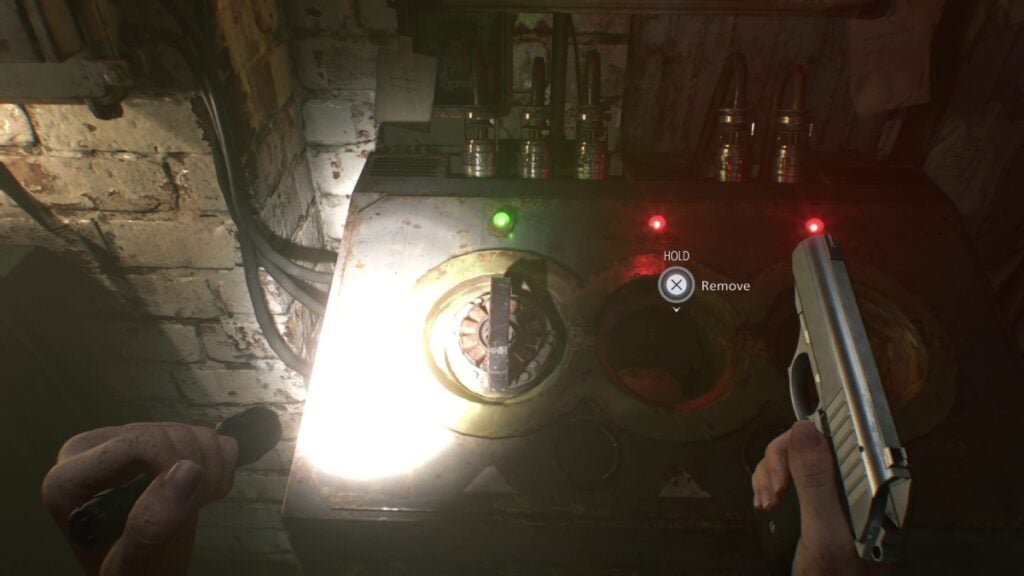
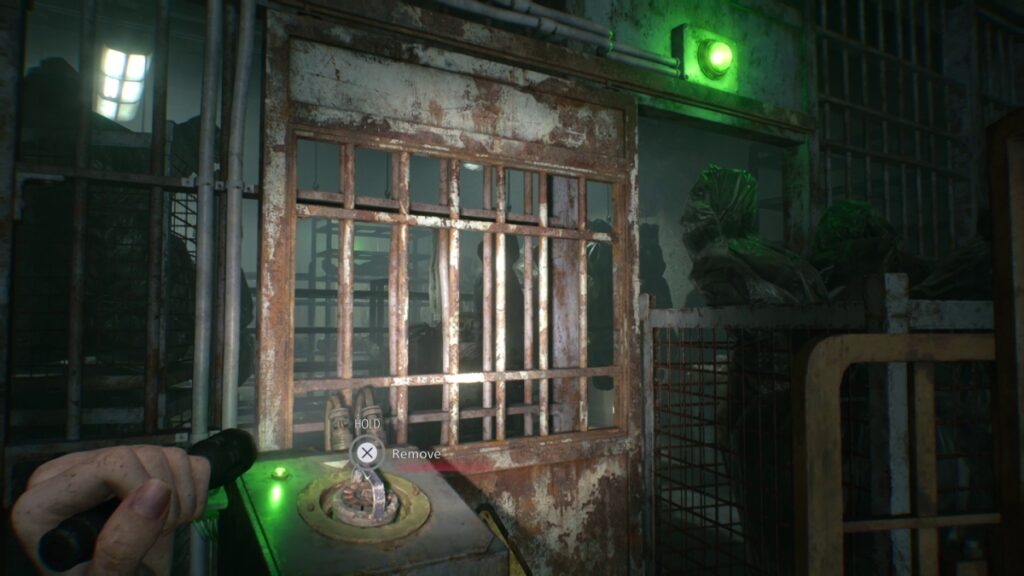
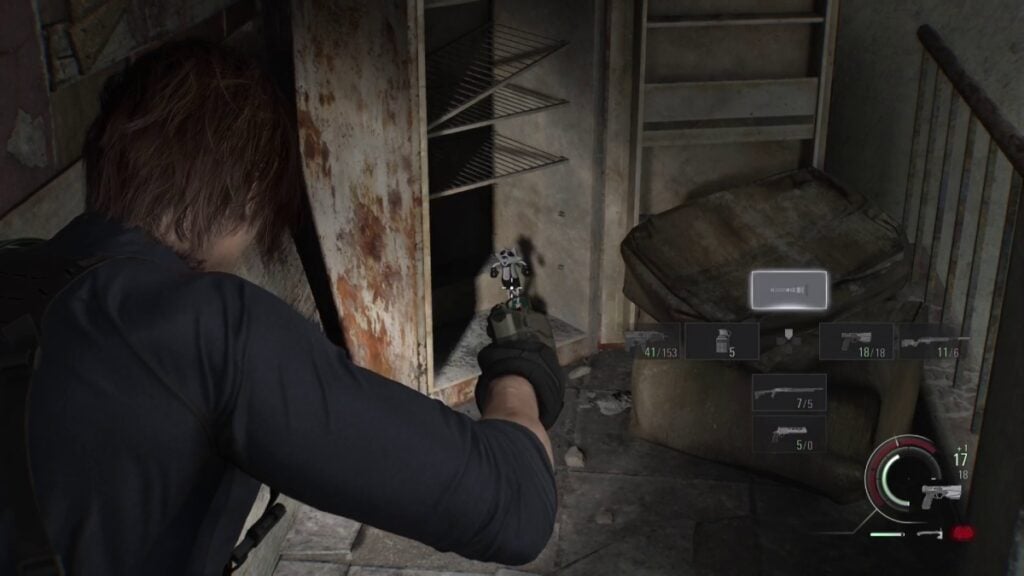
Keep going until you find a locked gate requiring two fuses. You can’t do anything yet, so head to the end of the corridor and open the drawer to get the Cherub Key. Now, return to the room marked with the Cherub, and you’ll find your first typewriter and an ink ribbon. Save before continuing. As a general rule, doors with a Cherub at the hospital are a safe room. If you see one, make sure to enter to save your progress or organize your inventory.
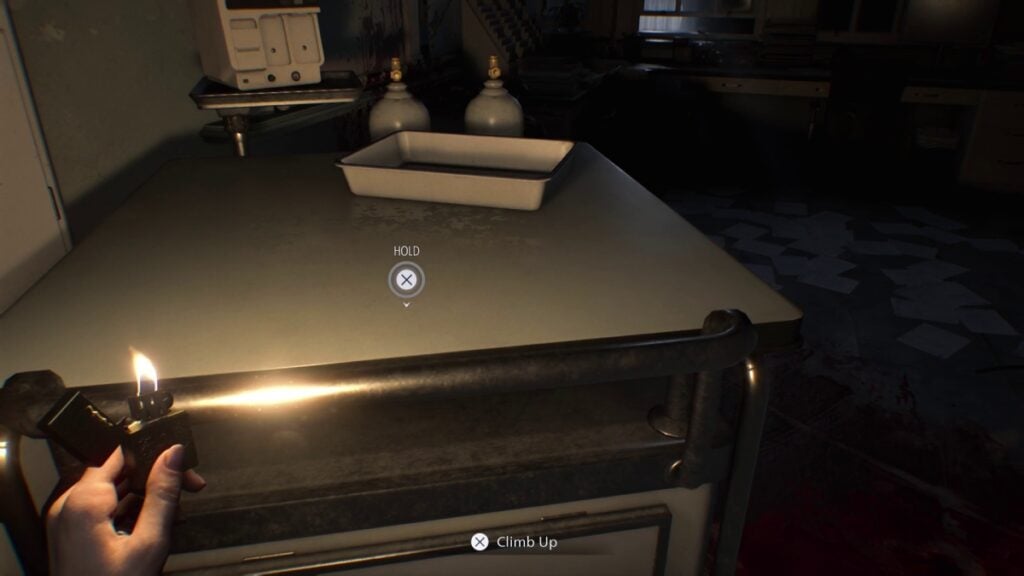
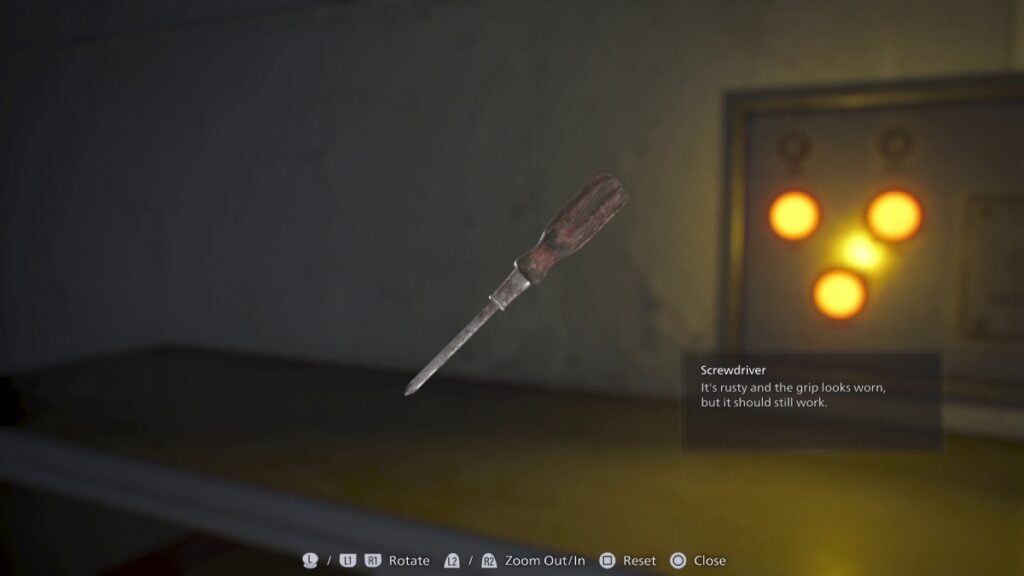
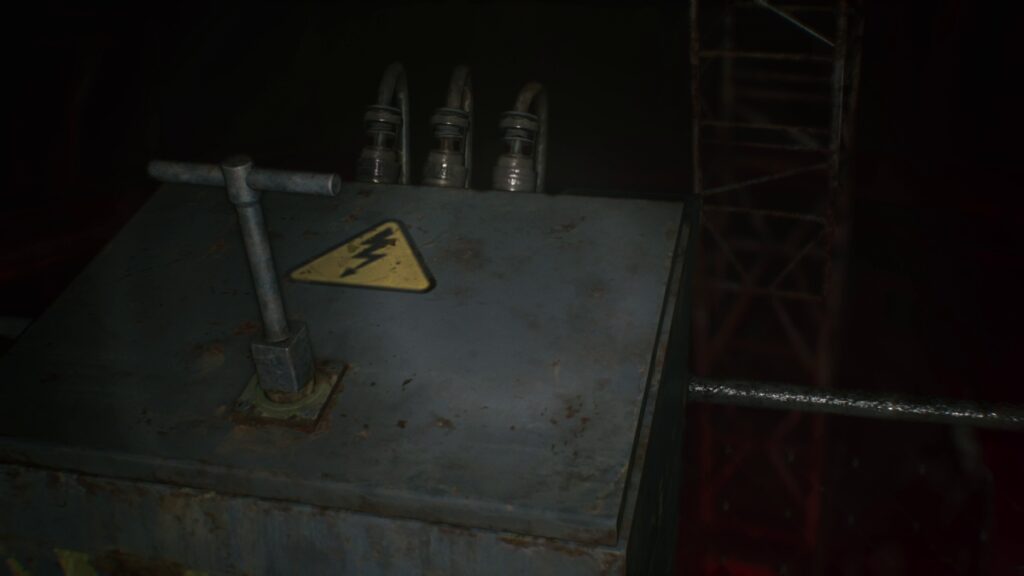
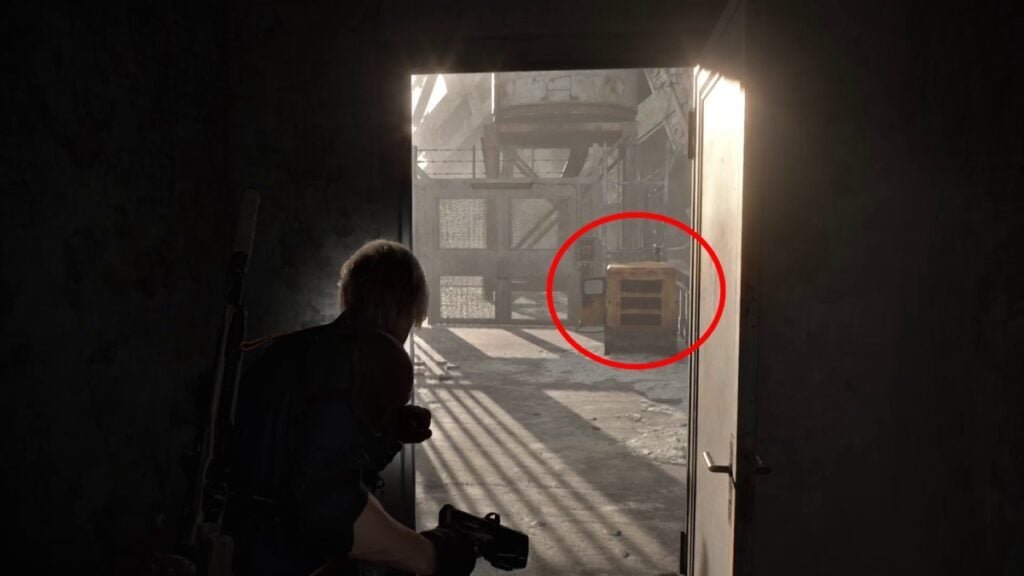
After saving your game or not, depending on how hardcore you feel, head to the bathroom in that safe room and grab the lighter, which will be extremely helpful, as things are about to get scary. You won’t be able to get the fuse yet because the box is locked. So, we’re off to get a screwdriver.
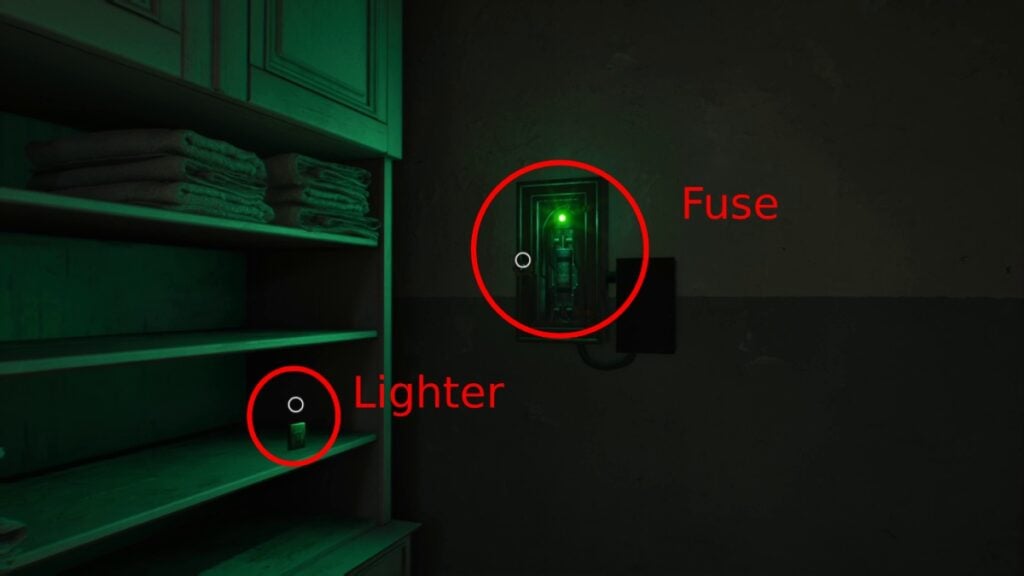
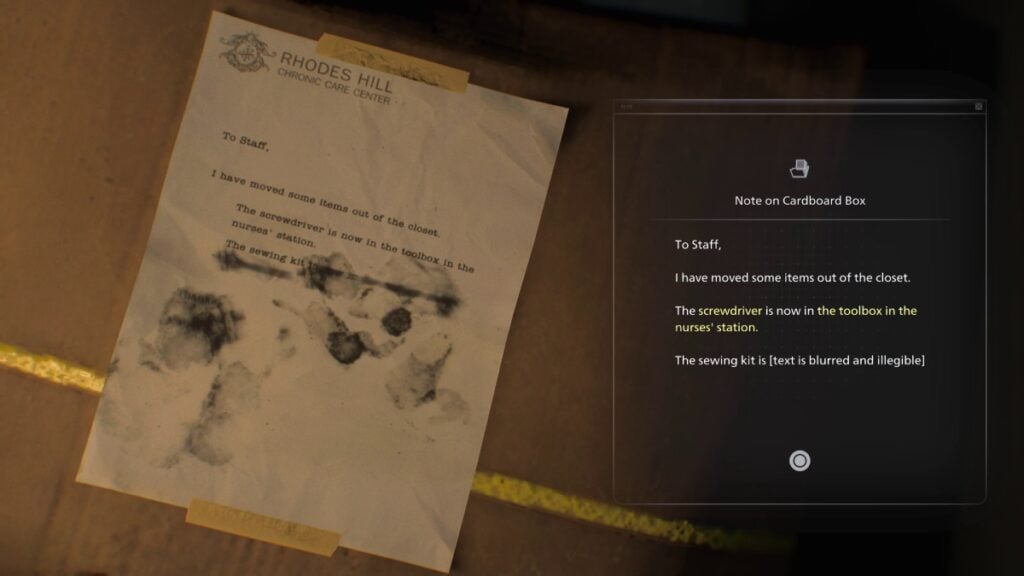
Continue exploring the hospital, and you’ll eventually reach the kids’ room. Here, there’s a creepy storybook, some kids’ toys, and that eerie vibe of being in a place for children but in a horror setting. While you may want to get out of there as fast as possible, look for the note on the cardboard box, which says the screwdriver is in the toolbox at the nurse’s station.
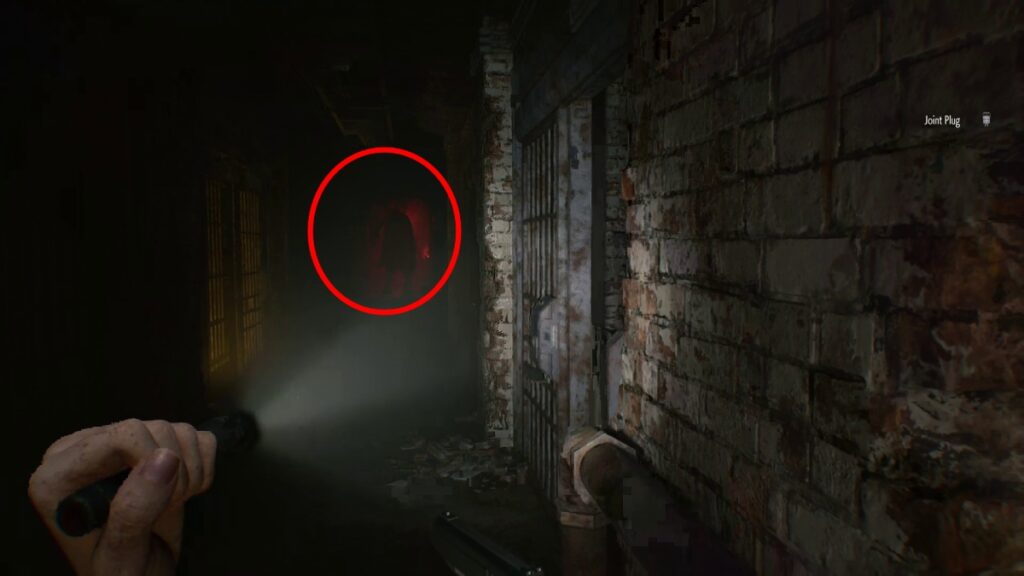
After reading the note, exit the room and head to the first room we saw that told us it was too dark to see. Now, it won’t be too dark, as we have our powerful lighter to help us in this situation.
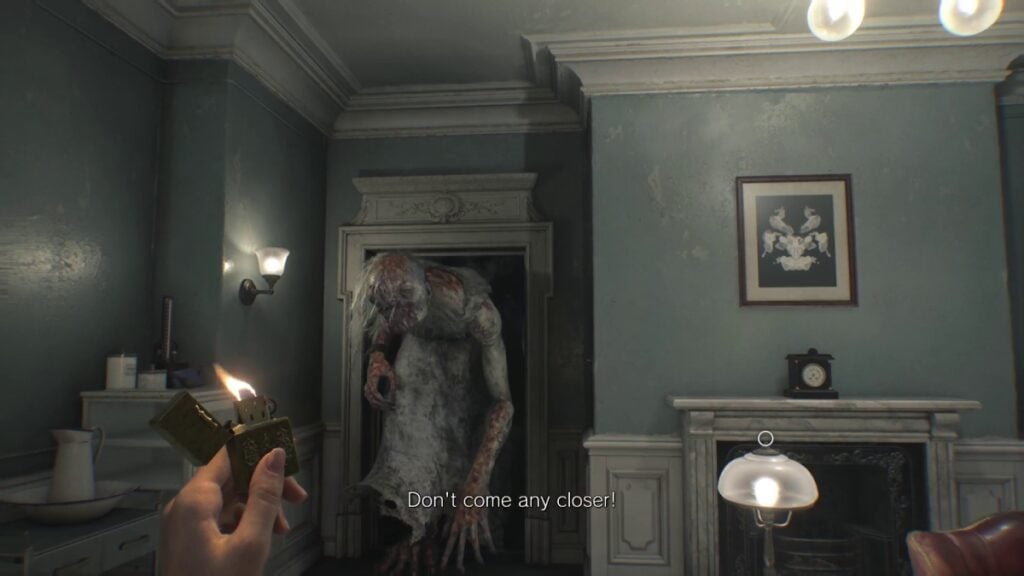
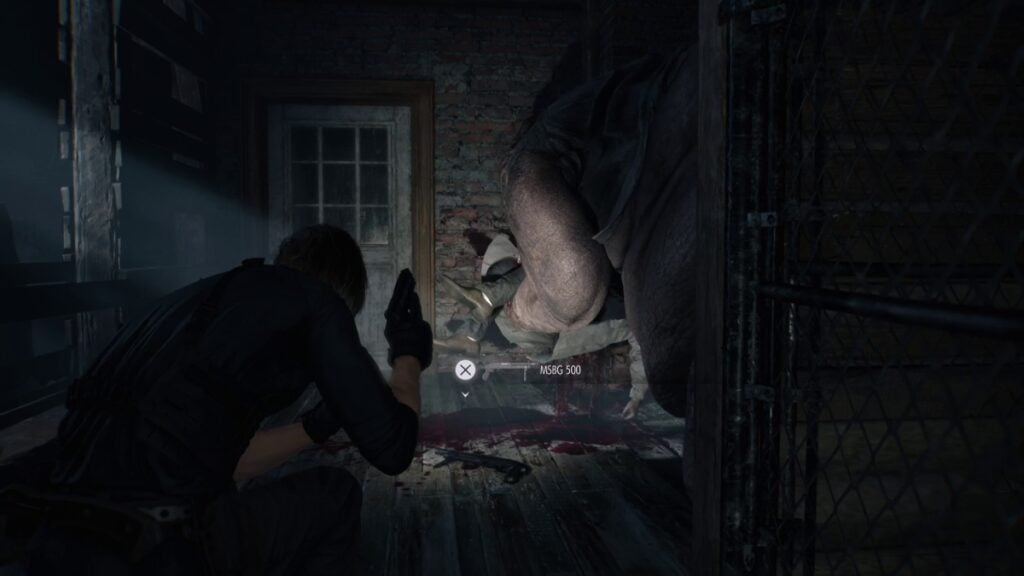
With your light on, keep walking and open the door at the end. Prepare for not one, but two jump scares, and you’ll be introduced to one of the recurrent enemies in Grace’s chapter. For now, we’ll dub it the big zombie.
After the cutscene ends, run toward the safe room. You’ll manage to evade the enemy here and get some respite.
Note on the Big Zombie: From now on, whenever it appears, make sure to run to an area with light, as this enemy can’t be near any light sources.
With the scary situation over, for now, make sure to save, or if you don’t want to use your ink ribbons, prepare for some hospital exploration, albeit with some company now.
Exit the safe room and head to where the big zombie appeared first. You can now enter and grab all items. Remember to open all lockers for some ink ribbons and your first green herb. After that, look for the cart next to the locker and start pushing it.
Eventually, the big zombie will stop you, and you will have to hide. There’s a table right behind where you grabbed the cart first. Stay there until the scripted scene ends.
Note: Do not use your empty bottles to lure the zombie away. The scene ends on its own, and the enemy will leave the room without you doing anything.
Once it leaves, head back to the cart and push it. Climb on it and open the toolbox that has the screwdriver.
All that’s left to do is return to the safe room to open the box that has the other fuse. Once you do it, a cutscene will happen, and the big zombie will appear right where you are. There’s nothing else to do but run to where the fuse box was. Insert it and wait for the cutscene, which will end this short section for Grace.
Rhodes Hill Chapter (Leon – Part 1)

Our hero has arrived at where poor Grace is, and it is time to see some of his new moves, albeit for a short time. When you get to control Leon, just follow the nurse to the room and let the cutscenes play out. You’ll then hear the Code Six alert that you likely heard during Grace’s part, meaning that chaos is about to go down.
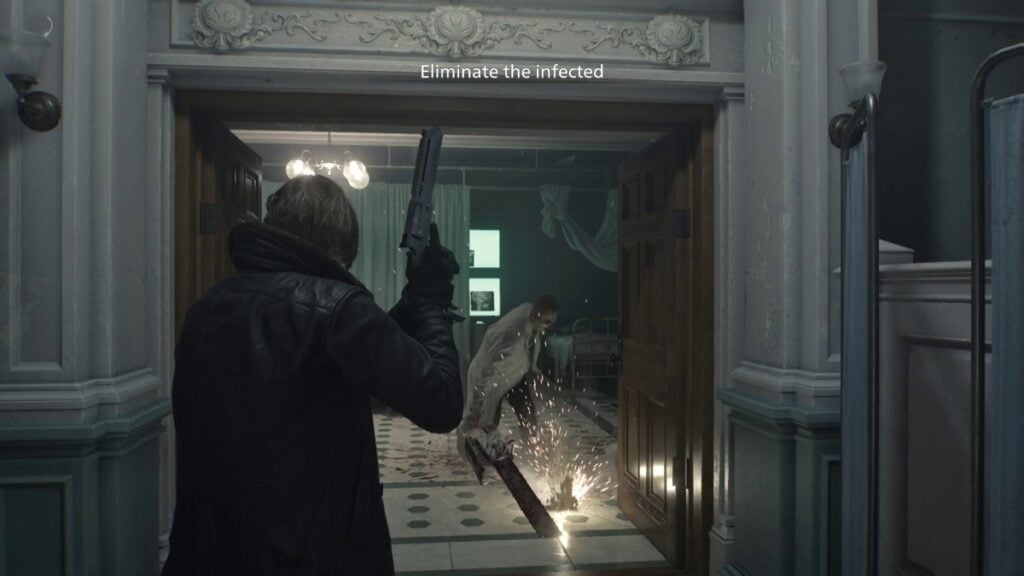
This is a pretty straightforward section in the sense that you can only do one thing: survive against the infected. The real challenge here is the chainsaw itself, not the zombie with the chainsaw. Let us explain. Once an infected drops the chainsaw, it will fall on the ground and continue spinning until it turns off. Wait for it and then grab it to slash these zombies.
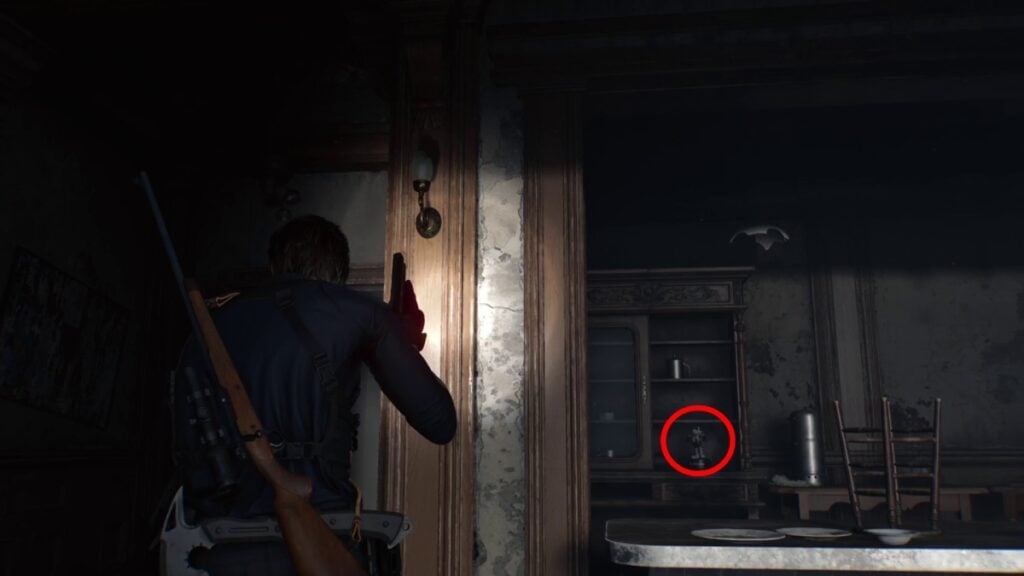
After you defeat the horde, grab everything inside the room and keep following the open doors until you find your first Mr. Raccoon. There are 25 in Resident Evil: Requiem, and we’ll be listing the ones we found here.
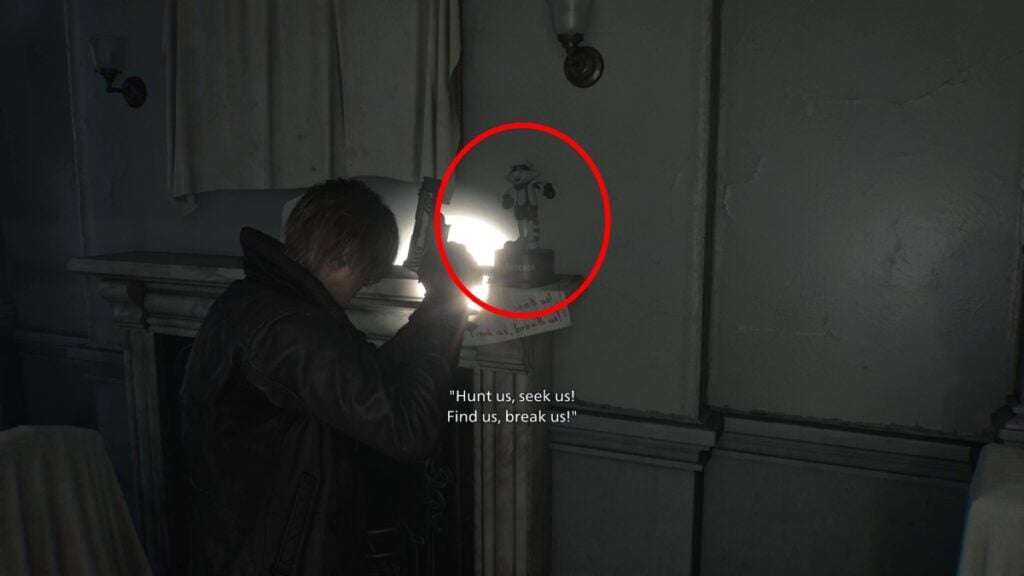
Note: You can always hear a sound when a Mr. Raccoon is close, whether as Leon or Grace.
Continue following the corridors until you hear Grace in danger. You will see the previous cutscene, but now from Leon’s POV. Wait until it ends, and this will close Leon’s first part in Rhodes Hill.
Note: Don’t worry about Leon’s parts being too short. Rhodes Hill is more about Grace, while the second map is all Leon. You just have to be patient.
Rhodes Hill Chapter (Grace – Part 2)

And now, the true game begins. Grace is on her own and has to explore the whole hospital, but don’t worry, Leon left us his Requiem, meaning we’re packing a punch.
As soon as the game lets you control again, head downstairs, and you’ll see the door leading to the courtyard. Naturally, since this is a Resident Evil game, it means this building has several elaborate puzzles you need to solve before opening a door. So, off we go to get three Quartz to open the door: Sun, Moon, and Star.

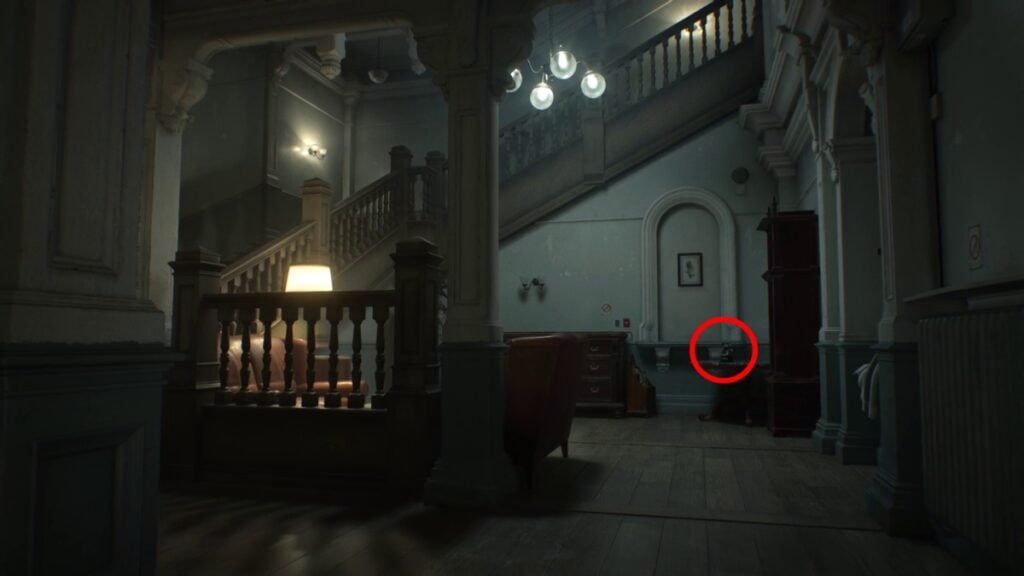
With the objective updated, head to the opposite side of the aforementioned door. You’ll notice both doors are locked, one leading to the west wing, and another to the east wing. Before heading to the safe room, look to the wall on your left to grab the map.
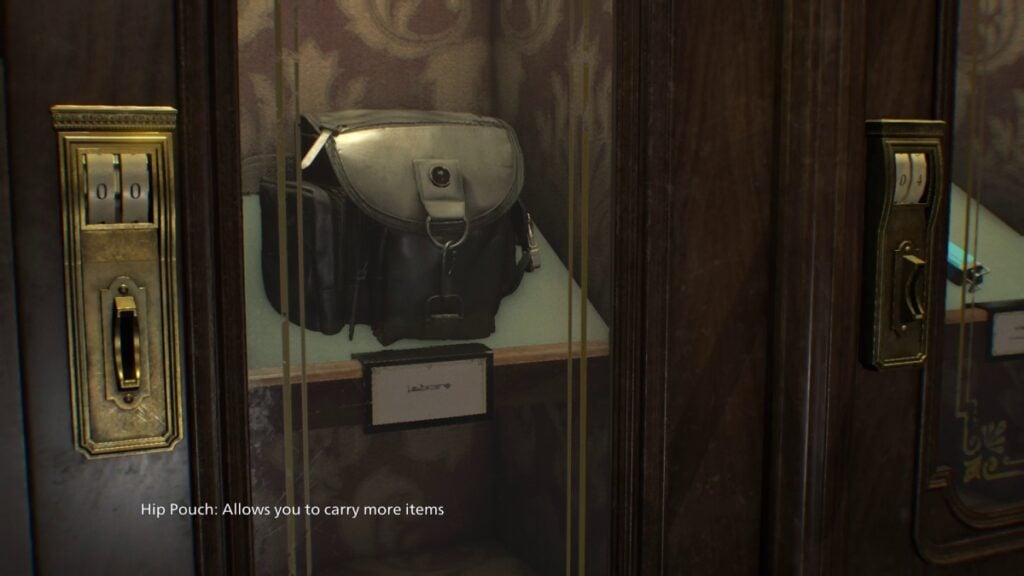
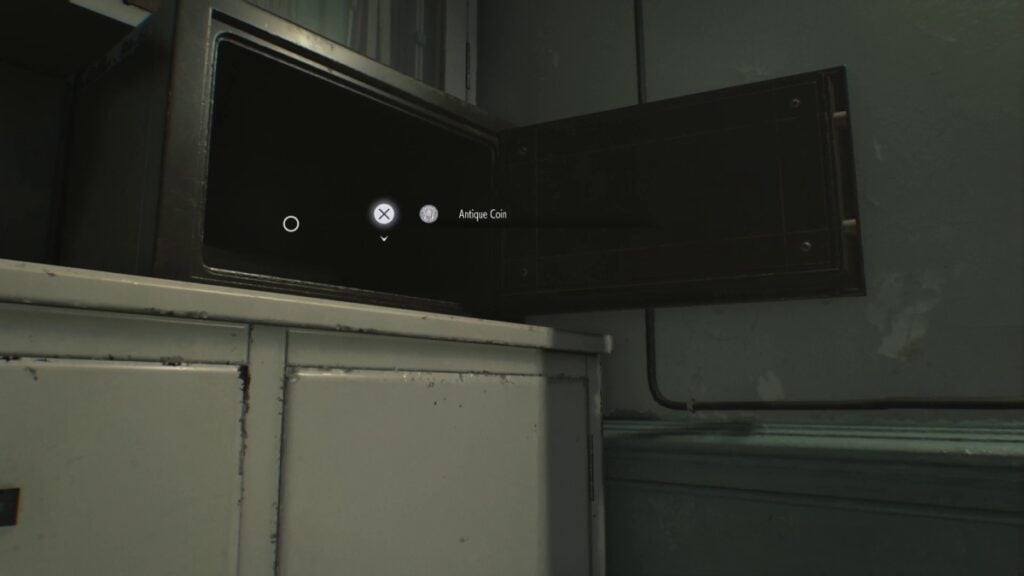
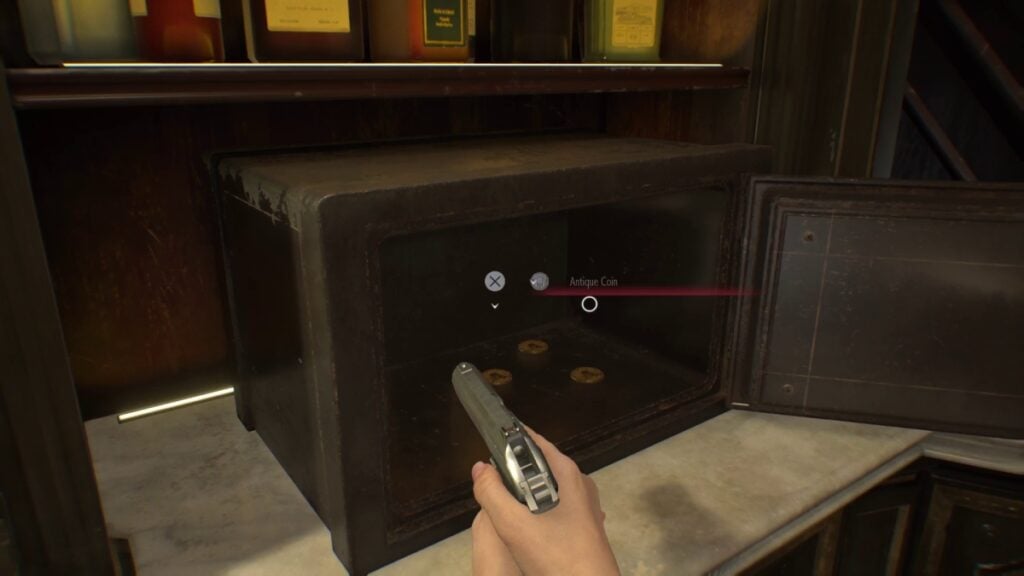
Enter the safe room and grab your first Antique Coin. You’ll need these to purchase upgrades for Grace.

Note: You can place your Antique Coins in the supply box to free inventory space.
Save if you want to, and head to the door with the red light. Watch the cutscene, and you’ll meet Emily, an important character who will eventually help you. However, the really important thing about this part is that you’ll get the West Wing Key, meaning that’s where we have to go next.
Use the key to access the West Wing, and immediately turn left. The right corridor’s door is locked, so there’s no need to go there yet.
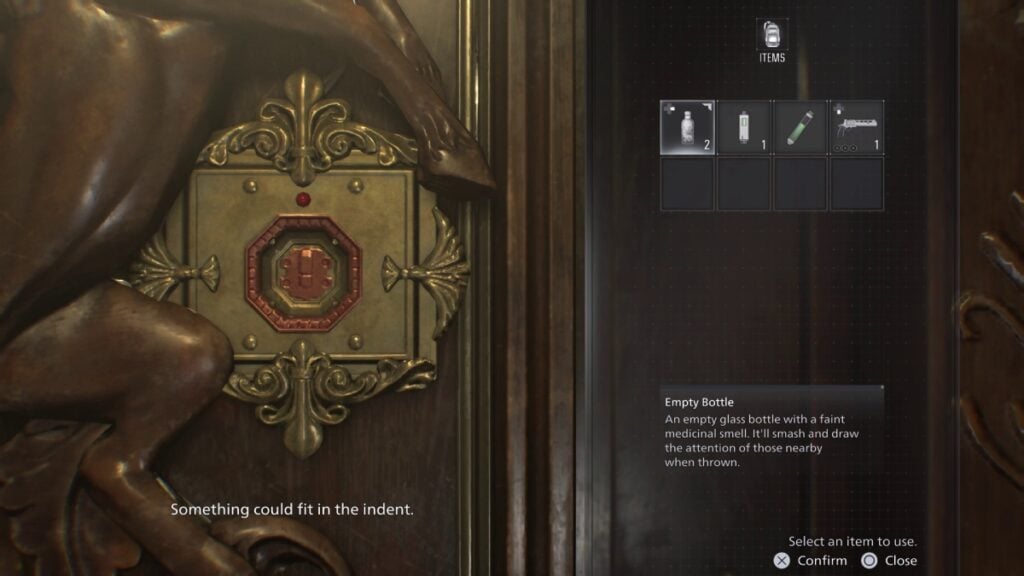
Head toward the left corridor, and you’ll find a locked door with a unicorn and an indent. Remember this place (it will be marked on your map anyway) because this is one of the most important rooms in the hospital.
Go past the locked room, and you’ll see two paths. The one on your left is locked, as you need level 1 clearance to enter. Still, you can go there, as there are items on the table. Then return and go through the door to the kitchen.
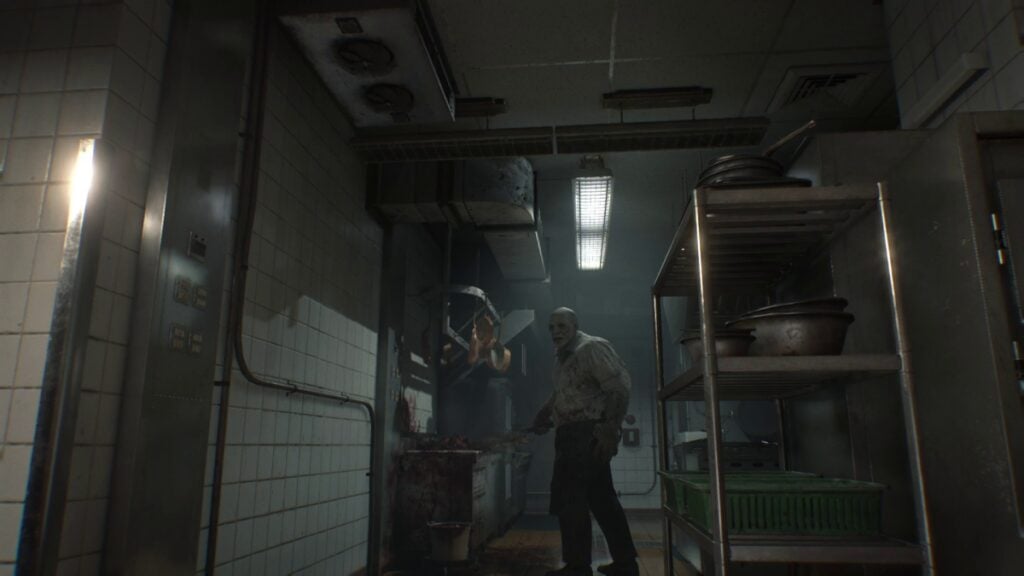
Here, you’ll see the chef, who is doing some nefarious things to some questionable meat. You will also see the pantry door, which is locked.
Note (Spoiler): The only way to open the pantry is by getting the key, which the chef has. You can kill the chef with Grace with Requiem, but we recommend leaving the fight to Leon, as it is much easier.
Get behind the kitchen counter and start pushing the cart. Stop once the chef turns around and go to where the pantry door is to hide. You’ll have to repeat this at least twice until you get the cart out of the way.
Once you get out of the kitchen, you’ll find a new corridor with one zombie turning off the lights. Here is where things get tricky, as you will have two options: engage the infected or lure them away.
Note: One of the game’s mechanics relies on a few zombies having behaviours from before they turned. In the case of this first zombie, it will always turn off the lights it sees, which you can use to your advantage.
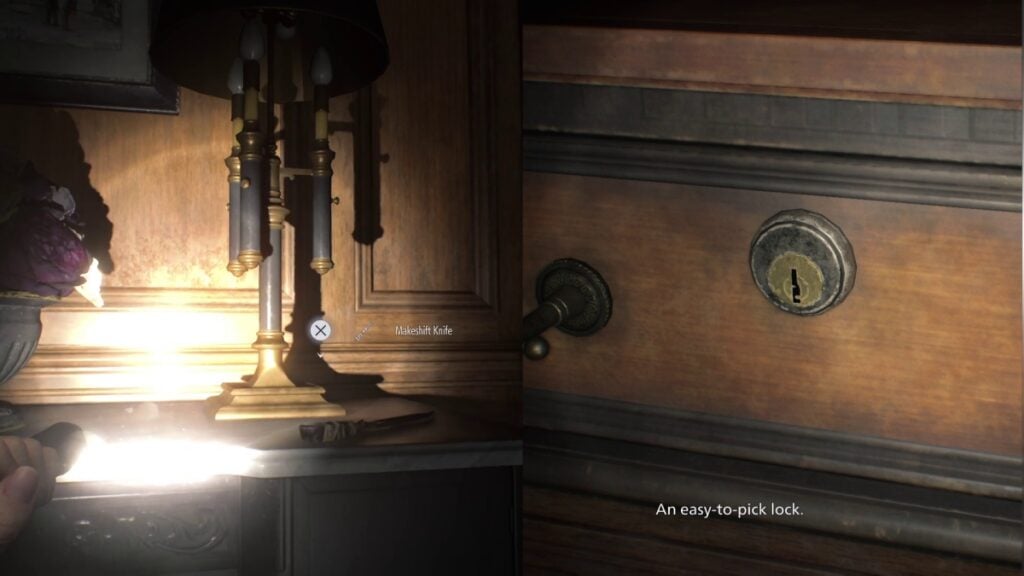
In any case, before luring that zombie away, turn left and head to the end of the corridor. You’ll find a makeshift knife and a locked drawer, which will now be marked on your map.
Return to the corridor and enter the bathroom. Wait for the zombie to move away to grab the green herb. Do not bother entering the stalls; there’s nothing inside.
Go back to the corridor and turn on the light to lure the zombie to it. Once it turns it off, you can sneak behind it.
Before opening the double doors on your left, head to the back of the corridor and open the door. This will give you a shortcut back to the lobby and the safe area, in case you want to use this time to save your game or organize your inventory.
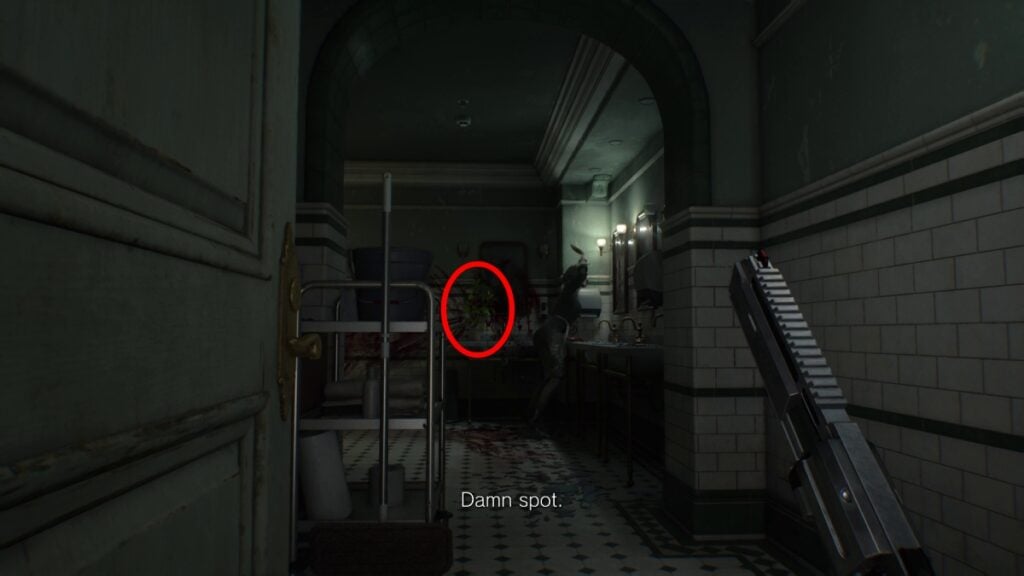
With that done, it is time to return to the harrowing dining room. Here, you’ll only have one big danger: the zombie under the table. What we did was wait for it to pop out and let it do its patrol rounds. Once the zombie is at the far end of the dining room, sneak past it and take a left.
Note: You’ll get your first handgun here. Grab it and back away before the zombie sees you.
If you want to have an easier time navigating this area, we recommend letting the zombie in the dining room spot you and lead it toward the corridor with the shortcut leading to the lobby. You can shoot it there to clear the way without alerting the lights or the bathroom zombie.
Now, here’s a tricky part because you’ll be going up some stairs that are full of zombies. Since you just got the handgun, chances are you don’t have enough bullets. Thankfully, zombies won’t follow you to the top floor, so you can run there, wait a bit, and lose them.
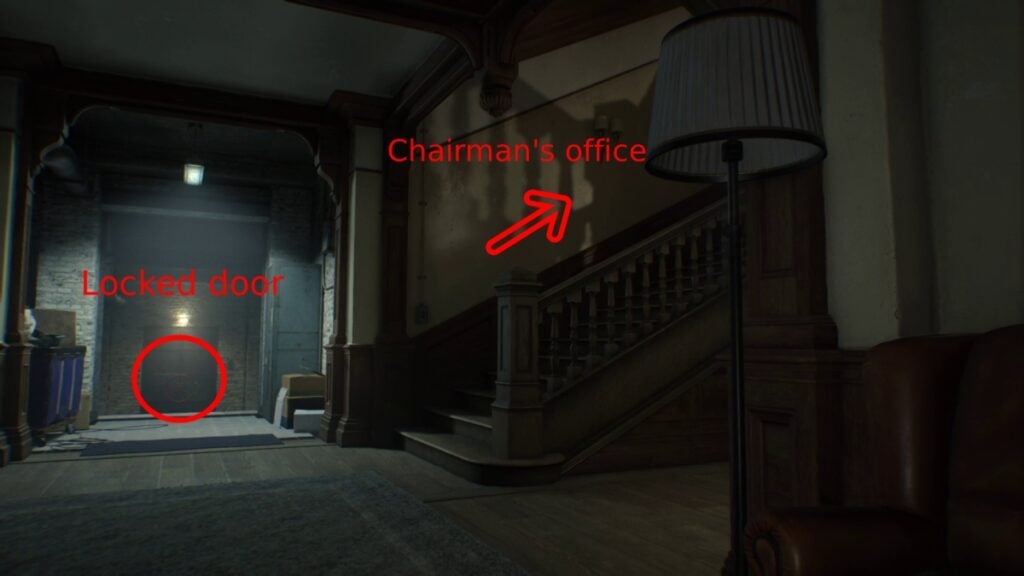
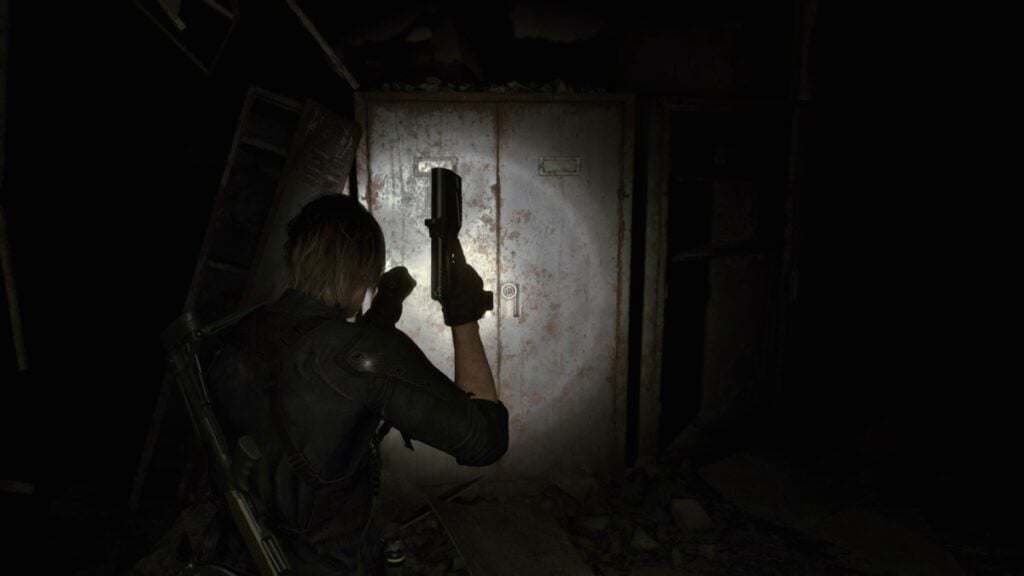
There’s a locked door with a red handle at the end, but don’t bother going there, as the only thing that will happen is the handle getting broken.
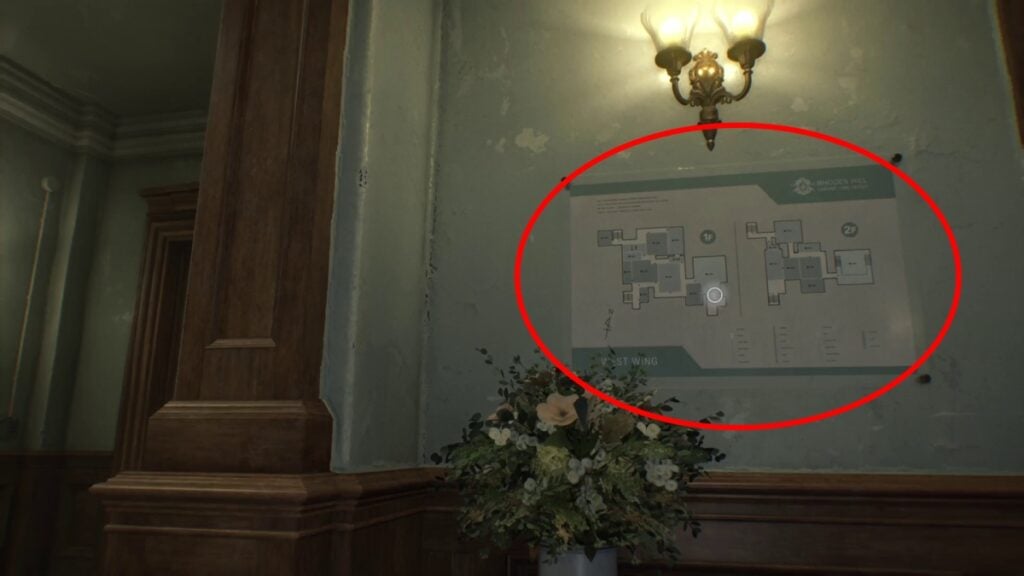
Once things have hopefully calmed down, head to the middle floor and grab the map on the wall. Then, open the door to your left (the one on the right will be locked).
Here, you’ll see a singing zombie, which can one-shot you if it gets close to you. It also screams at you, and if you get hit, you’ll lose health and won’t be able to shoot correctly, as its attack will mess up your balance. Use the Requiem to take it down.
Note: You’ll get an achievement for defeating the two singing zombies, so make sure to get this one first.
If you want to avoid aggroing the other two zombies, just have the singing zombie follow you into the corridor before shooting.
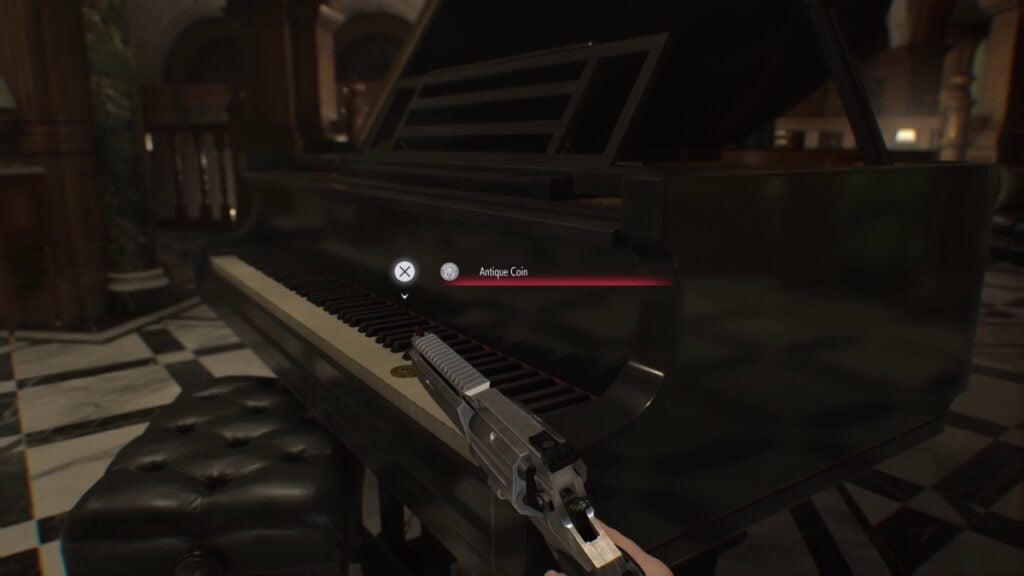
There are a few things in this area, including a safe, but we’ll come back later once we have more bullets and the code. For now, grab the coin on the piano and turn right.
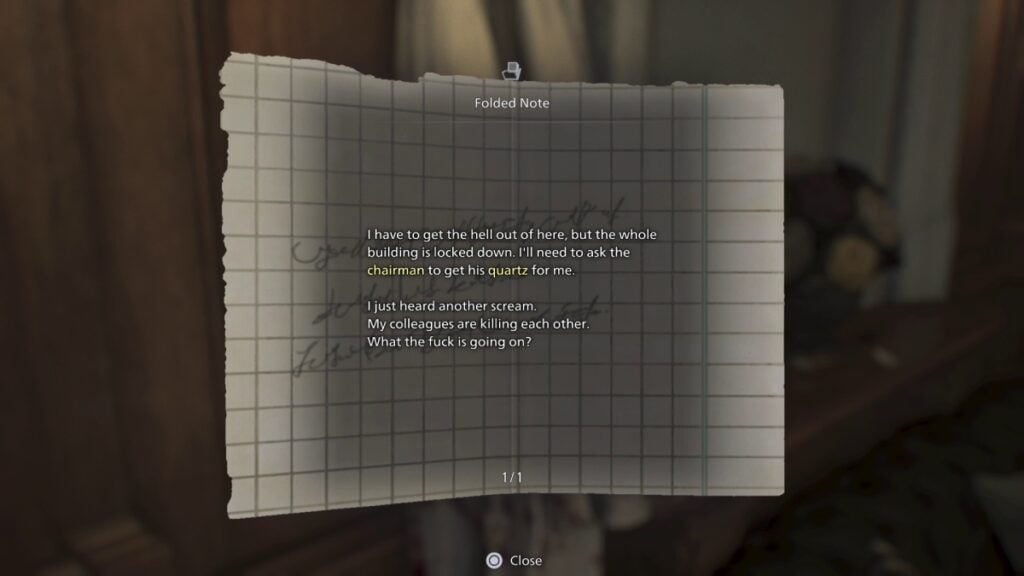
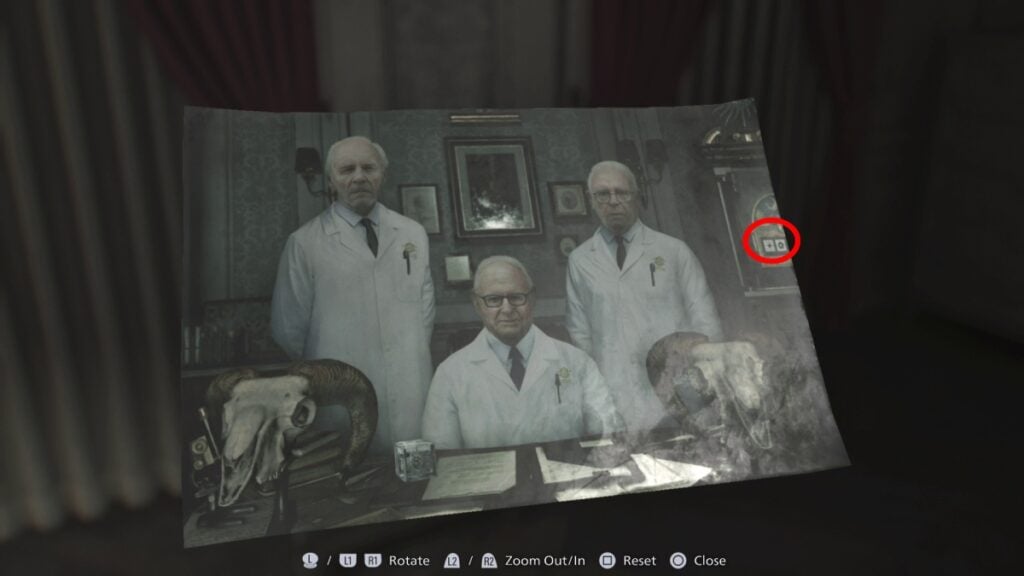
Head toward the gallery, and you’ll find another locked drawer, a model of the hospital, and a folded note inside a coat. The coat mentions how the first quartz is in the chairman’s hands, so it is time to pay him a visit.
The chairman’s office is across from where the model of the hospital was. Enter the room, and you’ll see a notebook with a torn-out page.

You’ll also see the Unicorn Trinket Box on a table. If you have enough inventory space, grab it.
Now, head into the chairman’s office and defeat the zombie. Grab the pencil on the desk. There’s also a note in the garbage can that you can read to learn more about Code Six.
Note: If you don’t have enough inventory space to grab all the items, exit the room and head right. Defeat the zombie in the corridor, and you will open a shortcut to the lobby, letting you place a few items inside your supply box before returning to the chairman’s office. Now’s a good time to save your game.
Whether you saved your game or not, it is time to return to the chairman’s office to grab a few items and solve the first big puzzle.
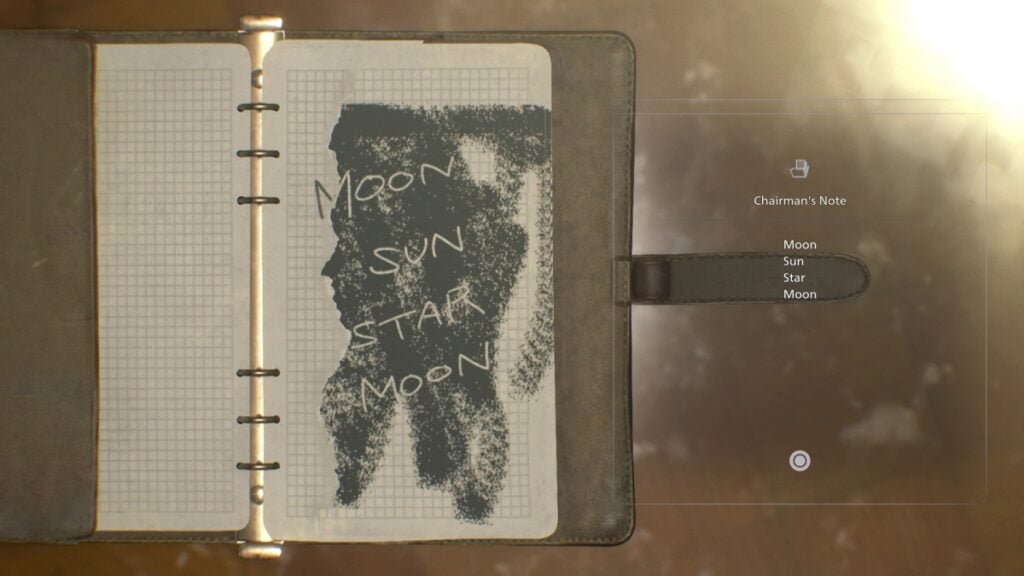
Once you’re there, remember to grab the Unicorn box. Then, grab the pencil and return to the notebook with the torn-out page and use it. You’ll get the following code:
- Moon, Sun, Star, Moon
Head to the machine with the dials in the top right corner of the room and input the code.
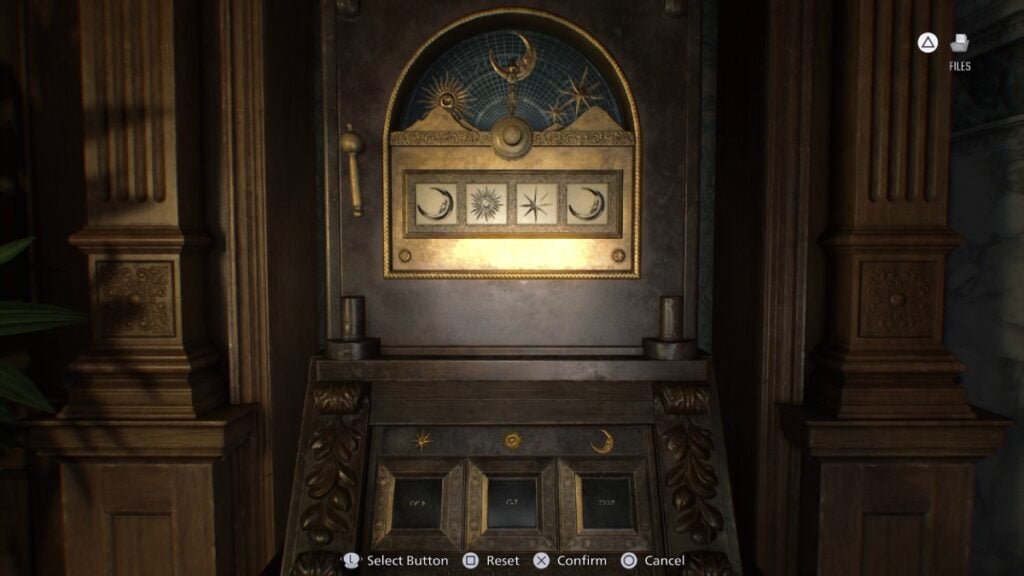
The safe will open, giving you the Moon Quartz.
Return to the lobby to insert it on the door and free up some space.
Now, you have to return to where the locked Unicorn door was. If you haven’t, open the Unicorn box, which will give you the item to unlock the room. However, here’s the catch: the chef will be patrolling this area. Wait until he goes all the way to the right corridor where the shortcut is, and sneak past him.
Inside the room, you’ll find a couple of Antique Coins, several items, such as Ink Ribbon Tins, but most importantly, cabinets with upgrades for Grace. These are the contents from left to right:
- Inventory Upgrade (Two Spaces): 3 Antique Coins
- Firearm Damage Upgrade: 4 Antique Coins
- HP Upgrade: 4 Antique Coins
- Blood Collector Upgrade: 6 Antique Coins
Note: As a general rule, unlock the inventory upgrade first, followed by the Blood Collector upgrade. Then, grab either of the two remaining upgrades.

Once you’ve grabbed everything and exchanged the coins you have, look at the far left end of the room, and you’ll see an arm stuck under a coffee table. Grab the arm and interact with it to obtain the East Wing Key. Without anything else to do now in the West Wing, go to the safehouse to save your progress and organize your inventory.

With the key in your possession, head toward the East Wing and enter. You’ll see a Mr. Raccoon right at the entrance.
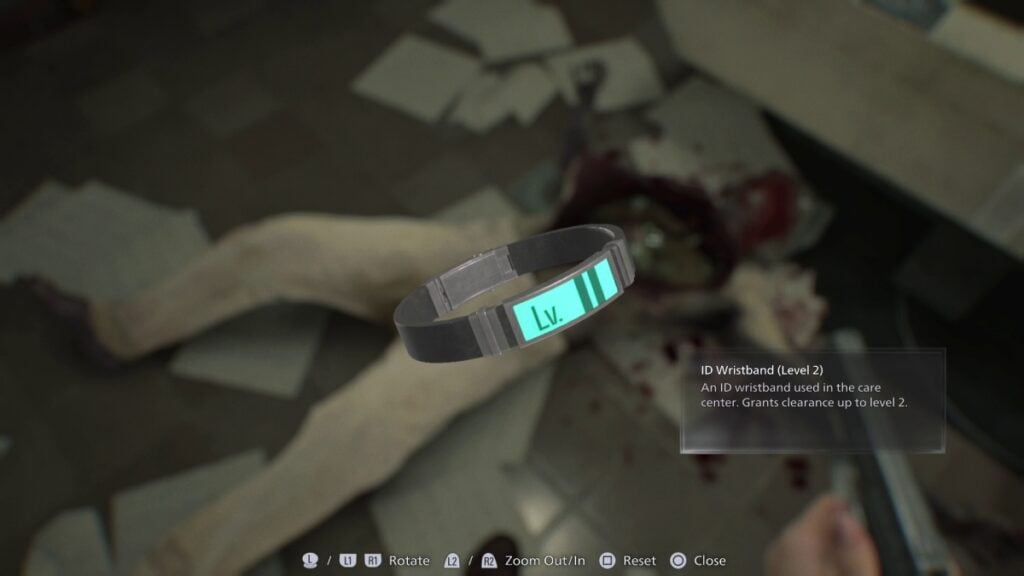
There’s only one way to go, so head left and enter the room with the corpse on the table. Examine it, and you’ll notice it is missing the heart and lungs. You need to find them to obtain the level 2 bracelet (yes, we know it’s the level 2, the level 1 bracelet is in another location).
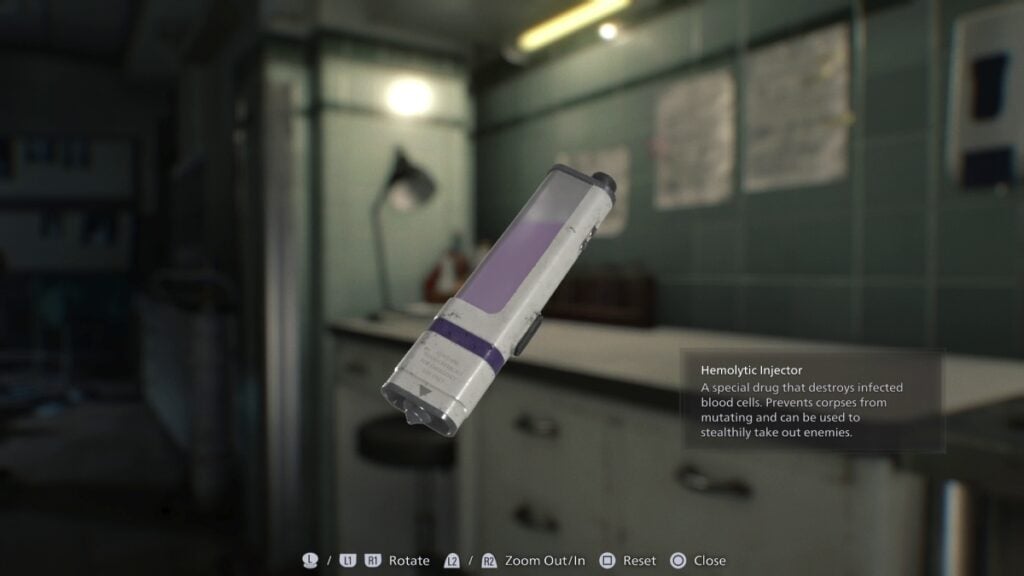
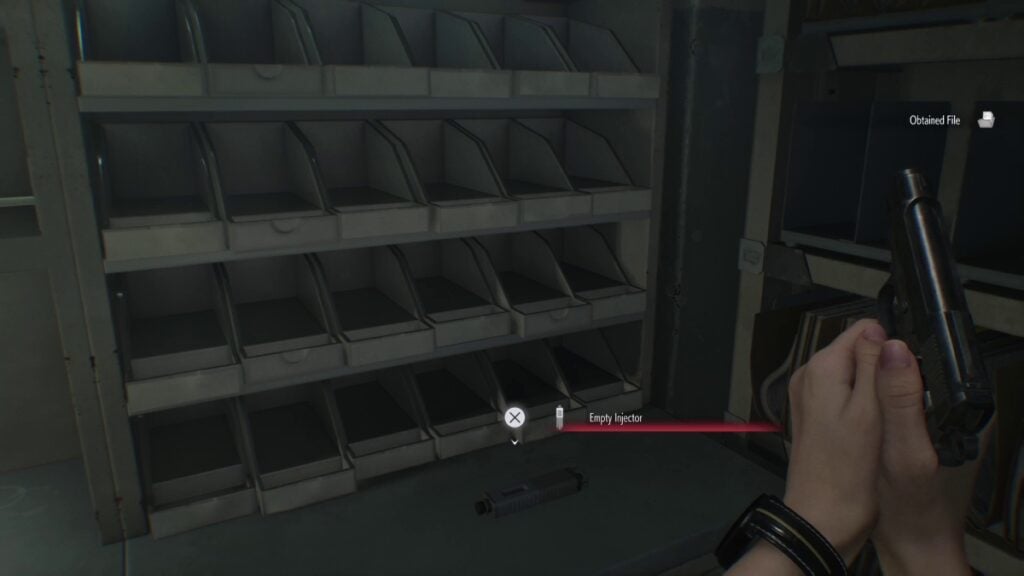
Go around the corpse, and you’ll see a zombie facing the wall. You’ll also get your first Hemolytic Injector, which lets you perform a sneak kill on unsuspecting enemies or finish off zombies that are staggered. You can use the injector on this zombie if you want to.
Exit the room, and you’ll see another zombie that gets drawn toward the lights. We recommend getting rid of it, as you’ll be going through this corridor more than once.
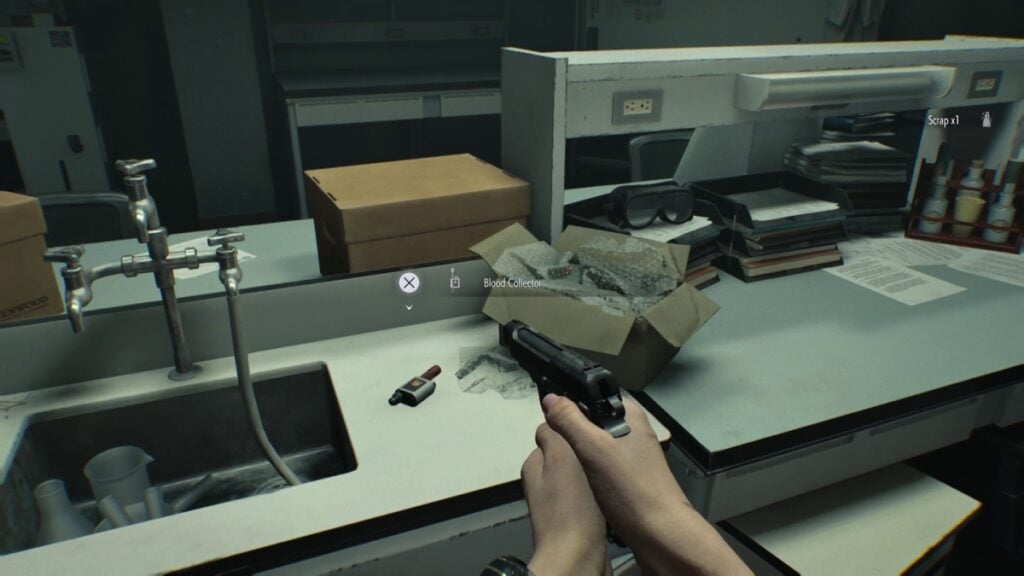
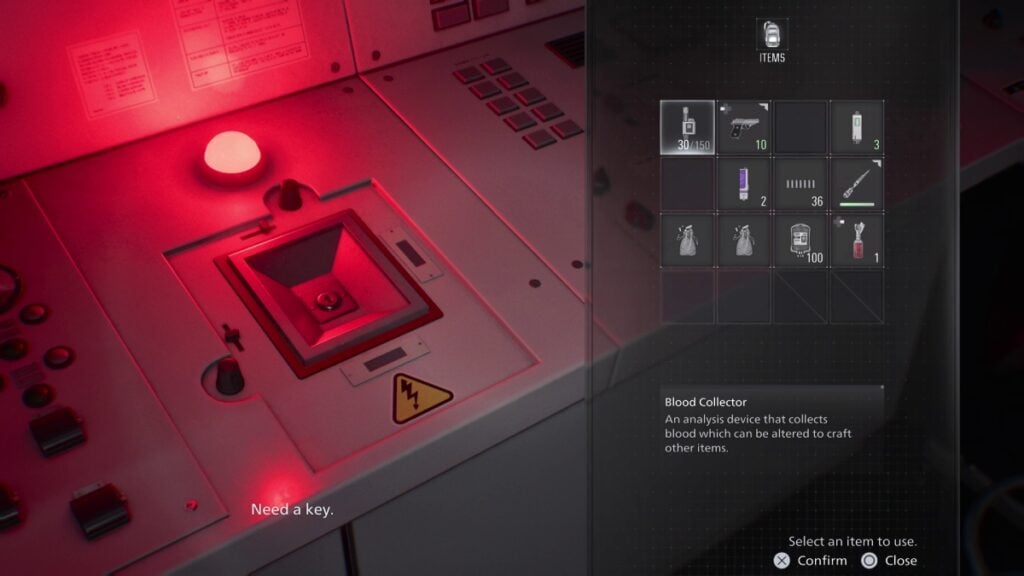
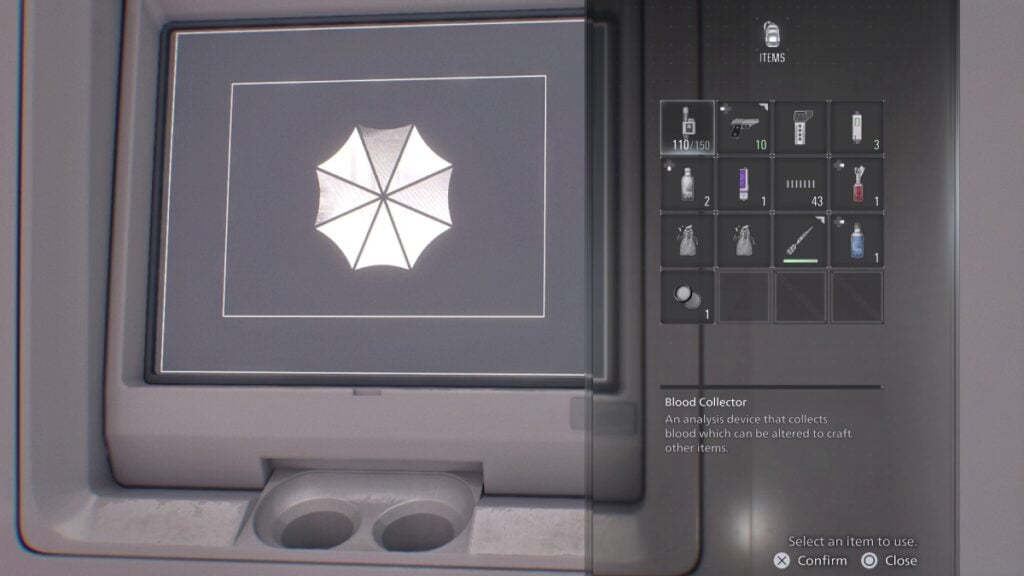
Once you do that, enter the blood lab, and you’ll obtain Grace’s most important item in the game: the Blood Collector.
The Blood Collector allows you to grab all the blood you’ve seen so far in places that say “There’s a lot of blood.” You can use the blood to craft items, such as Ink Ribbons, bullets, and many more.
You can also find blood specimens and use them on any laser microscope (there are two microscopes in the hospital) to unlock new recipes. The game will give you the first specimen, but you need to solve a puzzle to unlock its contents. Once you solve it, you’ll unlock the recipes for Handgun Ammo and Hemolytic Injector.
Either return to the safe room to save your progress, or keep going through the corridor with the red light outside of the Blood Lab. There, a couple of zombies will appear; we recommend defeating the one with the big bonesaw.
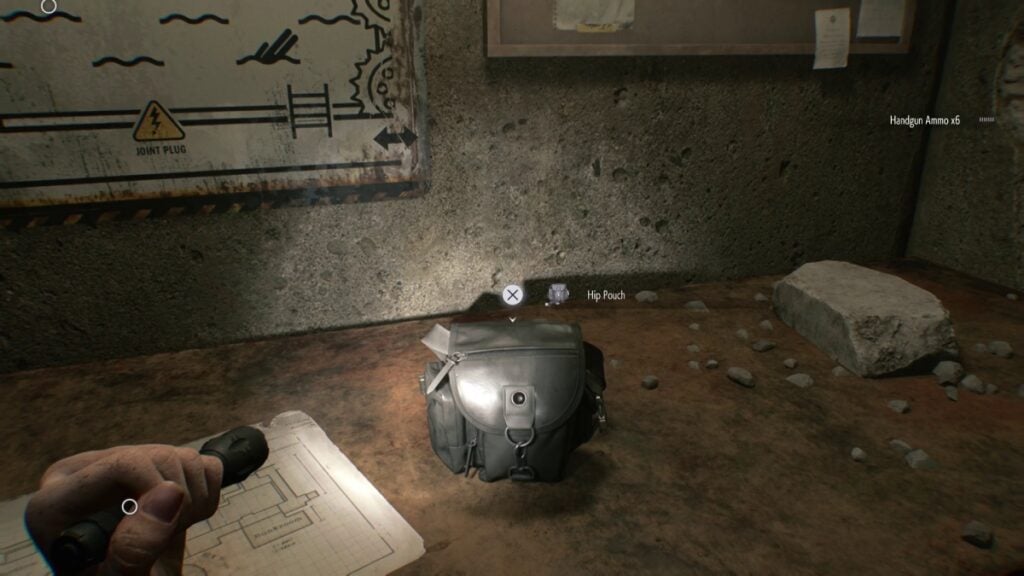
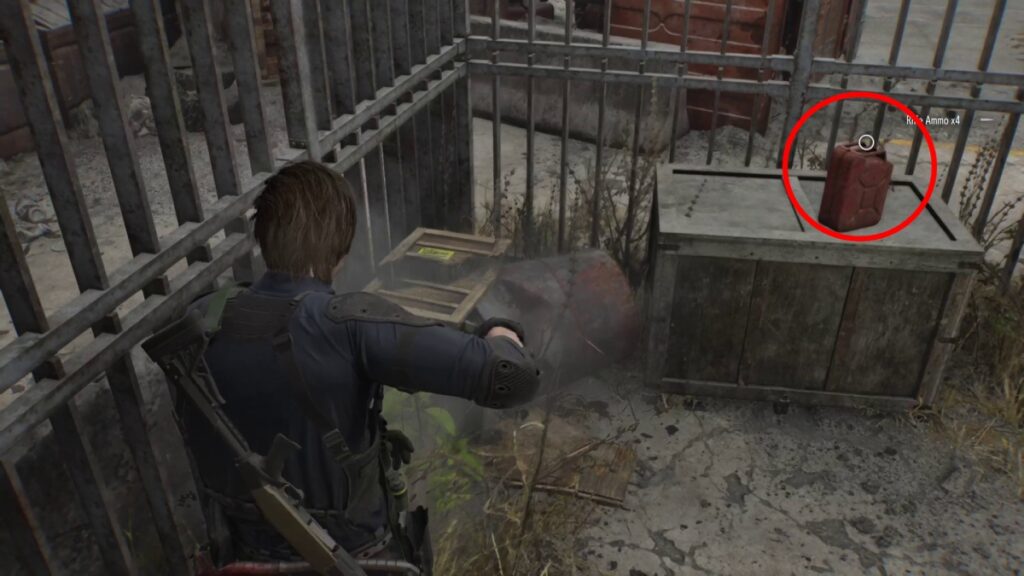
After that, go down the hall and enter the room to your right. Defeat the zombies if you have enough supplies. One advantage of this room is that one of the zombies is blind, so if you don’t want to attack it, just go around it. Before going to the double doors at the end, go behind the counter to grab a note showing the location of all three safes and grab the Antique Coins from the open safe.
With the shortcut open, we recommend heading back to the safe room to save your progress and put a few things inside your supply box.
Note: You should have enough Antique Coins for another upgrade, so make sure to return to the Parlor to open a cabinet. Remember our recommendation of getting the Inventory and Blood Collector upgrades first.
Note #2: Make sure to visit Emily, as one cutscene will trigger if you go to her right now.
It is now time to return to the east wing, go through the waiting room, and follow the corridor on your right until you reach some stairs. There’s a Mr. Raccoon on the table and an Antique Coin on a table in front of it.
Two zombies will block your way; we recommend getting rid of them if you have enough bullets.
Head upstairs and you’ll see a locked door, the East Wing map, and a corridor with a corpse.
First, grab the map, enter the room on the left, and save your game. There’s no supply box here, though. However, you’ll find your first lockpick on a table to your left, so grab it and open any of the locked drawers you’ve seen so far.

Once you grab the items and save your game, head inside the office and interact with the items on the desk. The first one is a picture of the puzzle box containing another quartz. This box has half of the code, and it shows Moon and Sun. However, we still need the other half.
Head to the drawer on the left side of the room where the microscope is, and interact with the other photo. It will show you the other half of the puzzle: Star and Sun. With that in mind, the complete puzzle is:
- Star, Sun, Moon, Sun
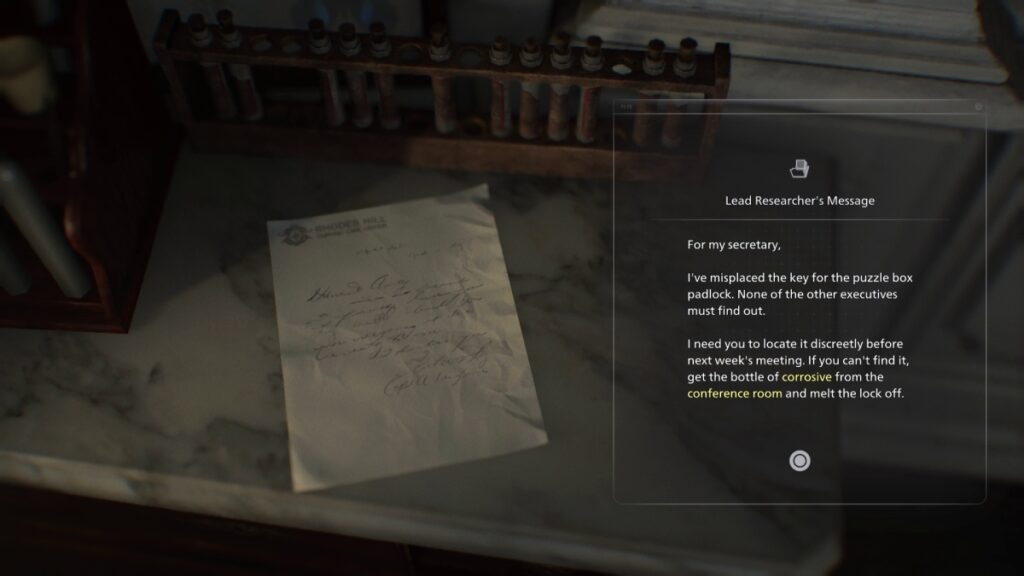
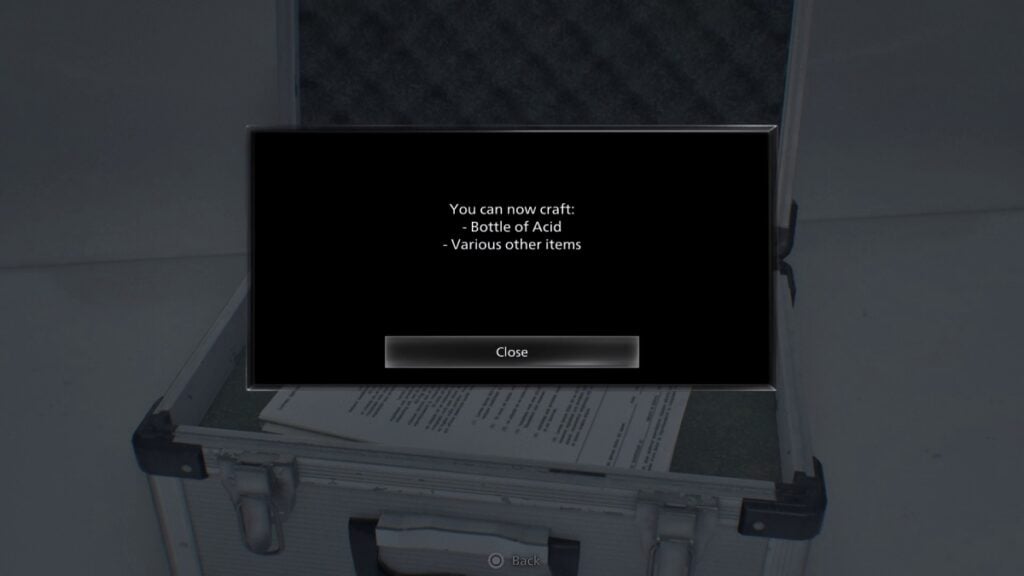
Unfortunately, it won’t be too easy to get into this puzzle box, because there’s a lock that you can only open with corrosive acid, so you need to find that bottle first. At least we have the puzzle now, right? Read the note on the right, and it will say the corrosive is inside the conference room, so off we go.
After reading the note and grabbing everything from inside the room and office, get ready to go out and head to where the corpse was. Prepare for a jump scare.
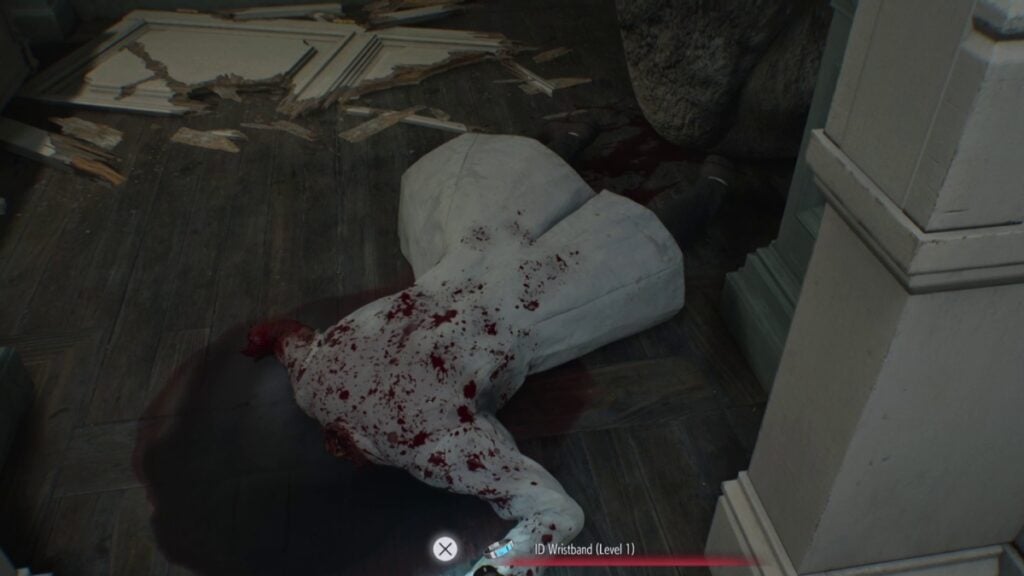
It might be obvious, but there isn’t a lot you can do against this giant baby zombie, for lack of a better term. So, all you can do is taunt it until it leaves the spot where the corpse was, and once it is safe, return to grab the level 1 wristband (told you we’d find it eventually).
Once you have the level 1 wristband, it is time to start exploring. Here, you can head to every location marked with the number 1 if you wish to do so, but we’ll just keep explaining the order in which we did our playthrough.
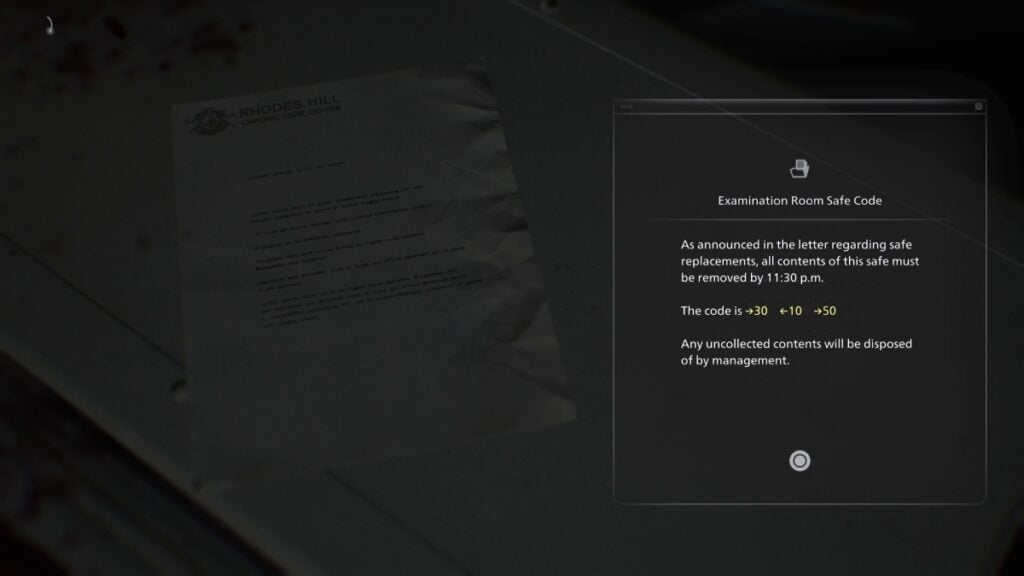
After grabbing the wristband, make sure to enter the room with the big hole in the wall and collect every item. Also, grab the note in there, which has the code for the Examination Room safe. It is →30, ←10, →50.
After that, we recommend saving in the office before proceeding.

Once you save, our first stop will be the closet in the Waiting Room. Head inside to find the Blood Specimen (Converged). Analyzing this sample will let you craft Requiem bullets.
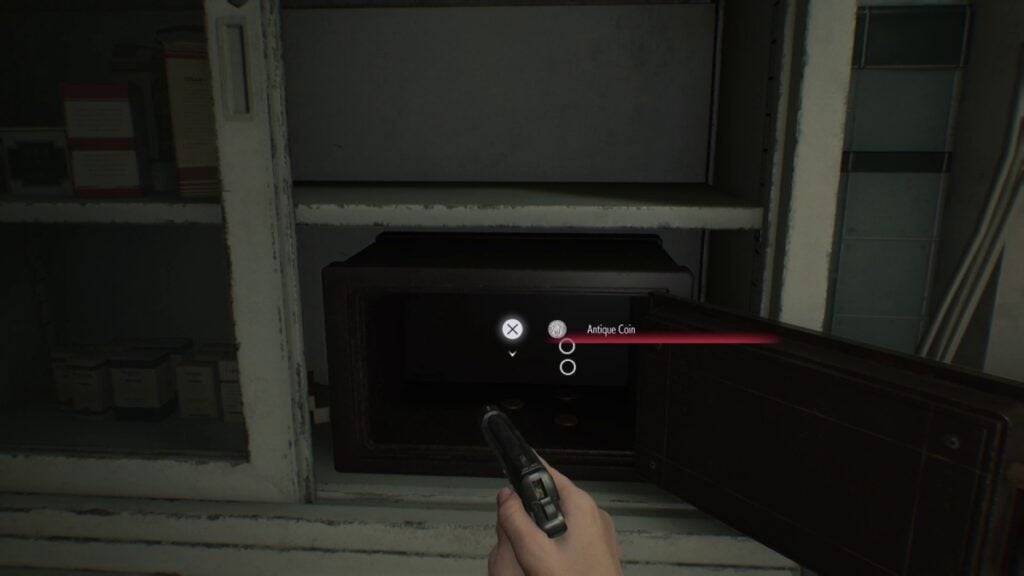
Exit the closet, and now’s the time to open the same inside the Examination Room. It contains three Antique Coins.

After that, our next stop is the Blood Lab to analyze the Blood Specimen you just gathered and open another level 1 door. You’ll find the Blood Specimen (Reversible) inside this room and an entry of Victor’s journal, which will provide more information about Grace.
The other important item in the room is the Medical Injector (Empty), which allows you to craft any of the permanent upgrades for Grace. Each upgrade requires an empty injector and a lot of blood, so be mindful of that. Before leaving the lab, remember to analyze the sample you just obtained to unlock the aforementioned recipes (Steroids and Stabilizers).
Now’s a good time to grab all your Antique Coins to hopefully unlock the last two upgrades at the Parlor, but also to save your game because the next part will be tricky.

We will now head to the Custodian’s Office, which you can now open with your shiny new wristband. Dispatch the zombie outside, then enter and grab every item in the room.
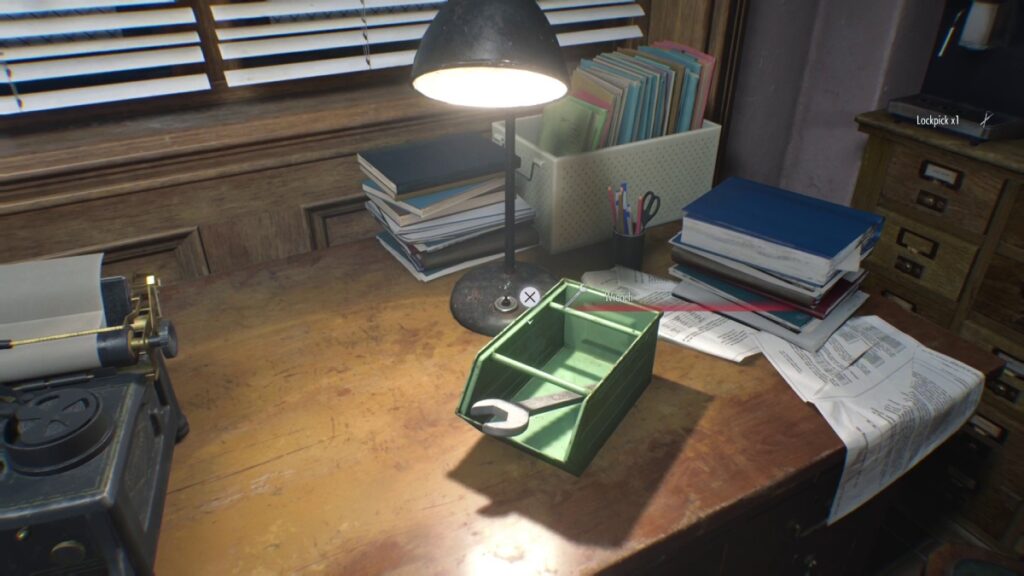
Head straight and you’ll find a new safe room. If you didn’t save in the lobby, here’s a good spot to do so. Also, this room is important because it contains the wrench you need to open the door whose handle broke on the way to the chairman’s office. Grab the wrench and either keep it with you or put it in your box in case you want to grab it later at a different safe room.
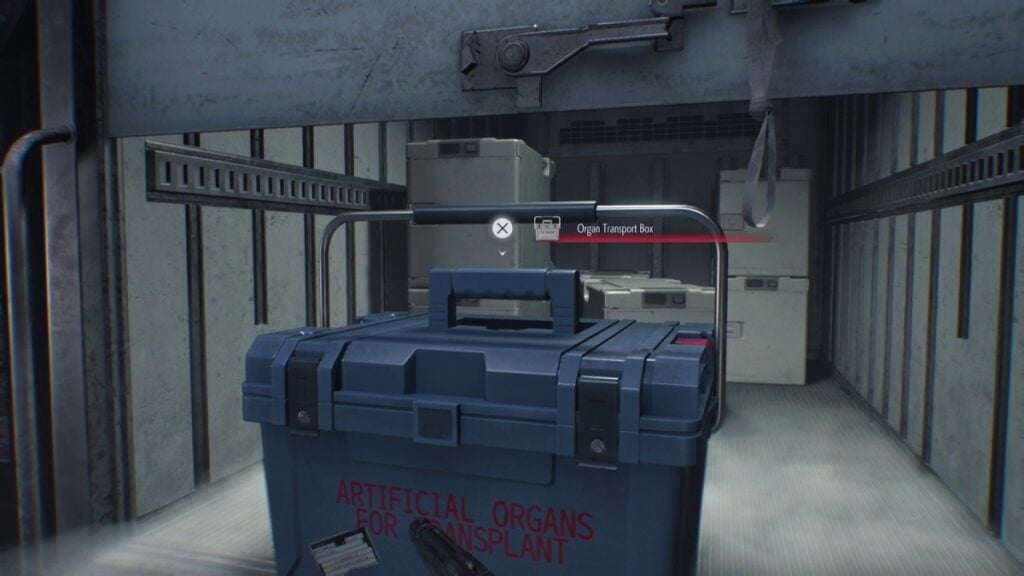
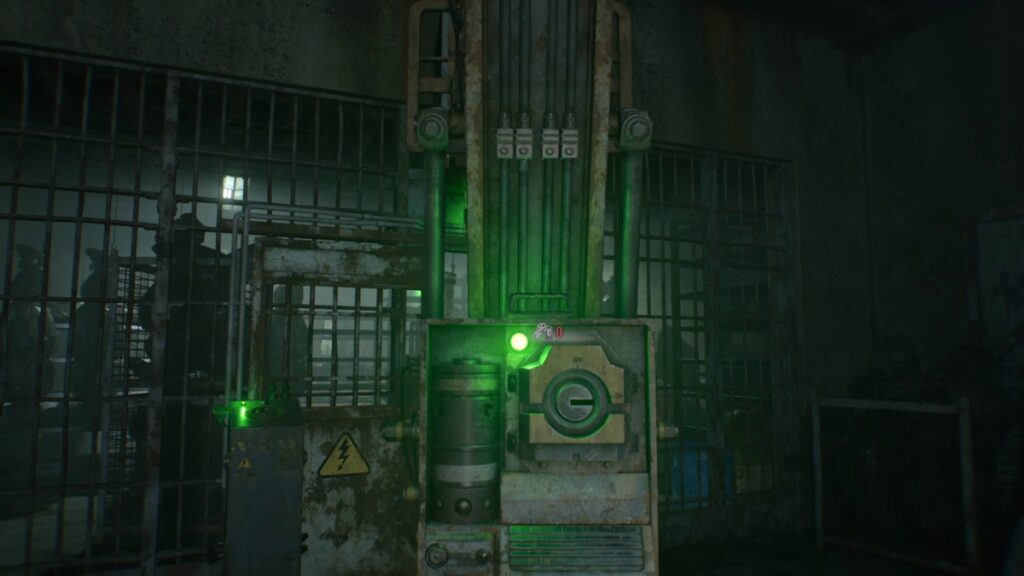
Exit the safe room and head left until you reach the garage. If years have taught us Resident Evil fans anything, it is that a quiet, big room always has a boss fight, so get ready. As soon as you grab the Organ Transport Box, a big excavator vehicle will bust through the wall. And well, it isn’t a boss fight per se, but you can still die, so shoot the zombie driving the vehicle. Go under it and open the boxes in the rooms, and then leave the garage for good.
At this point, we recommend putting the Organ Transport Box inside your supply box for safekeeping and then going all the way to the Filing Room to open the final level 1 door (the wristband will disappear from your inventory here).
Grab the inventory upgrade from here and head toward the cold storage.

Here, you’ll use the wrench to get inside and grab the Artificial Heart. Also, make sure to loot everything there, and prepare for two jump scares.

As soon as you exit, you’ll encounter your first mutated zombie. Don’t even bother using your normal handgun against them. Only the Requiem can kill them, at least when playing as Grace. Also, watch out: the chef has moved to this area and will now patrol the corridor leading to the dining room.
In case you missed it, there are a few other important items at the Custodian’s Office on the second floor, which is outside of the garage.
Here, you will find another laser microscope you can use to analyze blood specimens.

You will also find the code for the Bar & Lounge safe, which is ←10, →80, ←30.
Enter the room where all the crawling is coming from, either defeat or ignore the zombies, and grab everything inside it. There’s also a note talking about the events at the Wrenwood Hotel. Another important item here is the next empty injector, so make sure to grab it if you want to craft another permanent boost for Grace.

Exit the office and head through the small kitchen to see another Mr. Raccoon.
Before progressing with the main objective, you should use this time to open the Bar & Lounge safe with the code ←10, →80, ←30.
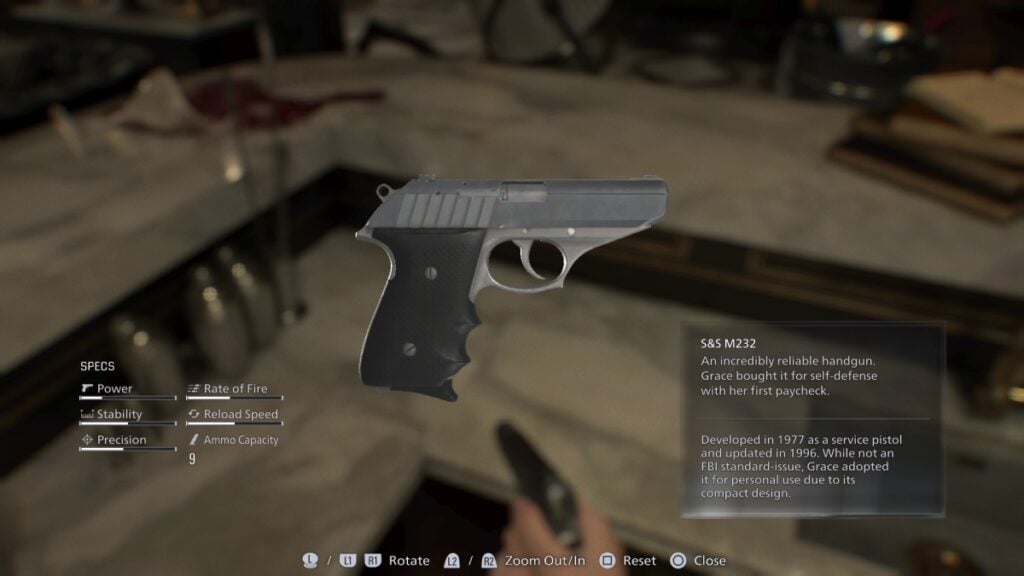
Also, if you didn’t, there’s Grace’s first handgun behind the bar. Grab it, equip it, and toss the other handgun inside your supply box, as this one’s much better.
Furthermore, if you need more Antique Coins, the safe has three.
After grabbing them, now’s the perfect time to find a safe room to organize your inventory and prepare for the next journey.
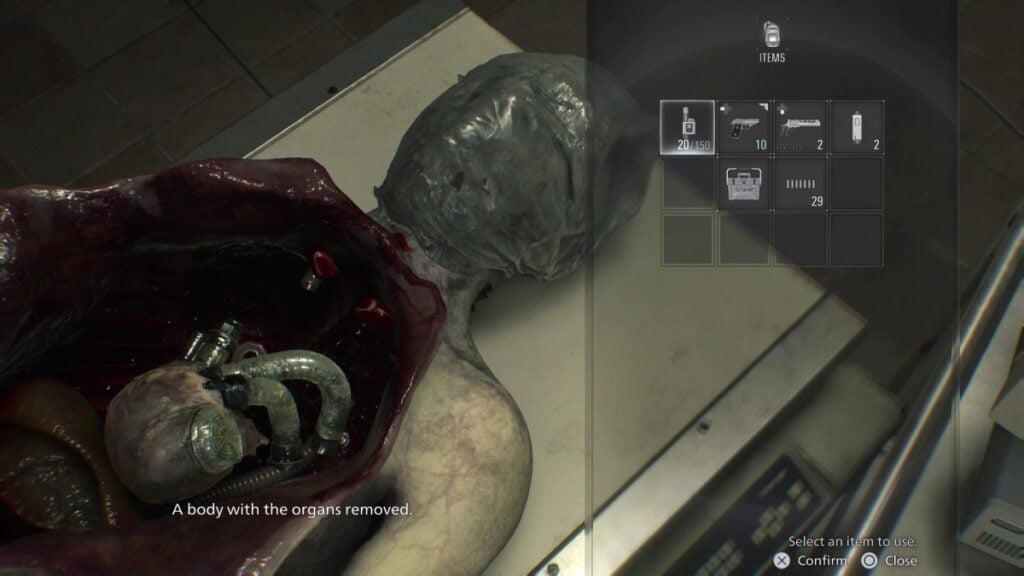
At this point, it is a good idea to return to the Examination Room to put the heart inside the corpse. However, you won’t be able to put the lungs inside, as those are in the organ box, which has a particular way to open it. In any case, drop the heart, and it’s time to go to the Conference Room.
The Conference Room is pretty challenging, as there are several zombies inside, as well as the second singing zombie. There’s no easy way to enter here, so start blasting and save your Requiem bullets for the singing infected.
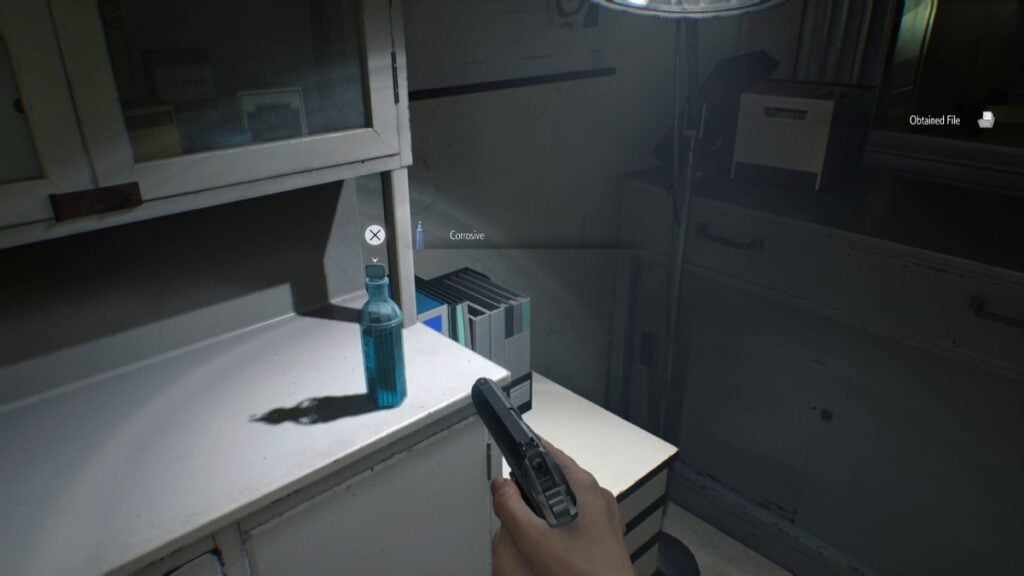
After defeating the infected, head inside the room at the very end to find some lore regarding the zombies, but most importantly, the corrosive. Grab it, and it is time to go back to the Sun Puzzle Box.
When you enter the office, however, you’ll be met with a cutscene. Let it play out, and pay attention to the Isolation Ward door, which is our next stop. Well, not before getting the lungs inside that corpse, right?
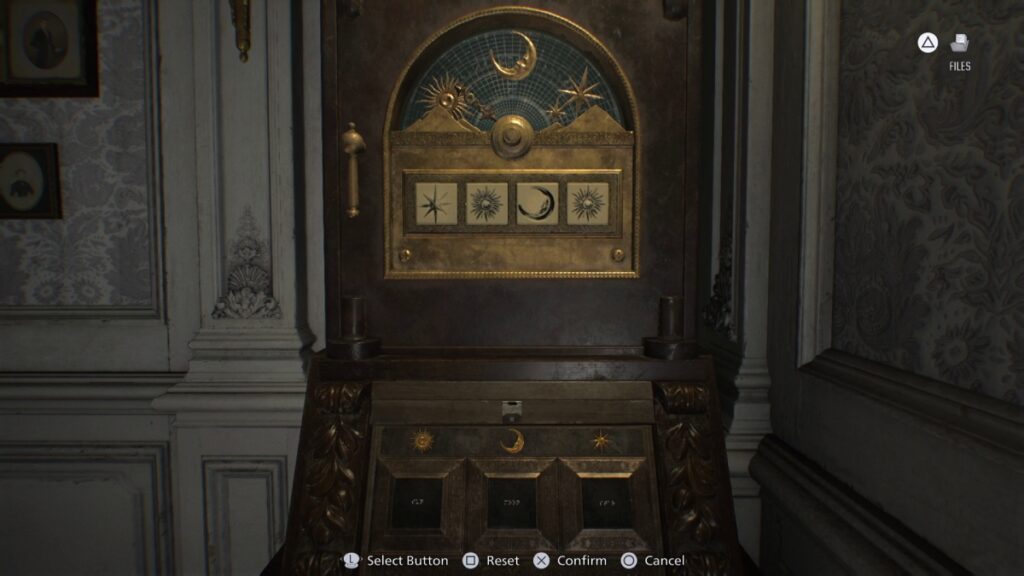
Once you start controlling Grace again, head to the office, use the corrosive, and remember this is the code for the puzzle:
- Star, Sun, Moon, Sun
Grab the Sun Quartz and the Leatherbound Notebook.
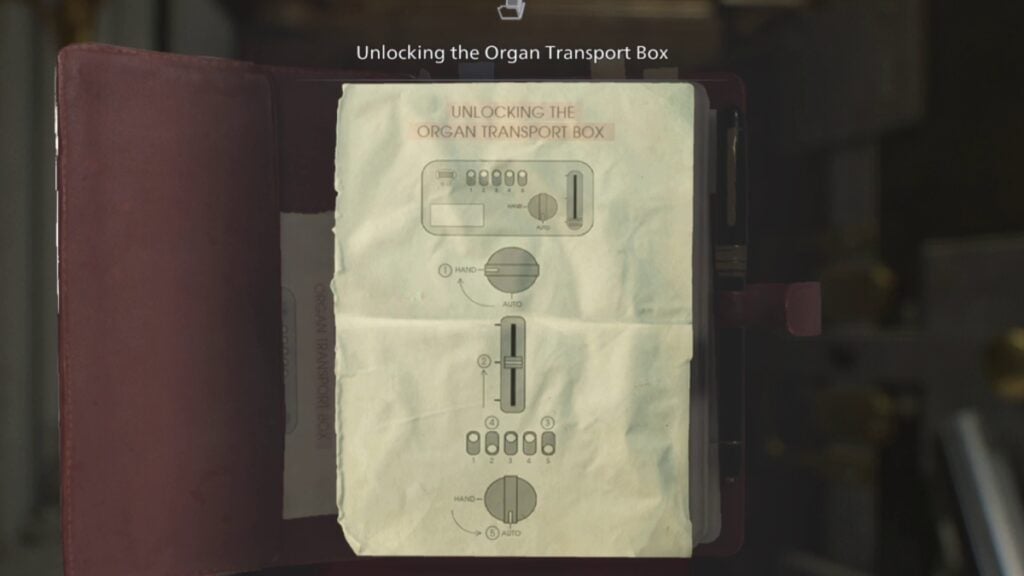
Open the notebook, and you’ll get the solution to the organ box, which is:
- Turn the dial to Hand.
- Put the switch on the right to 2.
- Put the fifth switch down.
- Put the second switch down.
- And finally turn the dial to Auto.
You will also get a really important document, which we won’t spoil, but make sure to read it.
With all that ready, it is time to open the organ box and take the lungs.
Naturally, the zombie will re-revive after you place the organs. Get rid of it and grab the level 2 wristband. And it is now time to head to the Isolation Ward.
Enter the ward, which will be eerily quiet for now. Head to the far end until you reach the office, where you’ll be welcomed by a corpse. Yes, it will eventually resuscitate, but not yet.
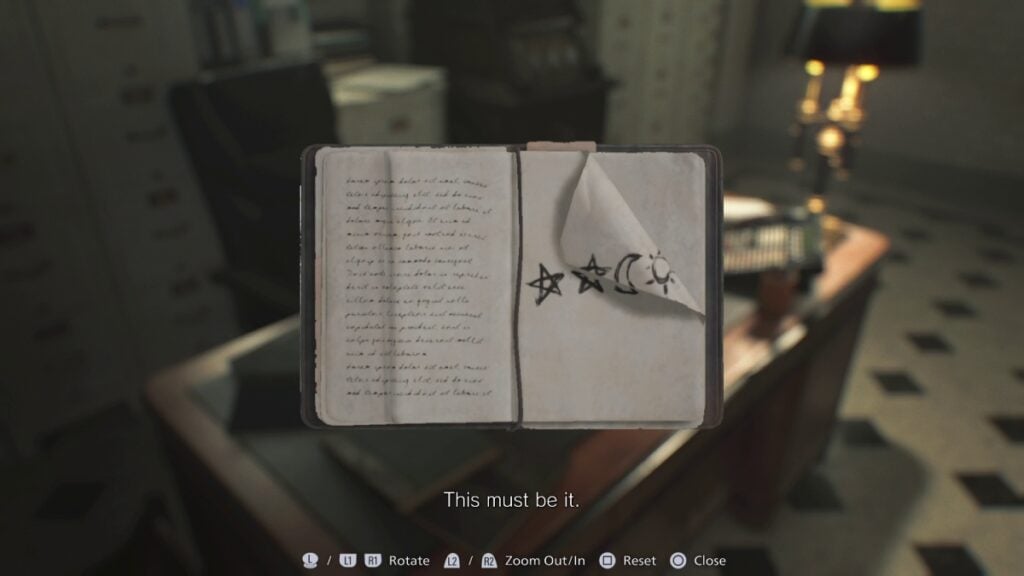
Here, you’ll find a notebook with the code for the final puzzle bow. However, the page is folded, so just interact with it to reveal the final code:
- Star, Star, Moon, Sun
That was easy, wasn’t it? Wrong! Because the next puzzle box is all in Braille. But lucky us! There’s a blind girl in the hospital, so it’s time to convince a kid to accompany us into one of the most dangerous places in the country.
Another good thing will happen because after watching the cutscene, you’ll get the level 3 wristband, which is the last one you need to open all the remaining doors in the hospital, but most importantly, the door to Emily’s cell.
Point of no return warning!!
Once you open Emily’s cell, you’ll reach a soft point of no return in the hospital. We say “soft” because you can leave Emily on the sofa to continue exploring. But if you’ve been following our Resident Evil Requiem walkthrough, you should be good to go.
The one thing we recommend doing before taking Emily to the final puzzle box is clearing the road of all zombies, except the Giant Baby one.
Once you’ve cleared the way, go and grab Emily and head toward the office.
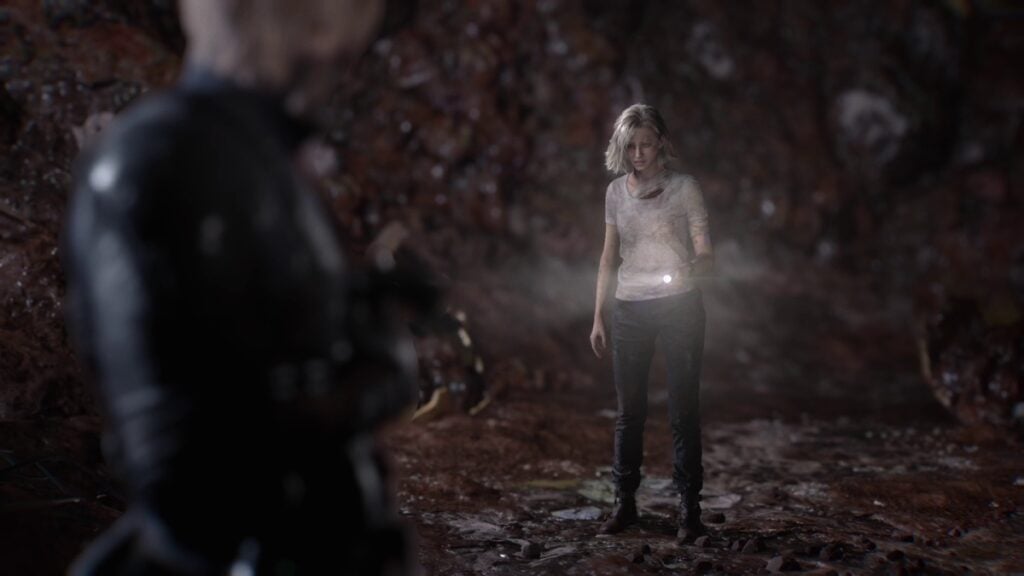
This is the one puzzle you won’t have to do, but the game won’t make things easy for you. There are a few zombies coming your way, and you need to survive until Emily gets the quartz. Defeat the zombies and go back to the office to meet Emily, who has the final quartz. Sadly, this reunion will be cut short because a familiar enemy will take Emily away, and it is time to follow them into the deepest parts of the hospital. However, that’s for another chapter because it is now time to see how Leon is doing.
Rhodes Hill Chapter (Leon – Part 2)
And now our walkthrough shifts briefly to Leon. Just like the intro part of the hospital, this one will be fast-paced, with an almost linear setting.
After watching the cutscene, you’ll regain control of Leon, who doesn’t have his Requiem anymore, but don’t worry, he can still kick a few infected butts.
The first thing you should do is open your map to look where you are. You’ll quickly notice that you’re at the only part Grace was not able to enter through the Lounge, which was on the top floor of the hospital. There isn’t a lot to do here, so just grab every item you see and head toward the objective.
Keep going until you reach the attic, and you’ll see a huge zombie there devouring another poor infected. You’ll need to approach it because the shotgun is right at its feet, and once you grab it, the boss fight will start.
This fight isn’t particularly challenging, so just wait until the zombie gets stuck and blast it with your shotgun. Remember to grab every item around the attic as you fight the boss.
Important Note: After defeating the boss, you can head to the main objective, which will quickly switch to Grace’s perspective. Instead of doing that, we recommend taking your time to explore the hospital as Leon.
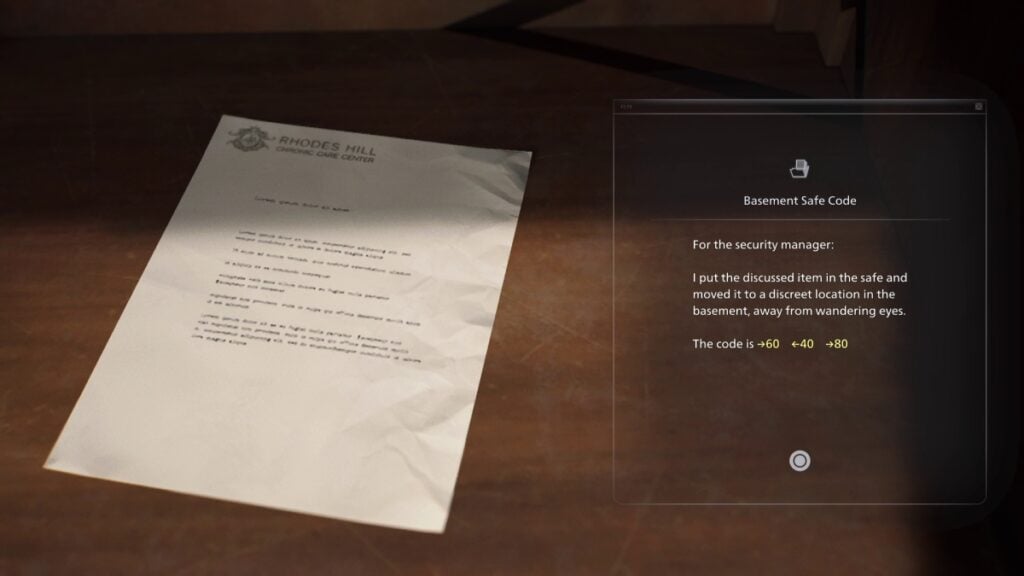
The first thing you’ll want to do is head to every warped door in the hospital, which you can now open with your axe. All of them should now be marked on the map. The first one you open will include the Basement Safe Code, which you’ll use later as Grace.
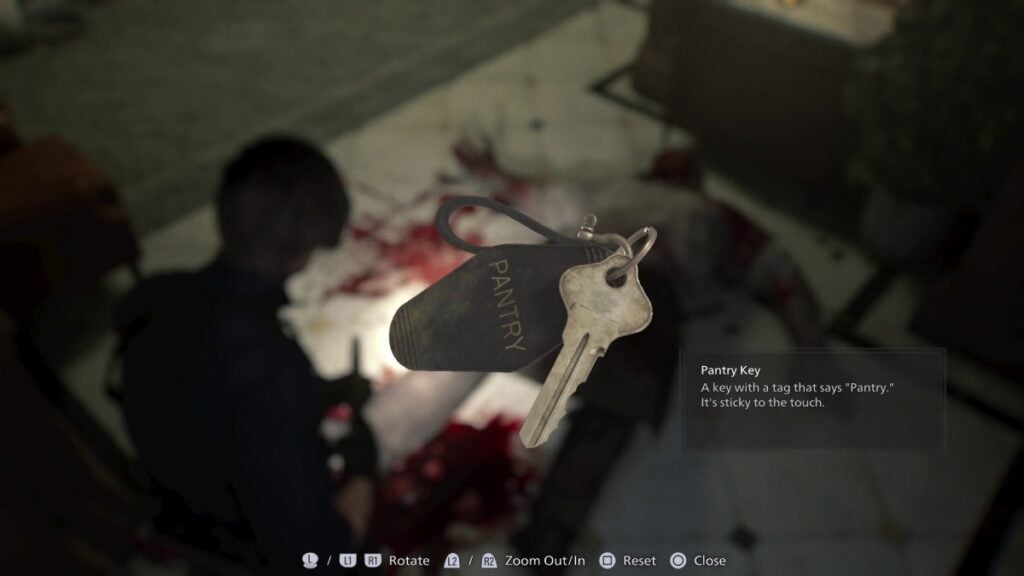
This is also a good time to defeat any of the tough infected you saw during Grace’s section, such as the Chef who drops the Pantry Key.
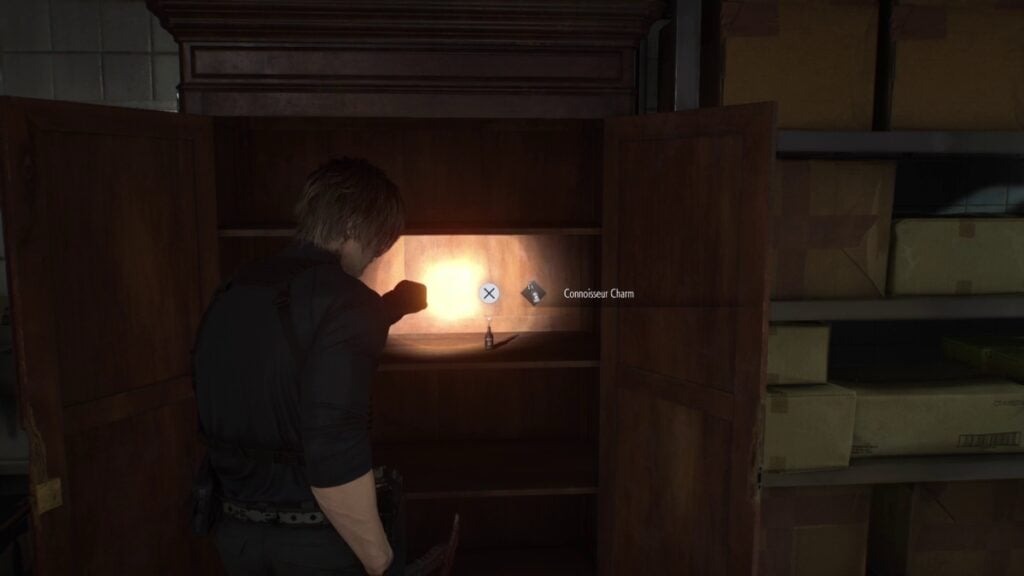
While there are several items inside the pantry, the most important one is the Connoisseur Charm, which increases the power of any firearm.
If there’s nothing else you missed here, now’s the perfect time to head to the main objective, which is just survive the onslaught of infected. After that’s done, enter the room with the computer, watch the cutscene, and we’ll say goodbye to Leon again, at least for a short while.
Rhodes Hill Chapter (Grace – Part 3)
And we are now ready for the last long part with Grace, at least for quite a while. You are now in the basement, which is much scarier than the hospital and way more dangerous.
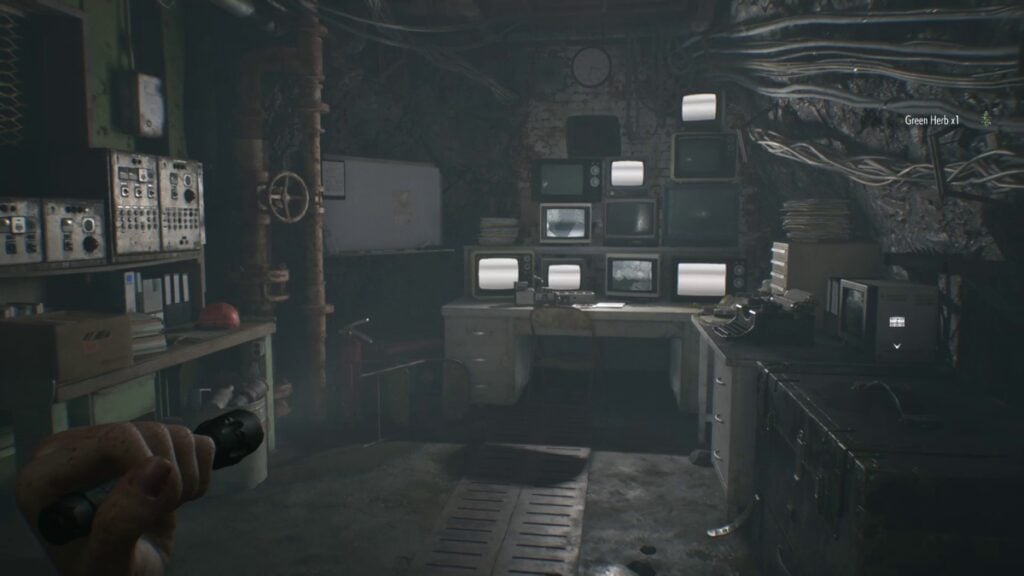
After reading the notes, saving your game, and organizing your inventory, check the TV screens and head out of the room.
You’ll enter the furnace room with two possible paths, head to the one on the right that leads you to the cells.
Note: If you have some leftover Hemolytic Injectors, we encourage you to use them on the zombies that are on the ground because, yes, they’ll eventually wake up and attack you.
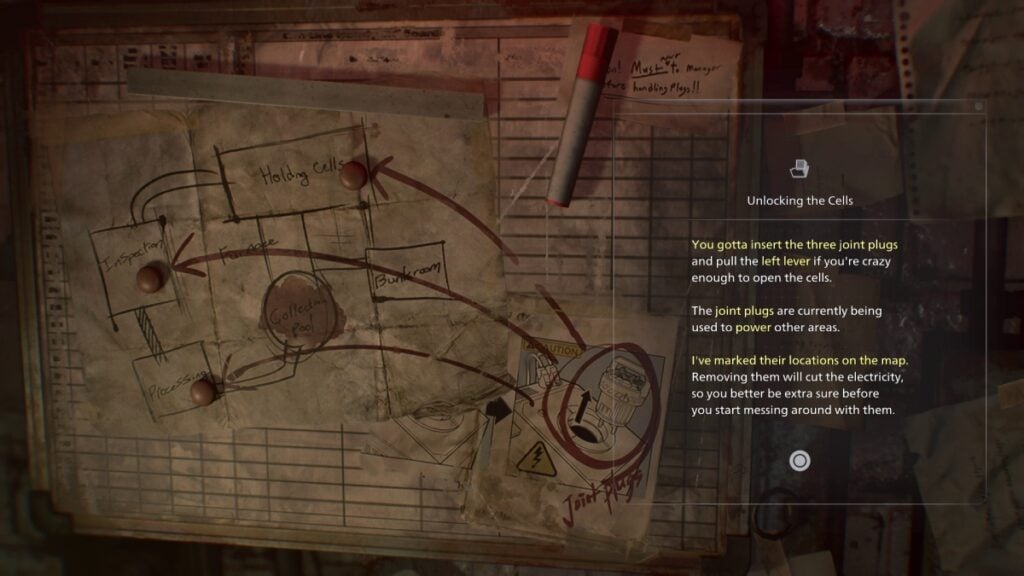
When you reach the cell area, don’t bother wasting your bullets on the zombies behind bars. Just keep going to the far right. A cutscene will trigger, showing Emily, and at the very back of that corridor, you’ll see your next objective, which requires you to find 3 Joint Plugs. You’ll also see a map that shows where each one is located:
- Holding Cells
- Inspection
- Processing
For now, remove the plug from the console and take it with you, as you’ll need it to access new areas.
As soon as you remove it, though, a familiar enemy will appear. You know the drill: hide or run toward the light to get rid of it for a while.
Once the big zombie disappears, go to the other end of the holding cells corridor and insert the plug to open the door.
Destroy the Mr. Raccoon inside and read the note.
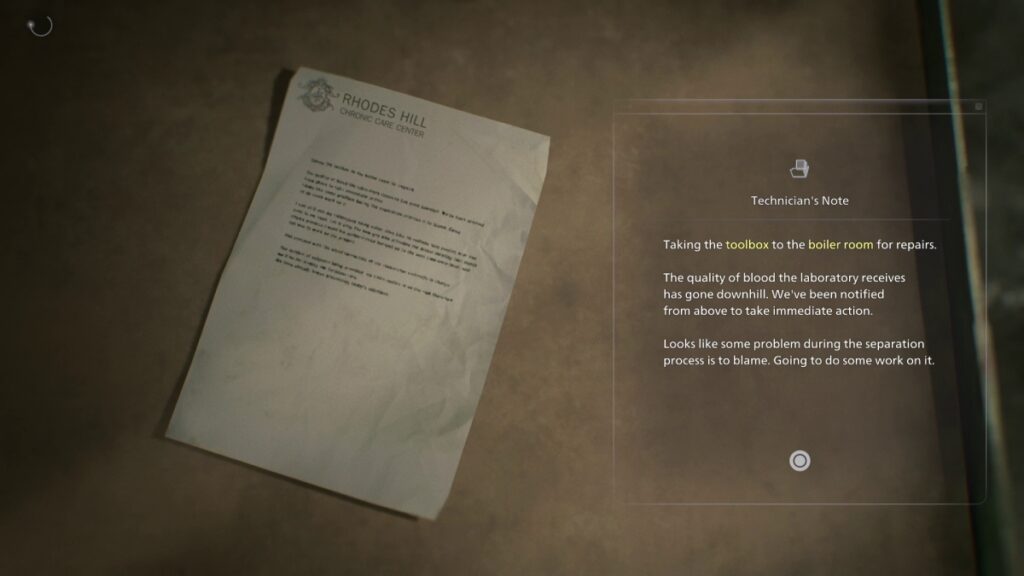
Your next stop is the boiler room, which you need to visit to get the toolbox to open the gate in the room where you found the note. So, if you have everything you need from this place, it is time to head back all the way to where the safe room is. Remove the plug and take it with you.
Go past the safe room (save if you want) and insert the plug in the console, which will open a few doors, including the boiler room.
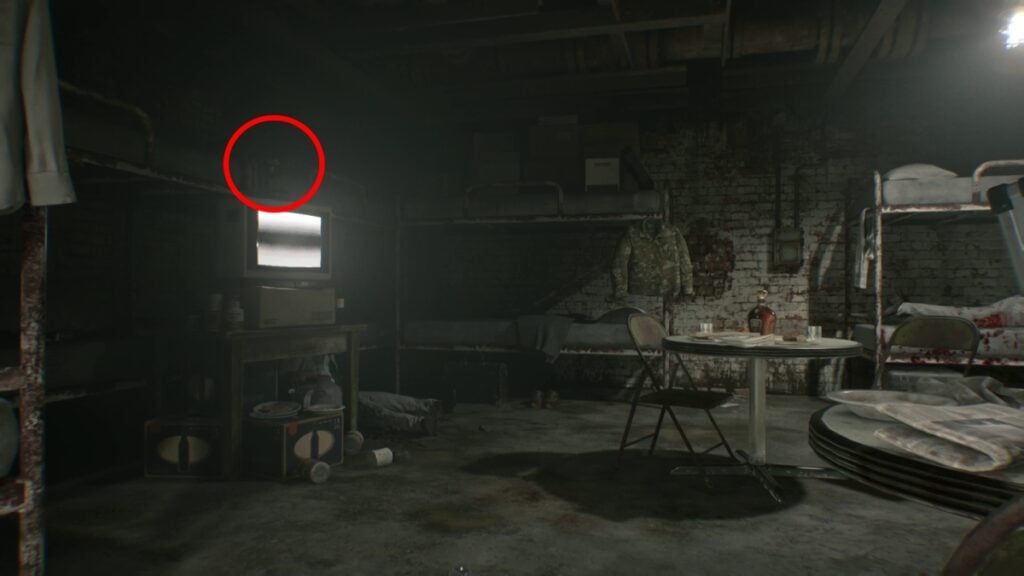
Enter the dormitories on the right, and get rid of all the infected here. There’s a Mr. Raccoon on top of the TV.
Once you grab everything from the bunkroom, go across from it and enter the boiler room.
When you enter, you’ll notice that the little room with the toolbox is unpassable, as there’s electrified water, meaning you have to go inside once you take the plug out of the console.
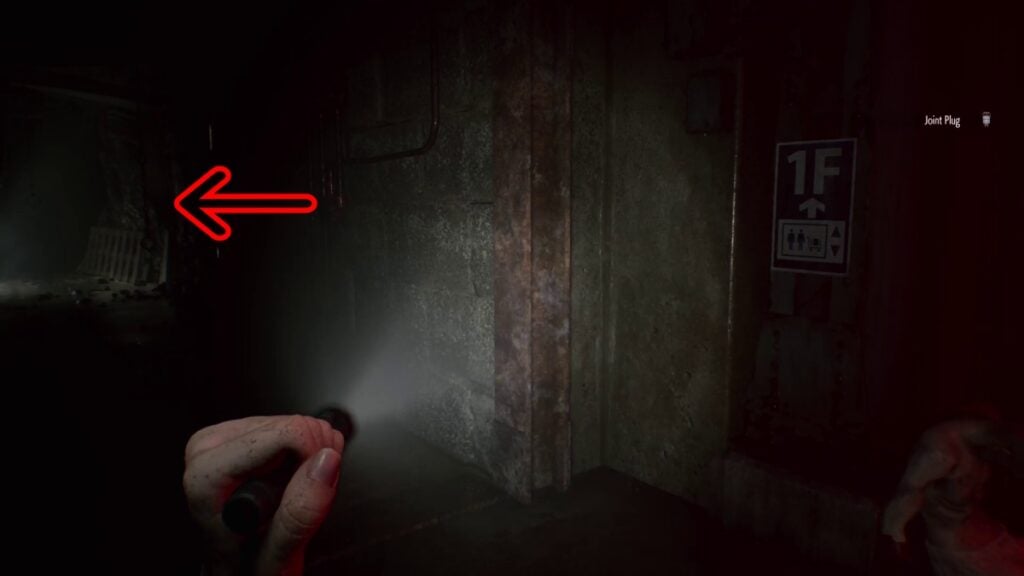
With that in mind, take out the plug, thus turning all lights off, and head toward the elevator, turning left when you see the sign that says 1F.

Take another left until you see another console that lets you put the plug in.
Enter the room and push the crate to open that space for you to crawl under.
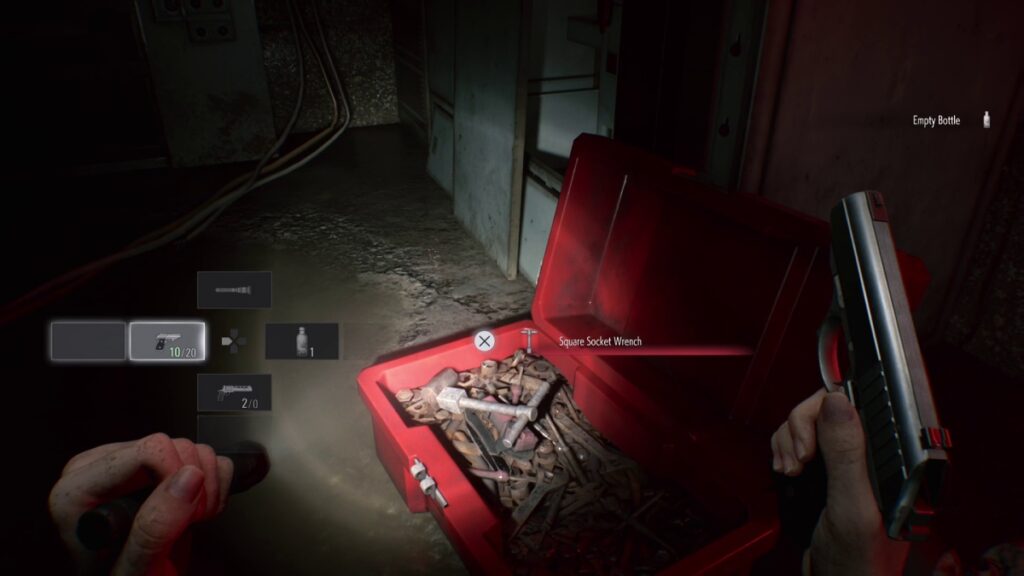
You’re now free to enter the room where the Square Socket Wrench is. Grab it and turn around.
As soon as you grab it, however, the big zombie will show up, so either distract it with a bottle or wait for it to leave. Then, return to where you left the plug, remove it, and head back to the room inside the holding cells.
You can now use the wrench to get inside the duct.
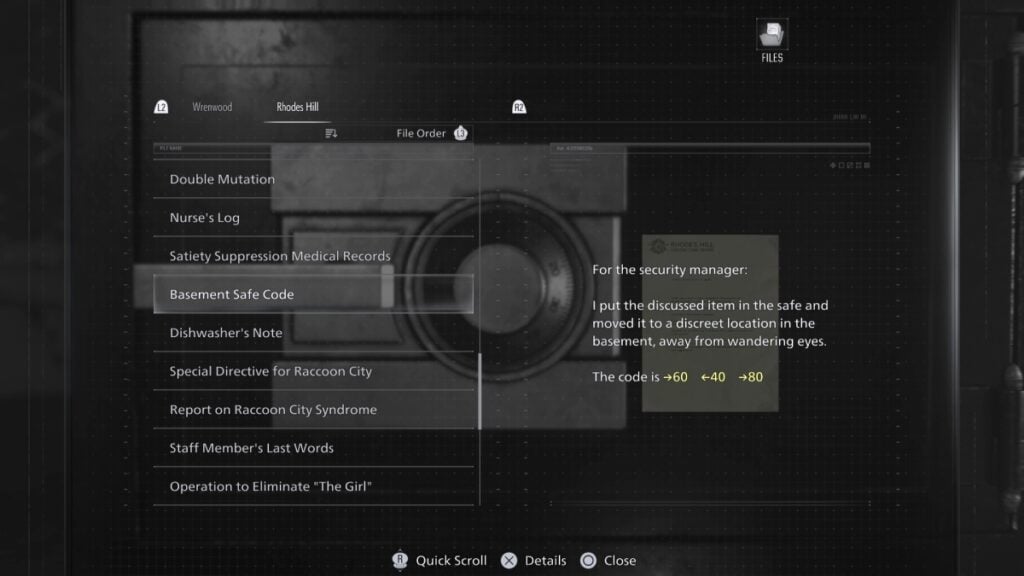
Follow the corridor until you reach the inspection area. Defeat the zombies and head toward the office to open the safe. Remember that code Leon found? You can use it here. The code is:
- →60, ←40, →80
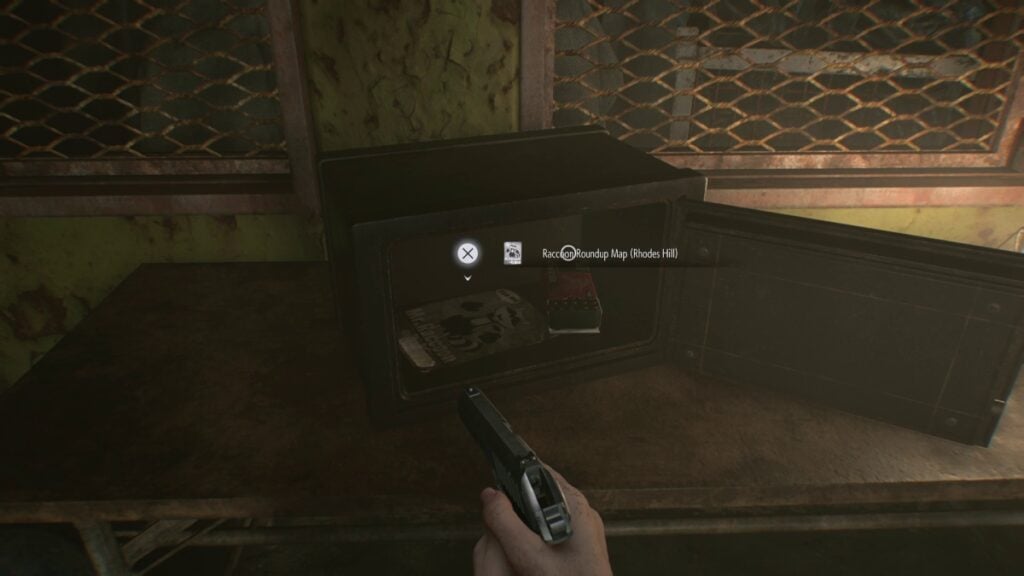
Unlock the safe, and you’ll get the Raccon Round Up Map (Rhodes Hill), which marks every Mr. Raccoon on your map.
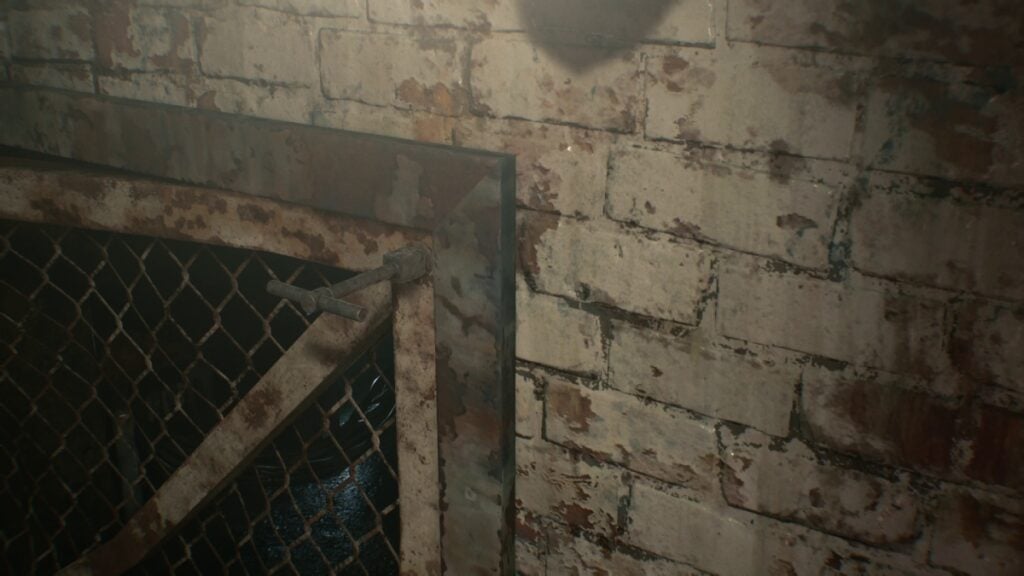
Exit the office and follow the corridor, take a left and go up the stairs, and keep following the tunnel. You’ll reach a locked gate that leads to the furnace room. There’s nothing you can do here for now.
Return to inspection and remove the plug next to the forklift. Then return to the holding cells and grab the other plug, and then head toward the furnace room.
Zombies will start waking up unless you already killed them with your injectors. If not, get rid of them, and try to kill them far from one another because a couple of them will become Blister Heads later.
And now, it is time to head to the processing area, which is the most challenging part of this section.
Use the wrench again on the panel (the wrench will disappear) and insert the two plugs you’re carrying.
Go across from the collection pool and enter the room. Follow the corridor and enter the tunnel where the fan stopped.
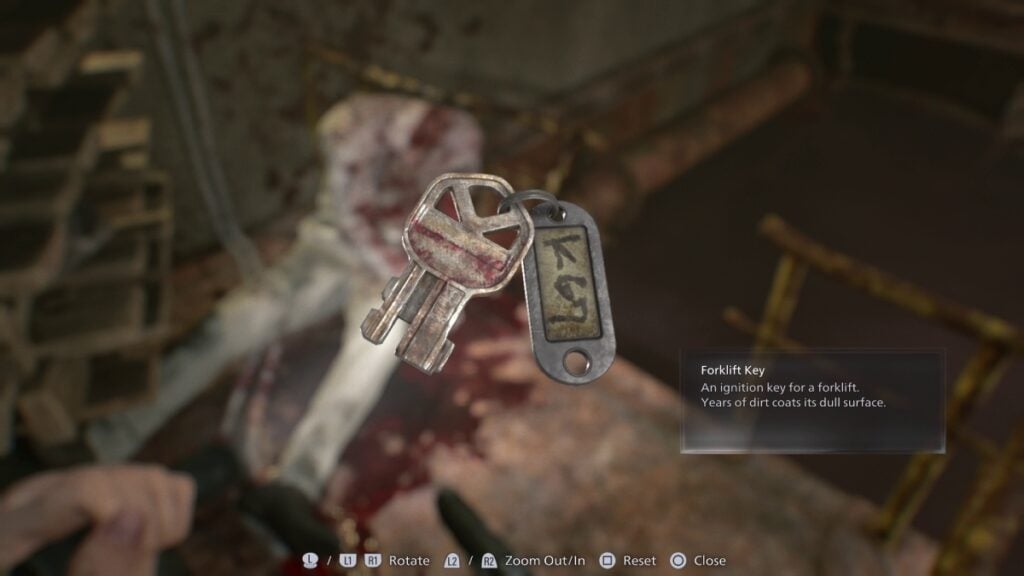
You won’t be able to cross this pool of blood for now, so just head to the back of the corridor and grab the Forklift Key from the body.
Use it on the forklift next to the body and enter the office to grab the map of this area. There’s also an inventory upgrade here.
Note: The third plug is here, but you can’t remove it just yet. Leave it there and go all the way back to the inspection area where the other forklift was.
Grab the other plugs on your way out of the collection pool and use the forklift key once you reach the inspection area. Remember to leave the plug there to prevent the big zombie from approaching you.
And now, it is time to play some sort of musical chairs with the body bags. Basically, you need to stick to the closed bags and stay away from the bodies. If you’re close to the bodies as they move, they will grab you.
Besides a few items in the room, the only important part is reaching the river of blood we saw in the processing area, where the third plug was. So grab everything, open up all shortcuts, and when ready, follow the body bags to the processing area.

There’s a spot to save your game here, and you’ll want to do so because here comes a really challenging part.
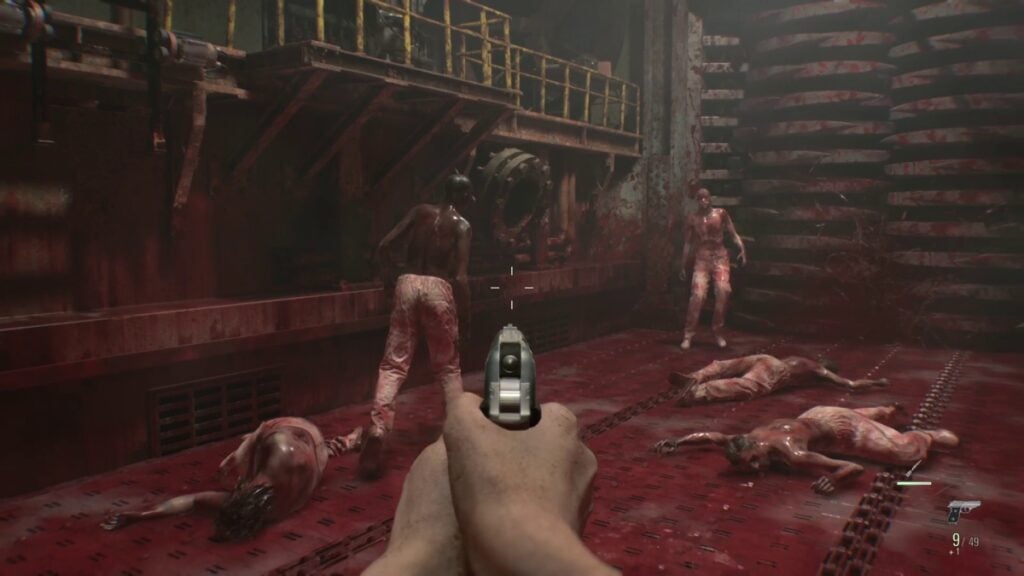
Once Grace drops down to the conveyor belt, it’s all about surviving. Keep killing zombies and let them get sucked into the grinder. Eventually, it will stop, lowering the ladder and letting you grab the final plug.
Grab the plug and follow your steps back to where you came. Collect every other plug on your way out, then activate the collection pool at the bottom to collect several blood samples for crafting items.
Once you’ve saved your game, organized your inventory, and taken care of all Mr. Raccoon figures in the basement, it is time to take the plugs to the holding cell and unleash hell (literally).
Grab Emily and head toward the elevator. A few scripted events will occur; it is evident what you have to do, so once it is all over, exit the elevator, grab the arm, and head toward the safe room.
Point of no return warning!! (And spoilers ahead)
Okay, so, a couple of important things here. Once you take Emily with you outside the hospital, you won’t be able to return. Use this time to check your map and see if you left any Mr. Raccoon behind. You can also grab a couple of items or blood you left, but what matters most are the Mr. Raccoon figurines.
Also, this is a part with heavy spoilers, so we will only talk about one puzzle solution and then jump all the way to Leon’s part. Fortunately, everything is heavily scripted, so besides the one puzzle we’ll show you, everything else is pretty straightforward.
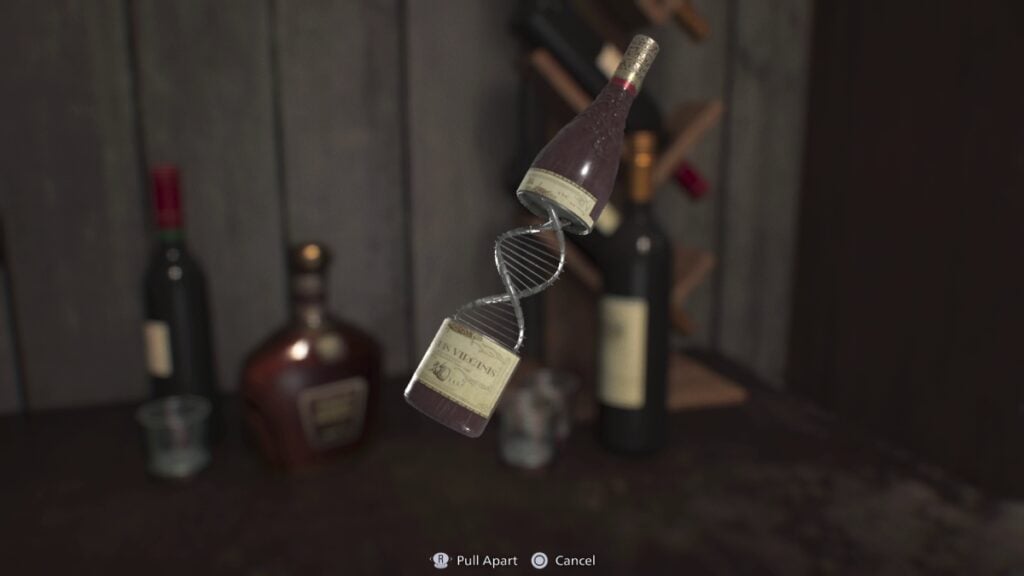
Once you get out to the courtyard, enter the house and head to the room where the puzzle is. To make it short, find the wine bottle on the table and interact with it.
Interact with the podium at the center of the room and activate the elevator.
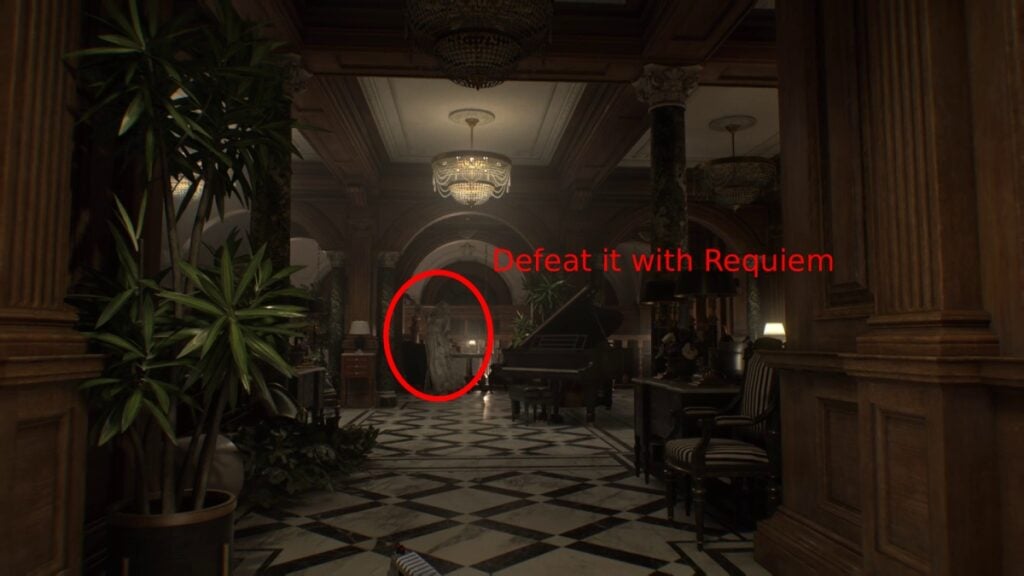
As we mentioned, this part is full of heavy spoilers, so just follow the path, watch the cutscenes, shoot a few zombies as Leon, defeat a couple of bosses, and once all that is done, Grace will take a break for a while, and guess what time it is? It’s Leon time and in good old Raccon City.
Note: In case you’re struggling with the final boss in Grace’s section, just use your Requiem. A couple of shots should take it down. The fight is extremely easy.
Raccoon City Chapter (Leon)

If you thought Leon was being sidelined in Rhodes Hill, that’s because it was Grace’s time to shine. Raccoon City is all about Leon.
After the cutscenes end, break the boxes to grab a few items, read the notes, and then head to the hotel. You’ll find a Mr. Raccoon here.
Once you’re ready, go through the revolving doors.
Your short moment of peace will get interrupted by a boss. So just run away from it, cut down the webs with your axe, and wait until you reach the building where you’ll actually face the boss.
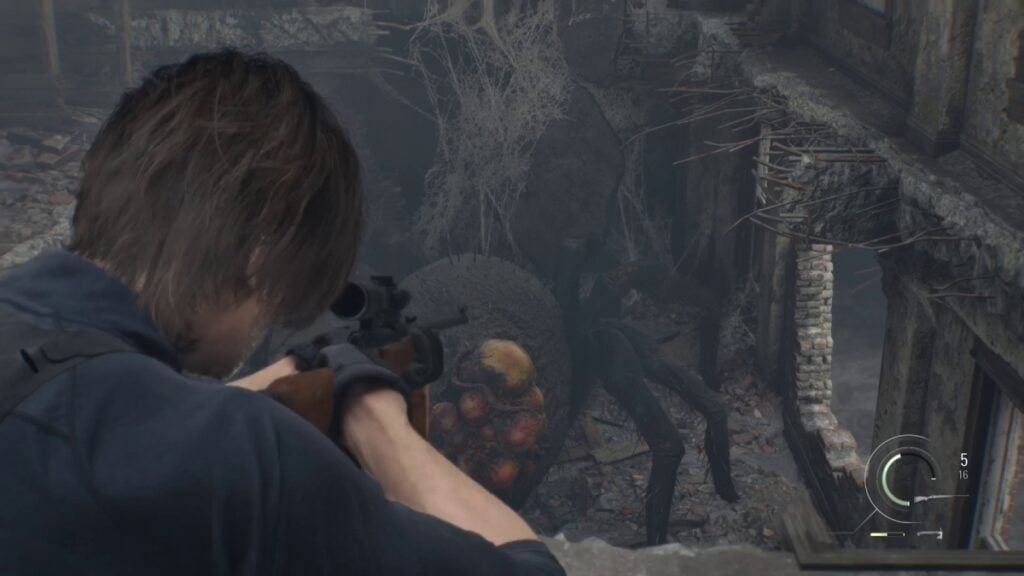
Tips: This fight is also pretty easy. Just make sure to aim at the back of the creature to maximize your damage. You’ll eventually trigger a cutscene, and the two of you will fall down into the train tunnels.
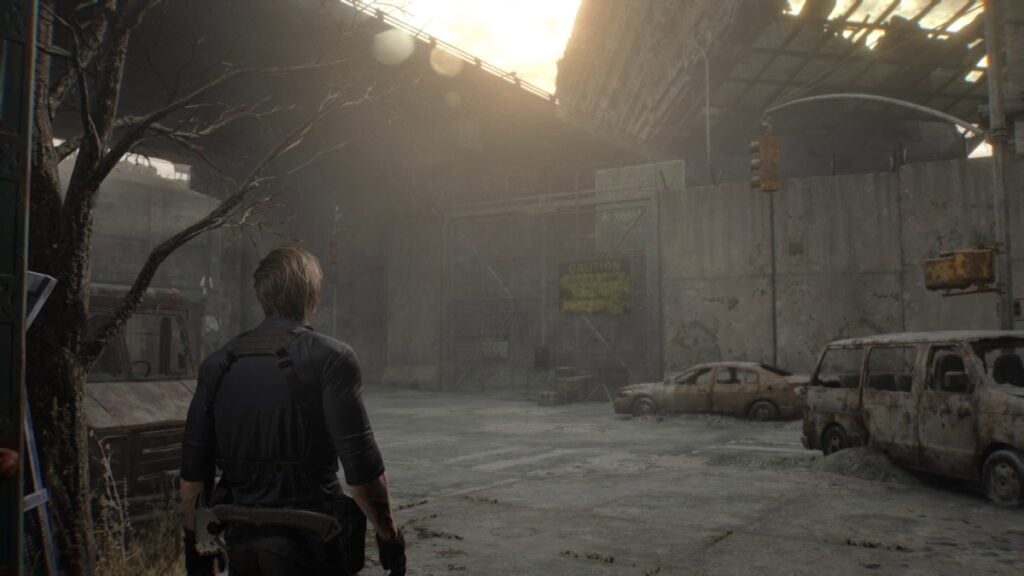
Go through the revolving doors and back to the street, and you’ll see a big gate leading to Raccoon City’s downtown.
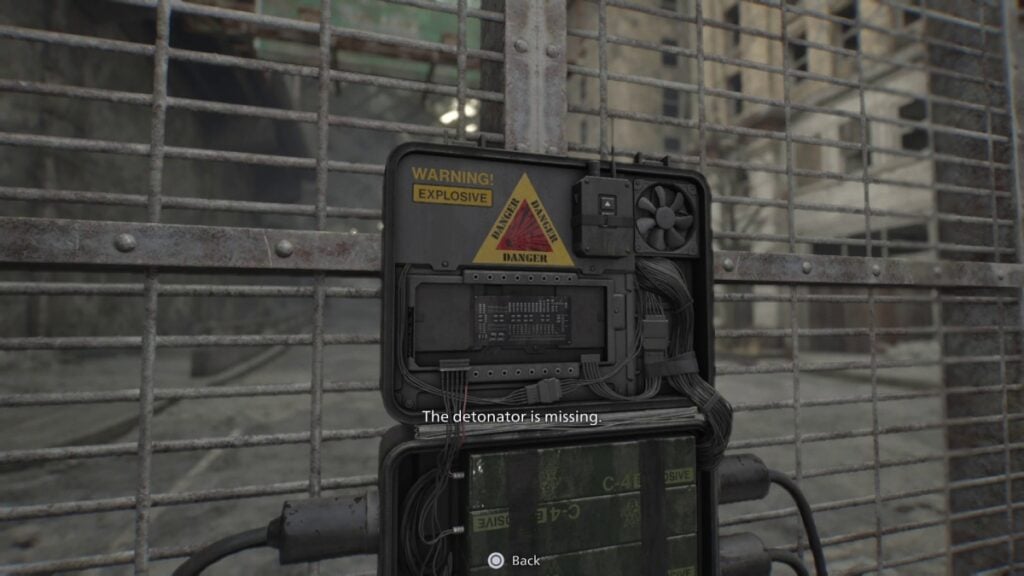
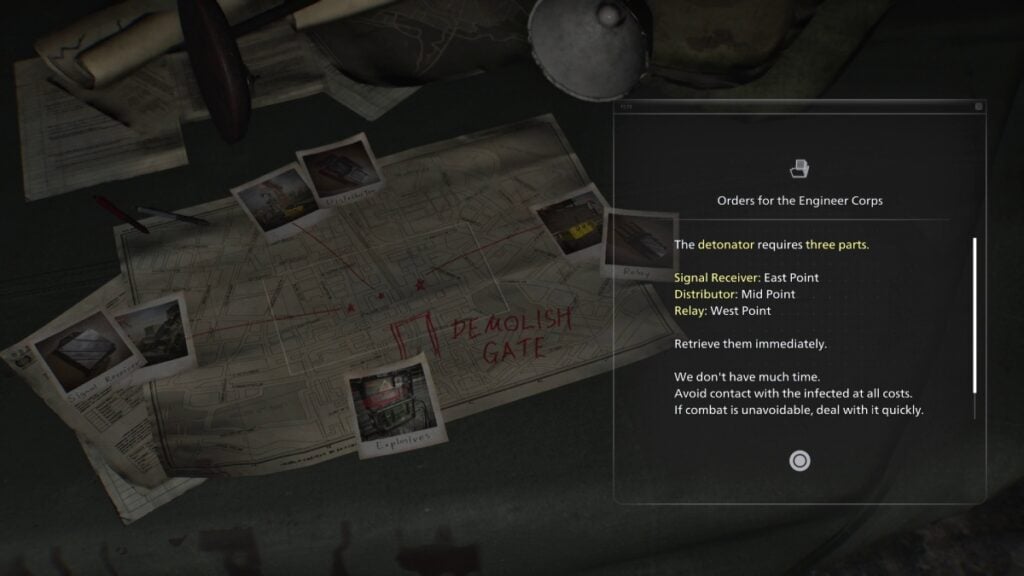
You need to blow up the gate, and to do so, you need to find three parts for the explosive.
Note: The game lets you get all parts in whatever order you want. This is a non-linear section, so we’ll go over the order we went through it.
Before leaving, grab the Tactical Tracker. Each kill will give you points that you can then use to purchase or upgrade weapons. Remember to exchange your points every time you find a supply box.
Quick note about upgrades: If possible, replace your handgun and shotgun as soon as possible. Focus on upgrading these two and then purchase the armor. You can buy and upgrade the rest as you see fit.
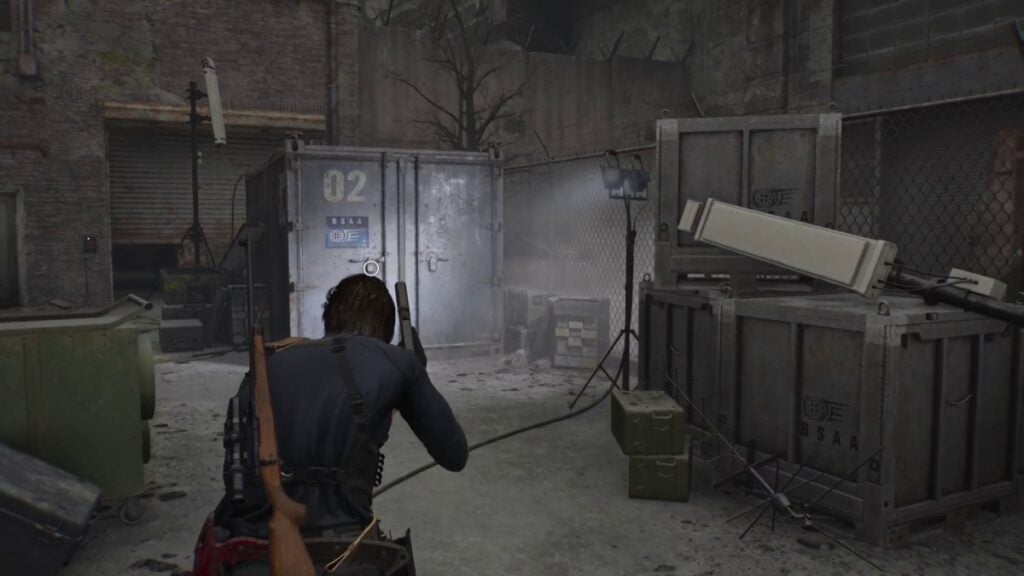
With everything ready, open the shutter gate behind the BSAA Container #2. You’ll fight a few zombies, a couple of them wielding melee weapons. You can use your axe to parry their attacks and drop boxes on top of them to kill them faster.
Once you’ve cleared the way, shoot the crate blocking your way to open a path to the outside of the building.
Note: There are a few boxes and enemies in the gated area of the warehouse, so make sure to go there for more items before leaving.
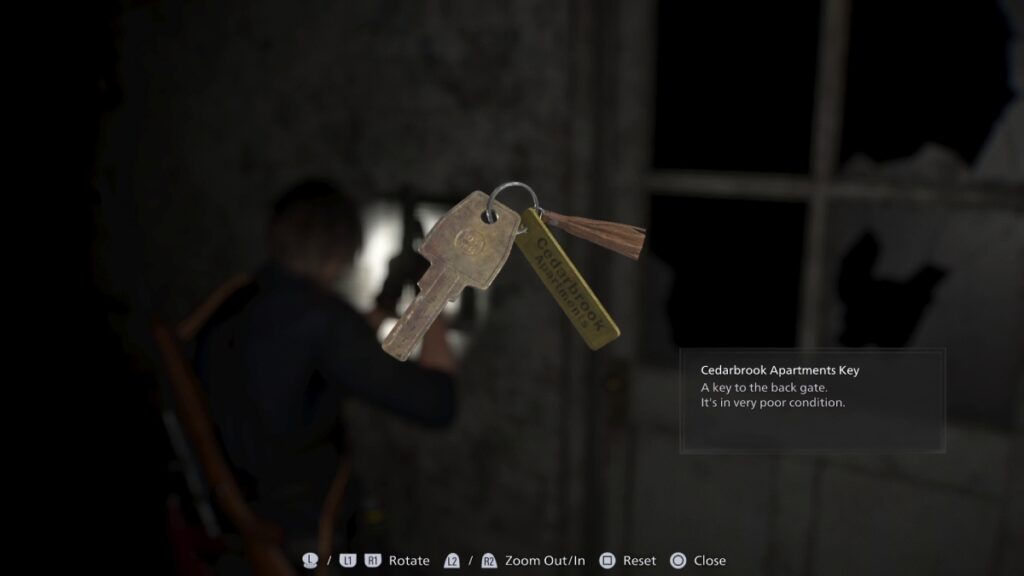
Follow the ledge, enter the room, and grab the Cedarbrook Apartments Key.
Once you reach the rooftops, you’ll notice a few locked gates and some generators that are out of juice. You’ll need fuel to use them, so we’ll eventually return.
For now, take a right from the generator and go through the door.
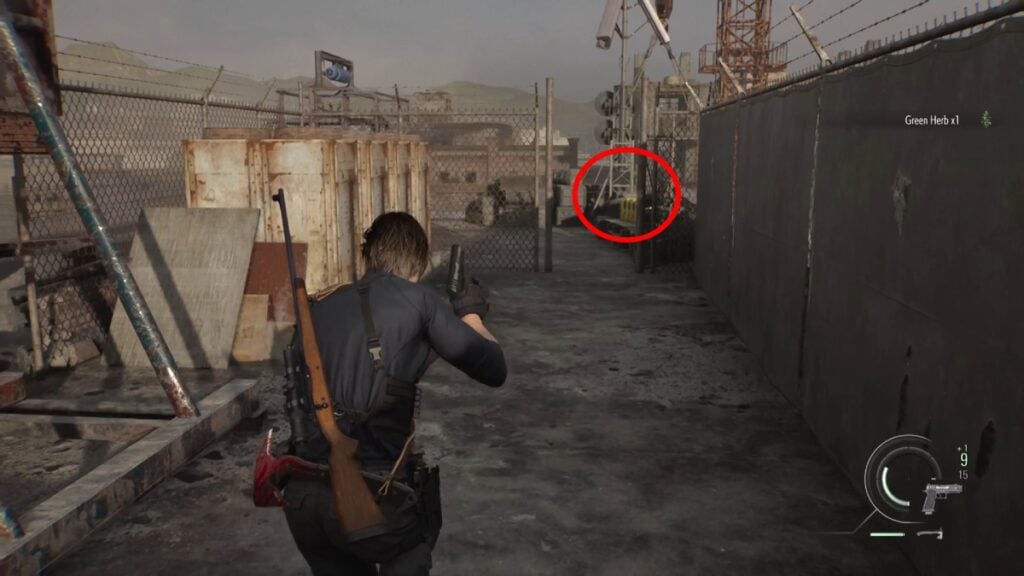
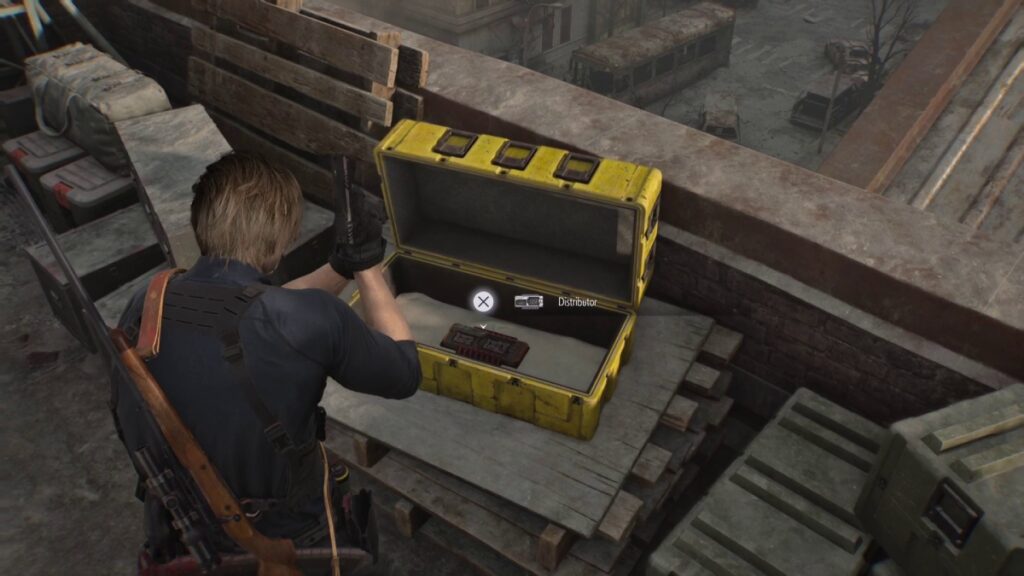
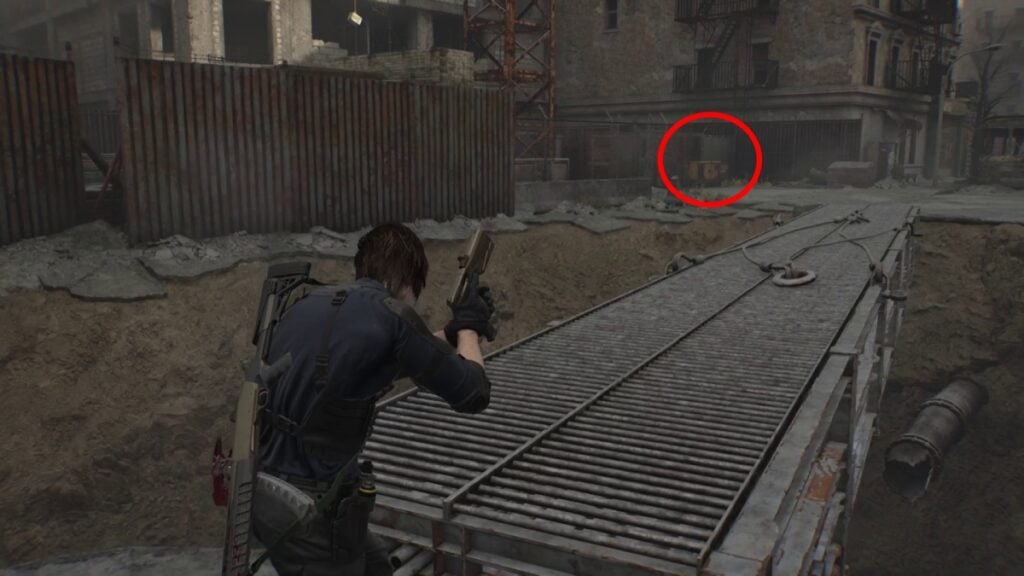
Go all the way to the far side of the rooftop, and you’ll see a yellow box with the first part: the distributor. After grabbing it, use your binoculars to mark the other locations on your map and ride the elevator down. You can also mark the gas station on your map from here.
Save your game, buy upgrades, and then exit the camp and take a right toward the door at the bottom; use the apartment key to enter (the key will disappear).
Head through this area until you reach the flooded parking lot. Instead of going here, however, we’ll ignore it for now and continue following the corridor until we reach the Sewage Facility.
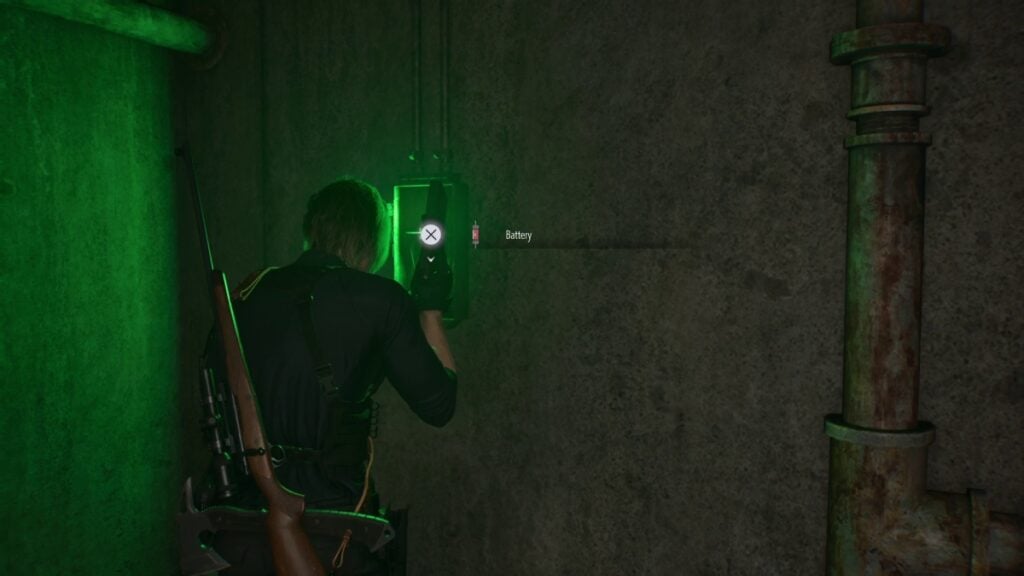
You’ll have to face a few enemies and one mini-boss, and after defeating them, activate the bridge and cross it to find a battery.
With that ready, it is time to take a dip into the flooded parking lot.
You can insert the first battery here, and while you’re at it, check the note saying where the other battery is, and you guessed it: the parking garage, which, luckily enough, is where you’re at.
This area is a bit complicated, as many zombies will appear from the water, but just dispatch them as they approach until you reach the office.
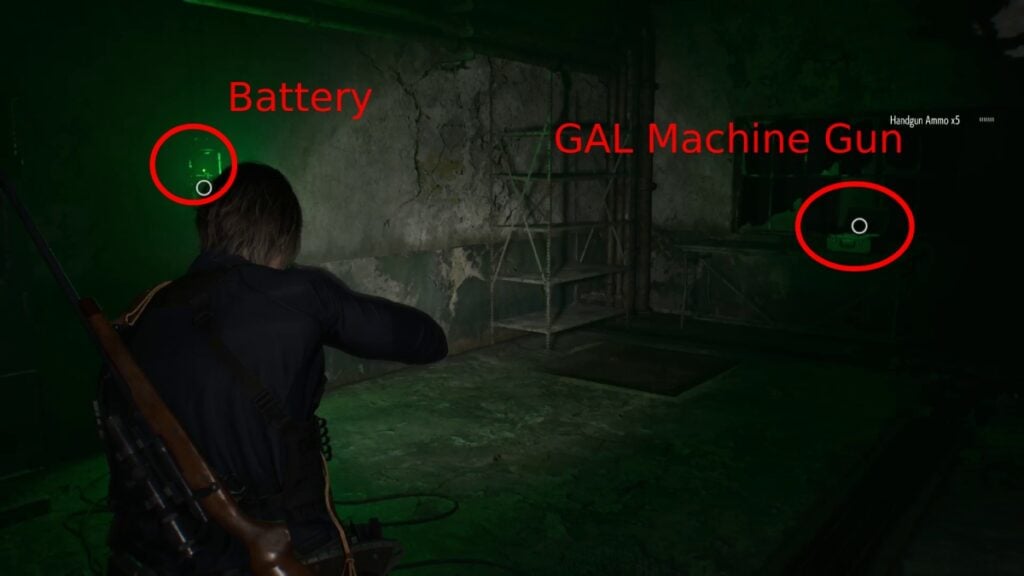
Once inside the office, grab the Gal machine gun and the battery, and then head to where the closed gate is.
Exit through the gate, and you’ll see the gas station. However, before going there, take a left and go through where the piles of bodies are. Trigger the cutscene and enter the container.
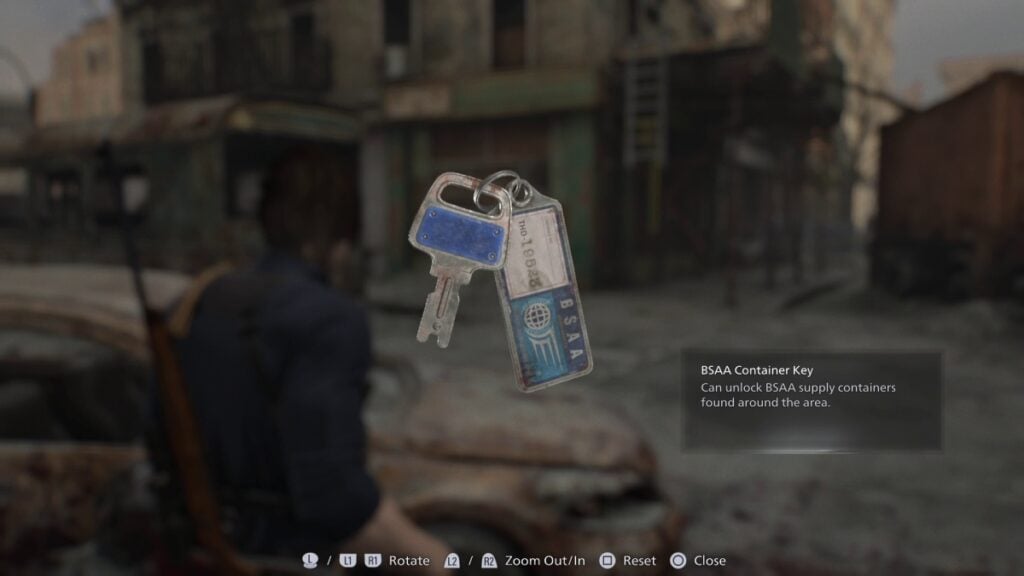
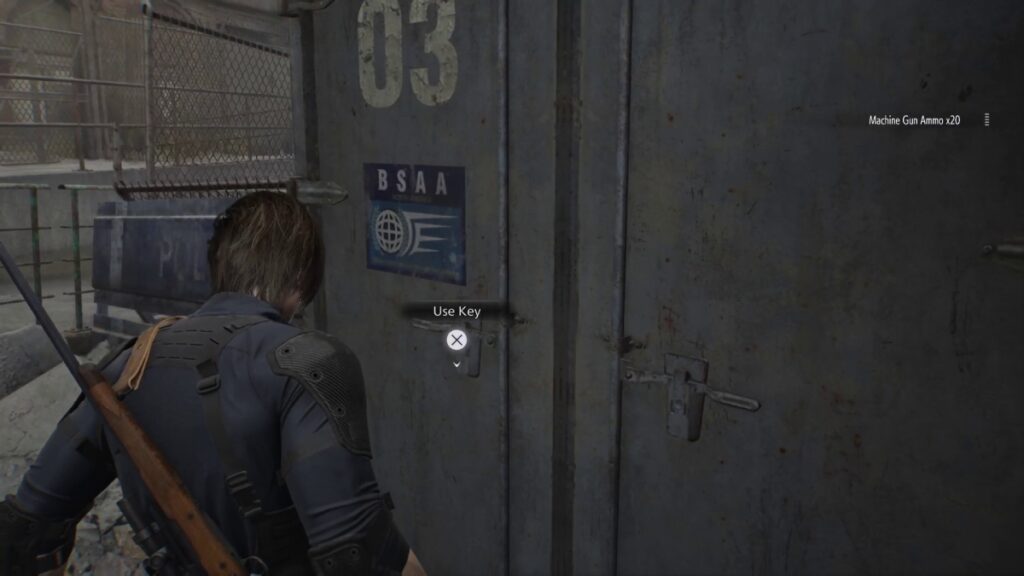
You will obtain the BSAA Container Key, which will open several containers, each one with different rewards.
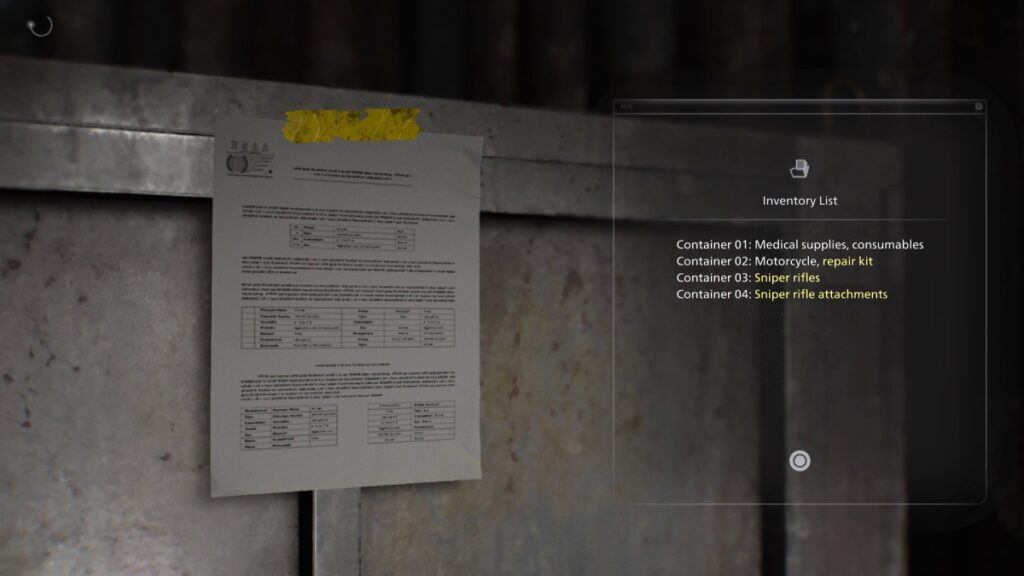
As the note inside the container says, these are the contents of each container:
- Container 1: Medical Supplies, consumables
- Container 2: Motorcycle, repair kit
- Container 3: Sniper Rifles
- Container 4: Sniper rifle attachments
Before heading to the gas station, enter the building on your left, follow the stairs, and open the shortcut leading toward the camp.
You can also open Container #2 now and grab the repair kit. The repair kit is necessary to finish the detonator.
After that’s done, return to the gas station, defeat the zombies at the end of the street, and go around the containers to climb a ladder.
Drop down to where the explosive is, and you’ll find Container #3.
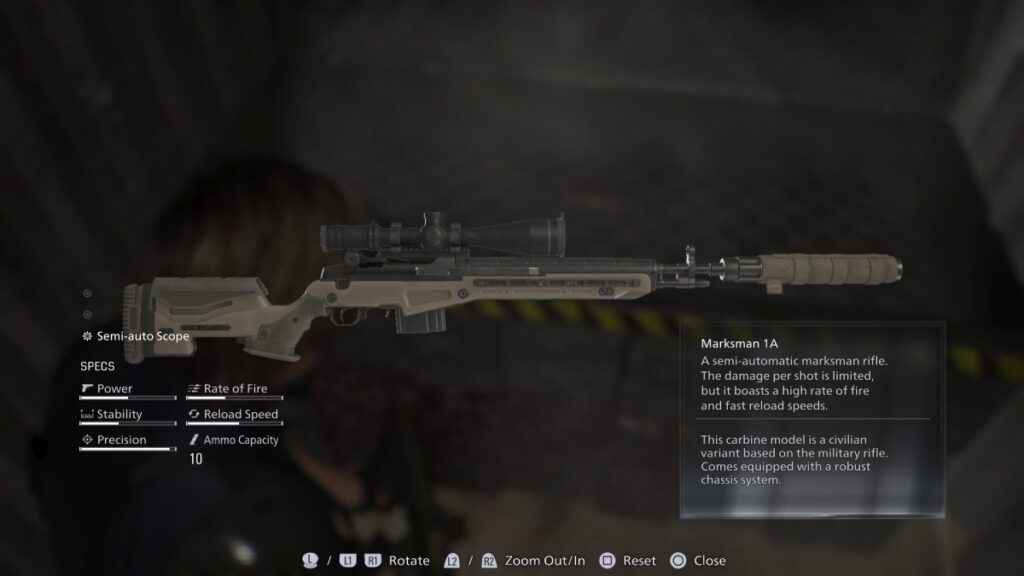
Defeat the zombies, and you’ll find the Marksman 1A rifle. You can either equip this or the one you grabbed at the hospital. We recommend Marksman 1A, as it has a faster fire rate.
Note: If you haven’t, you can shoot down a crane next to the gas station that creates a bridge heading toward the camp.
Return to the gas station and shoot the ladder with the scaffolding. Follow it and drop down into the station.
Defeat the zombies and go around the station to grab the Gas Can. Also, if you didn’t do it, shoot the Mr. Raccoon that’s on the shelves inside the building.
Once you enter the building, defeat the zombie, grab the chainsaw, and prepare for some wild zombie action.
For the final zombie, don’t bother using too many of your bullets, as you’ll have a chainsaw vs chainsaw clash to defeat it. You can also use this weapon to defeat all other infected enemies.
Once you eliminate the zombies, head to the pump at the back and fill up your can.
Head to the generator next to the building, fuel it up, and open the door.
Remember that generator we saw on the rooftop where you grabbed the first component? That’s our next stop. So, take the elevator back to the roof and use the gas can on the generator.
Grab the items inside the box and then use the zipline to descend to the other buildings. Things will get a bit challenging here because there are zombies with, drum roll please, guns.
Note: If you don’t have armor, now’s a good time to get it up to level 2 and then return here.

This part is pretty straightforward, and all you have to do is follow the doors blocked off with the conveniently placed yellow-painted planks.
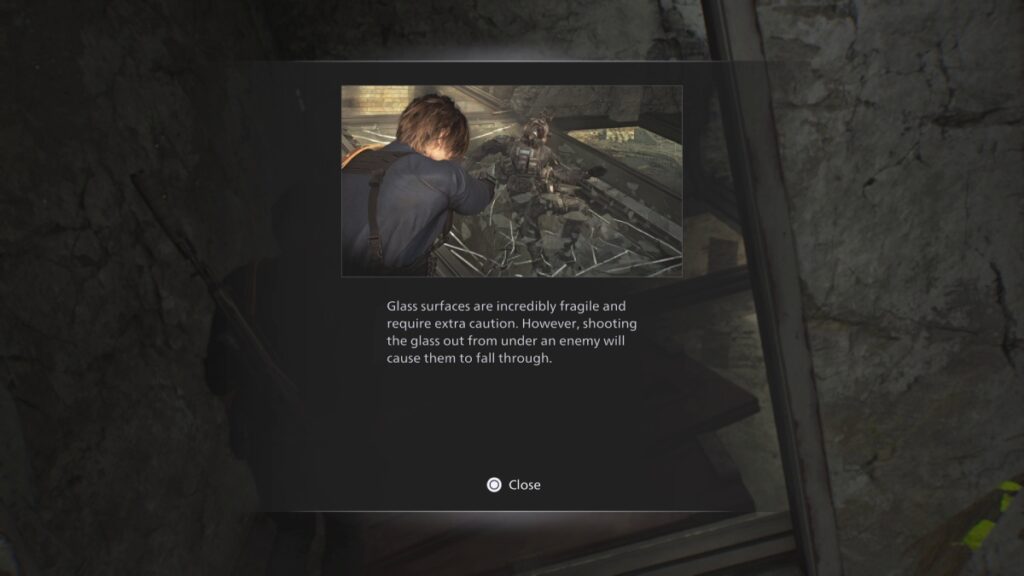
The challenging part will begin once the zombies start dropping on the glass floor, so, as the tutorial says, shoot the glass (shooting twice does the trick) and watch the infected fall down.
Finish this encounter, and cross the broken building until you see another yellow box at the back.
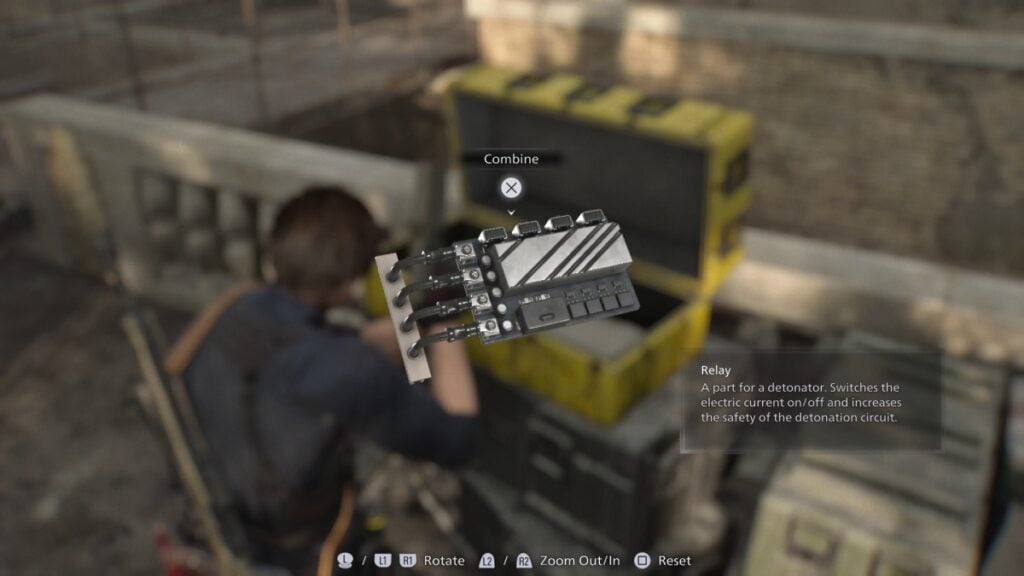
Open it to get the Relay, and then combine it with the other part you previously collected.
Another difficult part is ahead of us, so enter the room to save your progress and craft a few healing items before heading out.
After you finish saving your game and upgrading your weapons, exit the room, cross the bridge, and enter the next room before facing one of the toughest areas of this map.
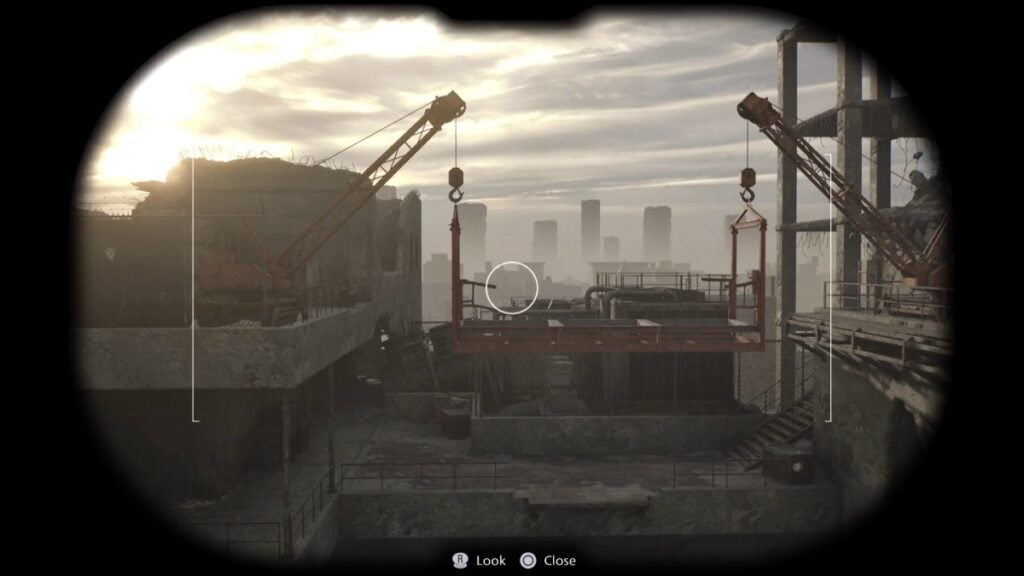
Look through your binoculars, and you’ll see that you need to lower down a platform to make your way to the street level. After locating the platform, follow the path and defeat all zombies.
The real challenge here is the number of enemies that approach you, but activating the lift shouldn’t be an issue.
Once you activate the lift, get on it and prepare for yet another fight, but now with zombies falling from the building and onto the platform.
Once you’re at the bottom, don’t even bother fighting the zombies, as you’ll only waste your bullets. Instead, run to the other end of this floor to exit to the street.
Before heading for the final piece, we recommend going to the last gated area that needs fuel, which is close to the camp.
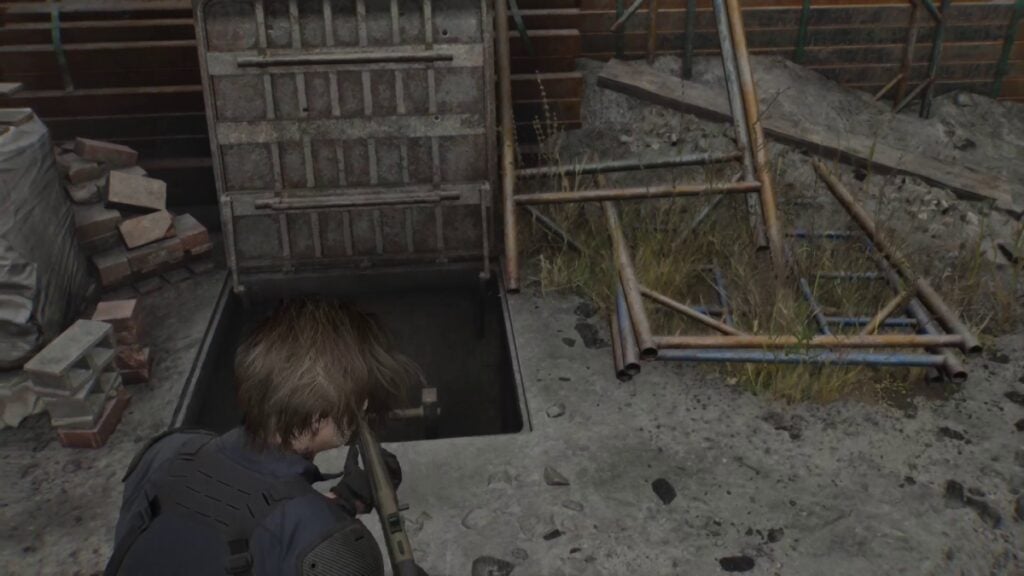
Defeat the zombies and look for the trapdoor that leads to the sewers. Follow the path until you arrive at a train graveyard underground.
This is also a pretty straightforward section, so just follow it, grab all the items, and you’ll eventually reach the first area that you visited.
The reason why we went all the way back here is for Container #4. Open it, and you’ll get a BSAA Emblem Charm, which is great for a scopeless weapon, and a Trading Module (Legendary) (8600).
With all that out of the way, it is time to head to the final location, where the bodies and Container #1 were.
Here, fight the zombies as you follow the stairs and drop to the bottom floor to find the Rusty Crank.
You can now use this crank to progress through this area, but also on the locked door near the Sewage Facility.
Follow the path to grab all the items, and then open the shortcut leading you back to the main street and to the apartments we were just exploring.
Head back to open the locked gate, and the crank will disappear. Climb the stairs, fight a couple more zombies, and prepare for the rooftop mayhem.
We say mayhem because you’ll encounter an area full of zombies with guns, and then three zombies using missile launches. Yes, you read that right.
The trick here is finding cover inside the broken-down buildings until you can reach one of the zombies operating the launchers.
We recommend going to the missile launcher that’s on the far right, as that’s where the final piece is, too.
You can now combine the final piece with the other two and use the repair kit to complete the detonator.
Once that’s done, all that’s left is defeating the other two missile zombies and preparing for one final onslaught.
A bunch of zombies will appear, so just use the missile launcher to get rid of them.
Once that’s done, leave the building, but not without destroying the Mr. Raccon inside the fridge that’s at the end of a corridor.
Point of no return warning!!
Your time at this part of Raccoon City is almost over. Once you detonate the gate and grab the motorcycle, you won’t be able to return, so grab every item you left around and check any marked areas on your map before leaving.
Also, there’s a scripted boss fight coming up, but we won’t spoil it.
Once you defeat the boss, get ready for a punch that packs a lot of nostalgia because you’re back in the Raccoon Police Department.
Raccoon Police Department Chapter (Leon)

And we are now back to where it all began for Leon. While this chapter is pretty short, it has a lot of nostalgic moments and scenes, so take it all in and let the tears flow.
Once you’ve seen everything, head to the East Office, which is where Leon was supposed to have his welcome party.
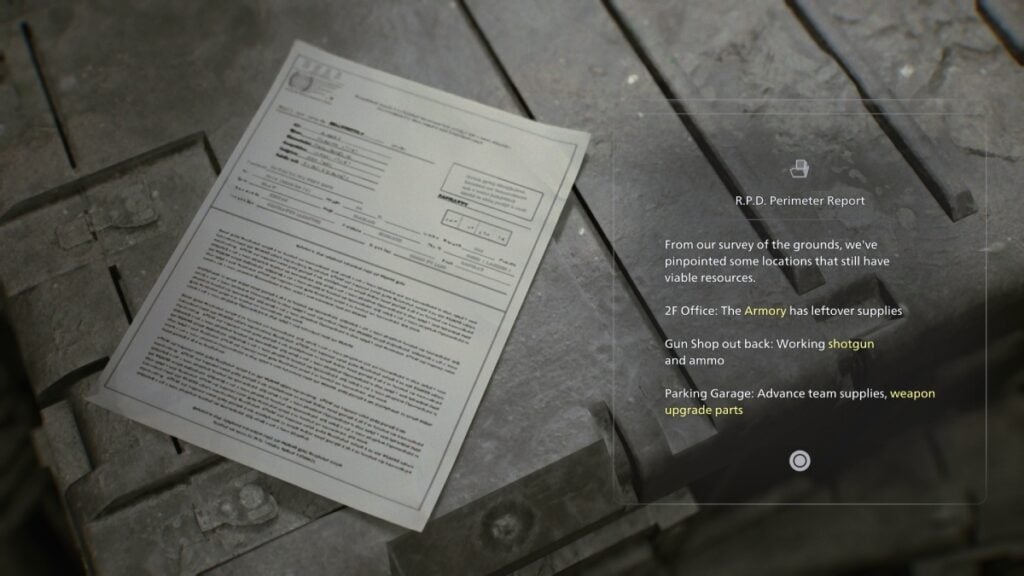
Look at the R.P.D Perimeter Report first, and you’ll see there are a couple of items of interest.
- The armory in 2F.
- The shotgun at the weapon shop.
- And weapon upgrade parts at the parking garage.
Don’t worry, we’ll eventually reach all these spots. For now, enter the office.
You’ll notice how there’s a locked cabinet at the back of the East Office. Remember it because we’ll eventually come back to it.
Exit the office, go past the Safety Deposit Room, and make your way to the Library.
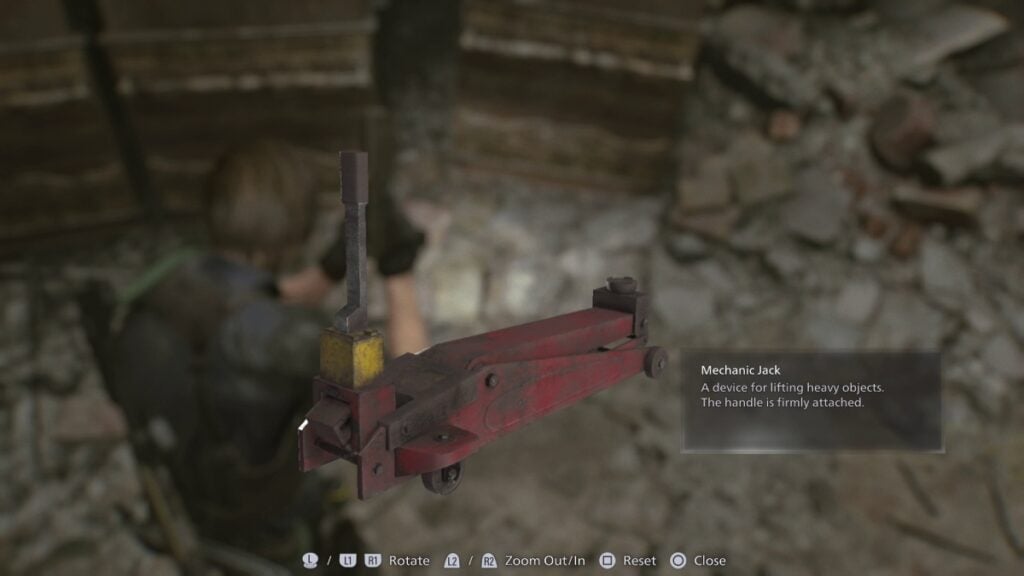
If you played Resident Evil 2 Remake, you’ll remember the Mechanic Jack you used to lift the bookshelves. Grab it this time and take it with you.
Before heading to the west part of the office, which is where that poor officer got cut in half with the shutters back in Resident Evil 2, head to the S.T.A.R.S Office because someone left you, or rather, the previous officers, a puzzle.
Interact with the picture that’s inside the familiar jacket, and you’ll get the first clue, which shows a blackboard inside a room.

Head to the entrance of the office, and open the locker on your left (or on your right if you’re entering the office). Here’s the second clue that shows the corner of a TV.
On your way to solve the puzzle, return to the library and shoot the Mr. Raccoon hiding behind the books in the middle bookshelf.
Then, head toward the room where the climbable stack of pallets was, climb it, and grab the keys from the TV.
You can now return to the locker to find a S.T.A.R.S Emblem Charm, which increases your firepower at the cost of more sway when aiming.
Before triggering the next big part of this section, return to the Library and head to the top left side of it.
Grab the Medicinal Benefits of Herbs book, and you’ll see a familiar picture. Flip it over to see the words “Rising Rookie Rebecca.”
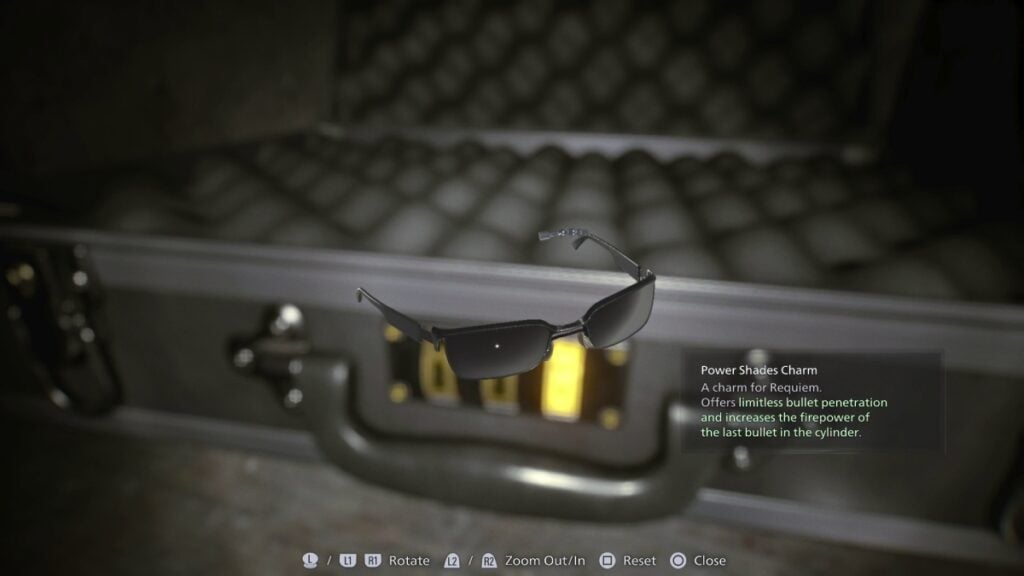
Now, return to the S.T.A.R.S Office and open the briefcase by using the code R-R-R to get the Power Shades Charm, which gives you limitless bullet penetration and increases the firepower of the final bullet in the cylinder.
Once all that’s done, head to the press room and prepare for a quick non-Leon section.
Heavy Spoilers!!
This part is a sequence where you play as a different character and go through Raccoon City’s orphanage.
We won’t spoil much, as there are some heavy lore moments here, but if you get stuck at the part where you need to go through some enemies to enter a room, head back to the stairs and wait for the enemies to leave.
Raccoon Police Department Chapter (Leon Cont.)
Once that sequence is over, prepare to run away from yet another familiar enemy. Again, don’t bother wasting your bullets on it, as all you can do is escape for now.
After surviving this encounter, exit the police department and take a left to find the parking garage. There are a bunch of zombies here. Defeat them and head to where the military camp is to gather a few items and the Silver Finish Scope.
You can also find the Cute Bear Charm in the parking garage, which increases mid-range firepower at the cost of less close-quarter potency. Once that’s done, head to the gun shop.
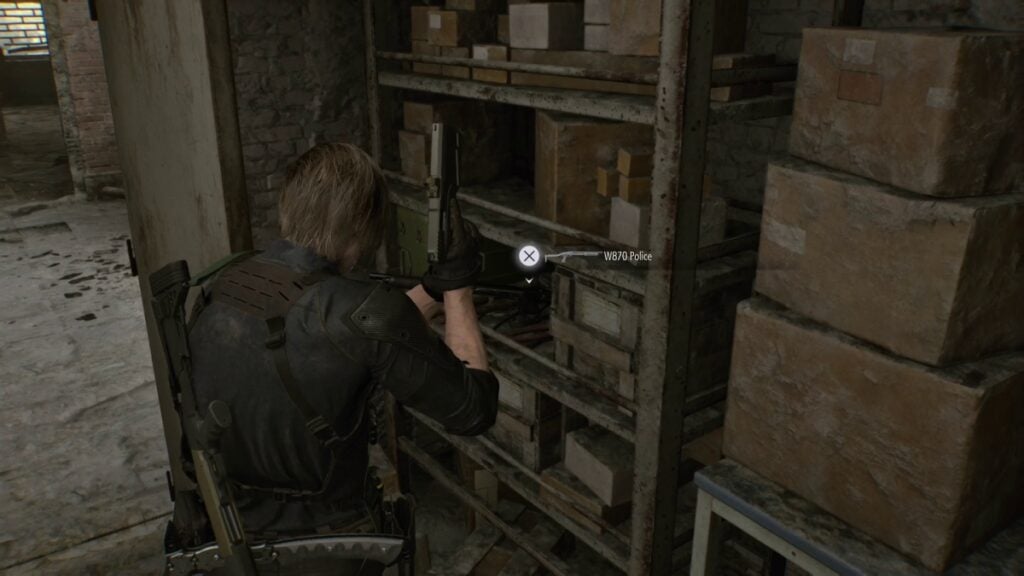
Enter the gun shop and wait for the cutscenes to end, and once you wipe off your tears, grab the W870 Police Shotgun.
Then, keep following the alley and prepare for another boss fight. Without spoiling, this familiar enemy uses similar moves to the ones you already know from a previous game, with the addition of being able to throw cars at you now. To avoid them, get behind vehicles, and wait for the boss to charge at you and parry its attack with your axe. The fight is pretty easy if you parry all hits.
Tips: The boss is extremely easy if you use your rifle to hit its weak spot, which is in its chest. One way to cheese the fight is by staying behind a vehicle at all times. When the boss throws a vehicle at you, you won’t be able to do so correctly and will drop the car in front. Then, just wait for the charge attack to parry it. Once you parry its tackle, use Requiem to finish the fight faster.
After defeating the boss, continue following the path, enter the orphanage, and you’ll reach the crater of Raccoon City.
Go through the broken-down trains, and you’ll eventually see yet another familiar enemy that we won’t spoil.
Destroy the enemies that appear and rappel down to the crater.
This area is also pretty straightforward, with one boss at the end. This fight is also extremely easy. Just shoot the buds that appear, and eventually a bunch of explosive tanks will come out of a container. Shoot them to finish the fight and reach the final area of the game.
ARK Chapter (Leon – Part 1)

And we are now in the endgame. This is the final part of the whole game, and it is quite linear as well as short, and will eventually bring Grace back to the fray.
For now, we continue playing as Leon. Keep following the corridors until you reach a safe room where you can save your game and purchase upgrades.

After exiting the room, look behind the crates, and you’ll see a Mr. Raccoon.
Go downstairs and enter the server room. Enter the room at the back, watch the cutscene, and prepare for some unorthodox encounters, at least compared to what we’ve faced so far.
These enemies use weapons, but are quite weak if you manage to shoot them. The easiest thing you can do is run toward them and use your shotgun. They usually go down with one shot if you have a fully upgraded shotgun.
You can also use the tanks to block their vision and attack them from behind.
After you exit the server room, enter the room on your right and get up on the scaffolding. Defeat the other enemies while staying behind cover. Eventually, you’ll see yet another familiar enemy, but this time it won’t be so scary, so don’t worry about being quiet when walking next to it. These blind enemies go down with one Requiem shot.
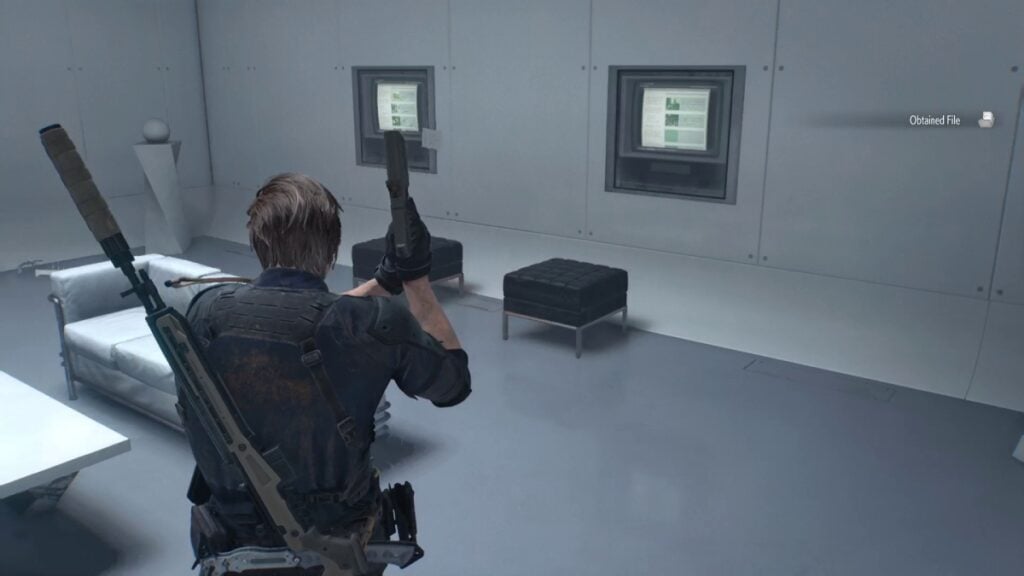
You’ll eventually find a room with several screens, revealing a lot of information about what’s happening inside ARK. Check it all out and head to the corridor.
And here comes another boss fight. This one is a big one in terms of the enemy you’re facing, so we won’t spoil it either. All you need to do to beat it is parry everything and get a few axe hits in.
Tips: Do not use guns against this boss. While you can get a few hits in, it is better to stick with your axe to finish the fight. Usually, a 3-hit combo works before the enemy counters your attack, so just follow the pattern of hitting it three times after parrying and then wait to parry the next attack. Rinse and repeat until the fight is over.
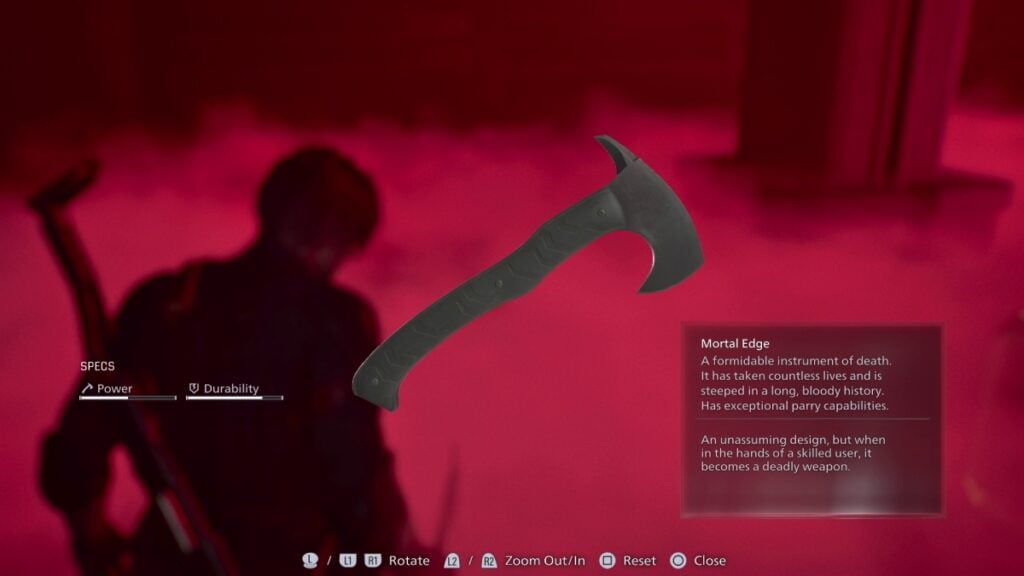
Defeating it will give you the Mortal Edge axe.
Keep going to trigger a cutscene, and once it is over, our two heroes will be reunited, but due to some story reasons, it is time for Grace to explore the ARK.
ARK Chapter (Grace – Part 1)
And it is now time for Grace to explore ARK, which won’t be a walk in the park. Let Leon boost you and then go through the duct until you see a vent cover.
Once you open this cover, there’s no going back to Leon. Fortunately, there isn’t anything important back there, so drop down when ready.
In that room you dropped into, you’ll find a console that needs a key. For now, turn right and follow the path until you reach the safe room. Feel free to save and restock if necessary. Also, Grace won’t have the Requiem this time around, so you need to be more careful when facing some enemies.
Exit the safe room and go all the way back until you find a room to your left. Enter it, and you’ll notice those blind enemies.
Note: The Lickers will hear you if you run or if you step on broken glass. They will also follow you if you shoot your weapon. You can either craft Hemolytic Injectors to take down enemies more quietly or just ignore them and walk away. Enemies here are pretty slow, so you can avoid almost every fight.
Enter the room and make a mental note of the safe at the end of it. We’ll get the code later. For now, take a left and head to where all the bodies inside tubes are. You can unlock a shortcut on your left that takes you to the safe room.
Follow the tubes and go into the corridor with the Licker on the ceiling. You can ignore it, as it won’t attack you unless you run or make noise.
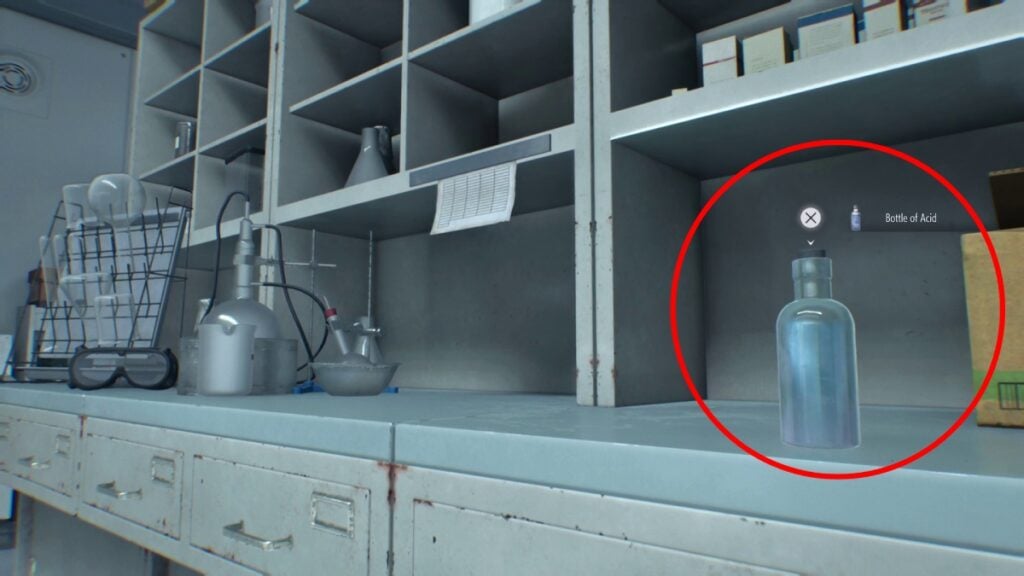
Enter the room and grab the Bottle of Acid, which is highly effective against Lickers, basically killing them with one hit.
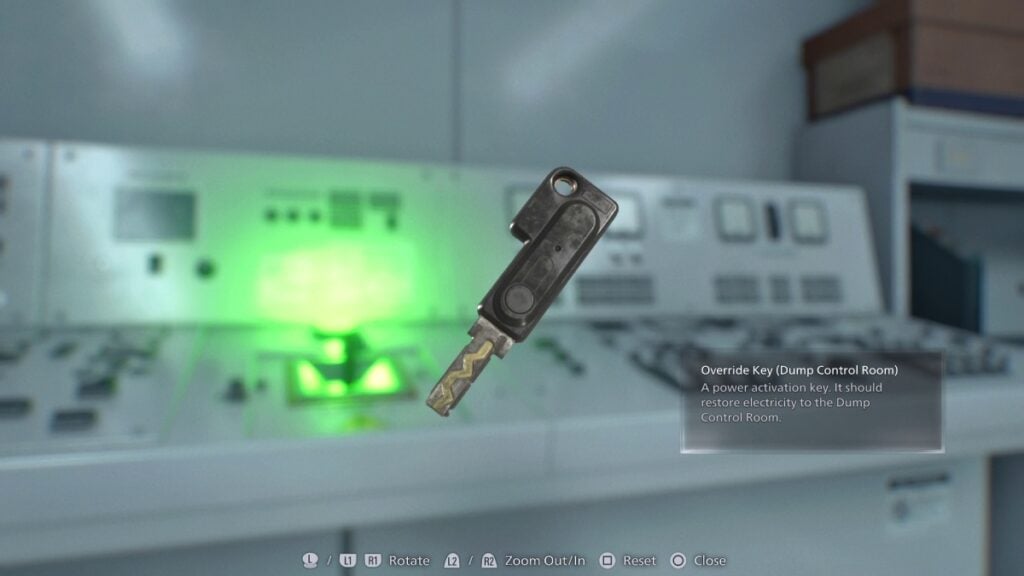
Your objective is at the back of the room, which has the Override Key (Dump Control Room). Grab it, but be careful with the zombie on the right. You can also ignore this zombie and walk away.
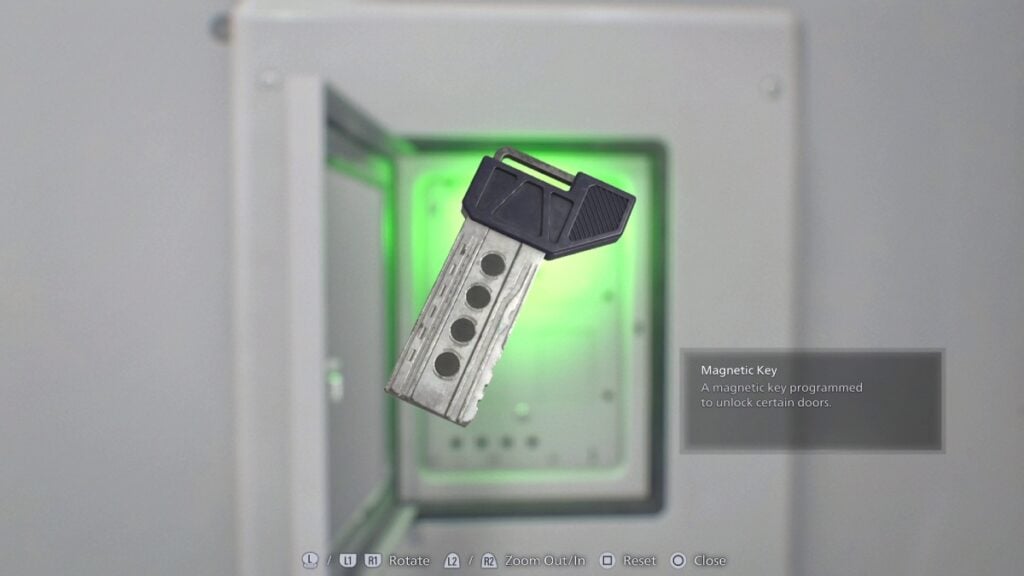
You can now return to the Dump Control Room; just be careful with the enemies that spawned. Move the crane and then grab the Magnetic Key from behind you. Your next stop is the Lobby.
You’ll encounter a locked door that requires two orbs, so off we go to find them.
Before exploring further, look at the room on the left inside the Lobby. You will find a locked safe, but most importantly, new crafting recipes for the Bottle of Acid.
Now, before heading deeper into the Lobby, we recommend going to the Bioweapon Repository 02 area, as you now have the means to counter all enemies there.
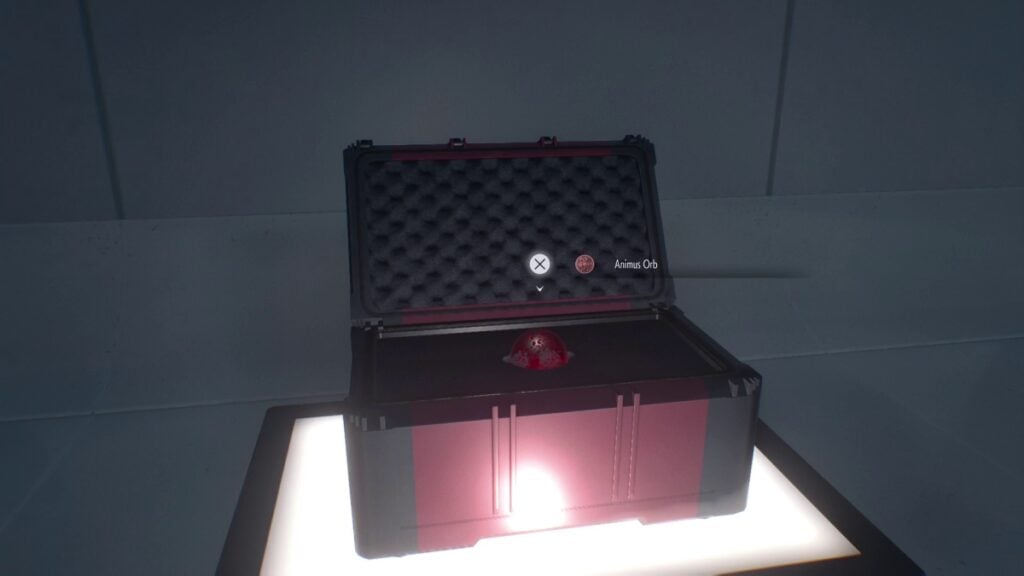
Enter the Cleanroom at the end, and open the red container to obtain the Animus Orb (Red).
Return to the lobby to place the orb, and you can now explore beyond the lobby.
This part is tricky, as it is a maze full of Lickers and other zombies. There are several containers you can open that have items inside, but a few of them also have infected enemies.
Tip: The best way to clear the area is by bringing empty bottles to lure two Lickers at a time to one spot and use a Bottle of Acid on them. The two will die with one hit, and you can then lure the zombies to another room before shooting them.

Before entering the maze, enter the open container to grab the Sterilization Room Safe Code, which we’ll use later.
After that, head into the maze and use the above tips to clear the area. Also, make sure to open every container.
The first one has an inventory upgrade, which should fully upgrade Grace’s inventory.
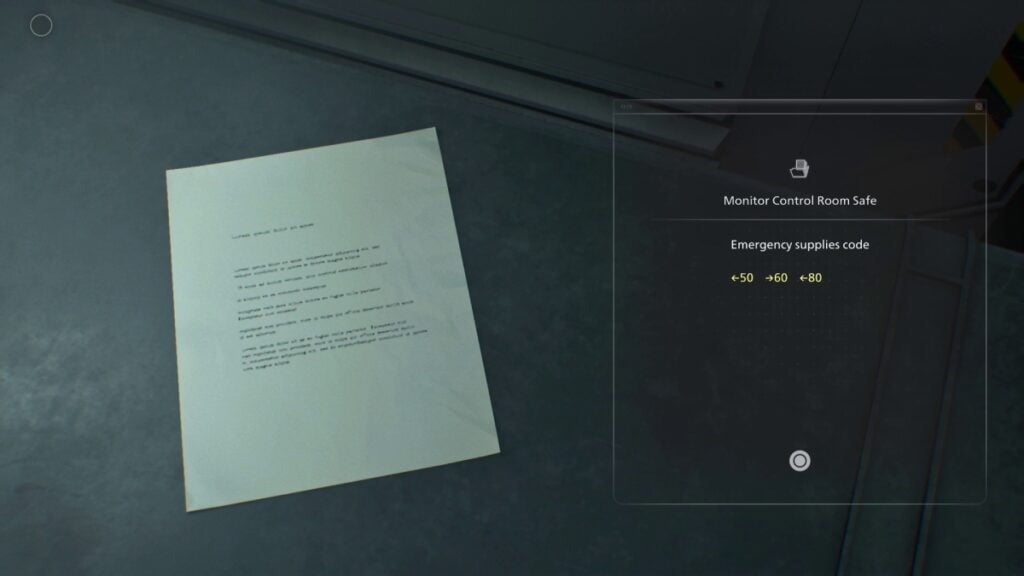
The other container of interest is right before the stairs, at the far right, at the end of that corridor guarded by two Lickers. This one has the Monitoring Room Safe Code, which we’ll use in a bit.
Keep following the containers until you reach the stairs.
Note: Breaking boxes will also alert the Lickers, so don’t do that until they are all taken care of.
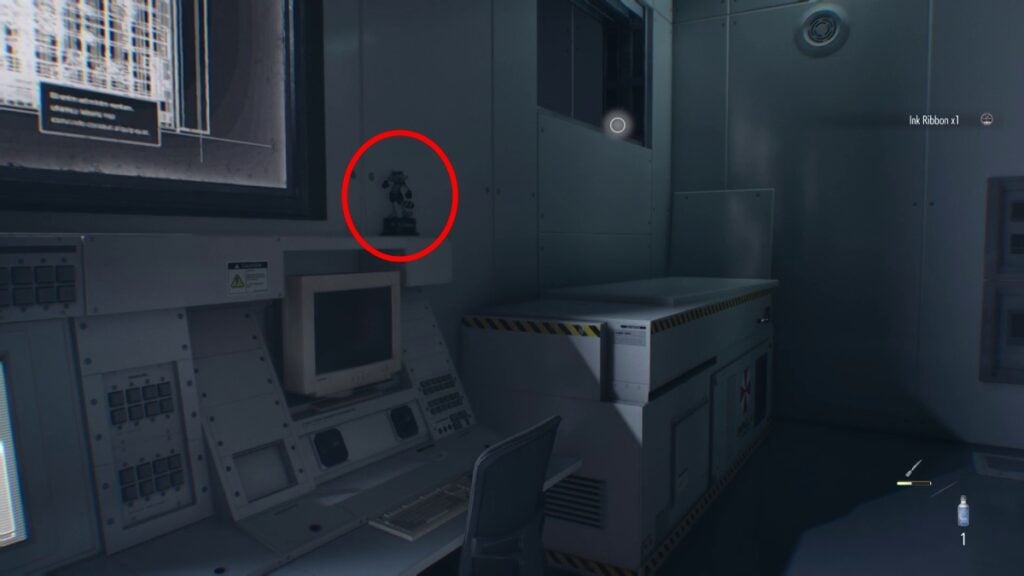
Enter the office, save your game, and shoot the Mr. Raccoon next to the screens.
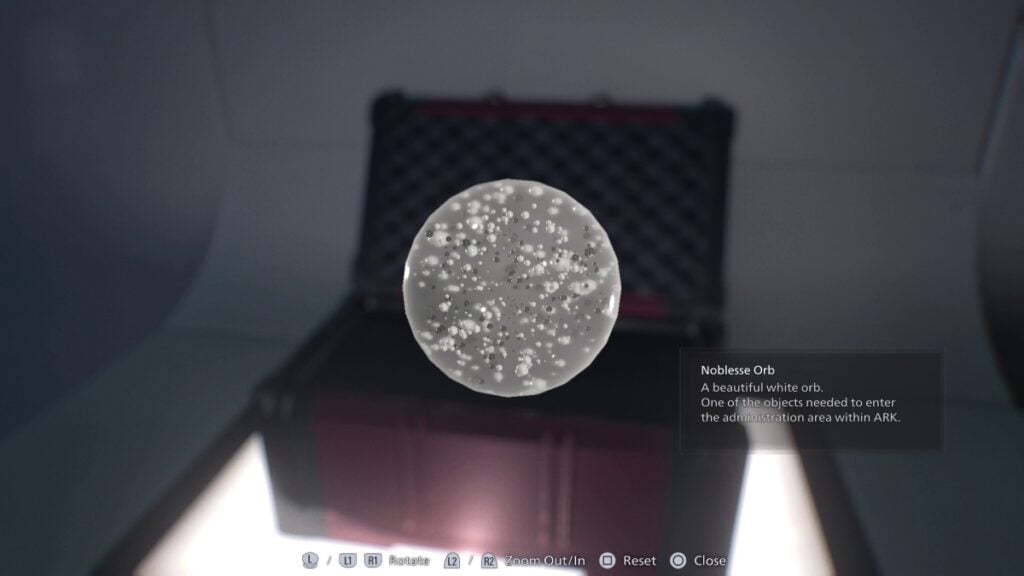
You can also grab the Noblesse Orb (White) from the back of the room.
Once you do that, jump through the gap in the room and follow the scaffolding until you find a room where two Lickers will appear. Hug the wall on the right until the Licker moves away, letting you pass. Alternatively, you can use acid to take both of them down.
With the two orbs in your possession, it is time to return to the Lobby. You can use the Monitoring Room Safe Code here, which is:
- ←50, →60, ←80

You’ll obtain a Bottle of Acid, an Empty Bottle, and a Medical Injector.
And last but not least, head to the Sterilization Room and use the following code:
- →10, ←90, →20
You will get some handgun ammo, a Molotov, and a Medical Injector.
With all that done, go back to the Lobby, use both orbs, and prepare for one big revealing cutscene. After that, we go back to our hero.
ARK Chapter (Leon – Part 2)
This next part will be short, albeit a bit difficult, especially since Leon won’t be in top condition as always. However, the good news is that there aren’t any complicated puzzles or something of the sort, so it’s all about shooting everything you see until you reach the end.
There is just one minor puzzle in the area with all the containers, but all you need to do is find the consoles with the red buttons and activate them to open the door.
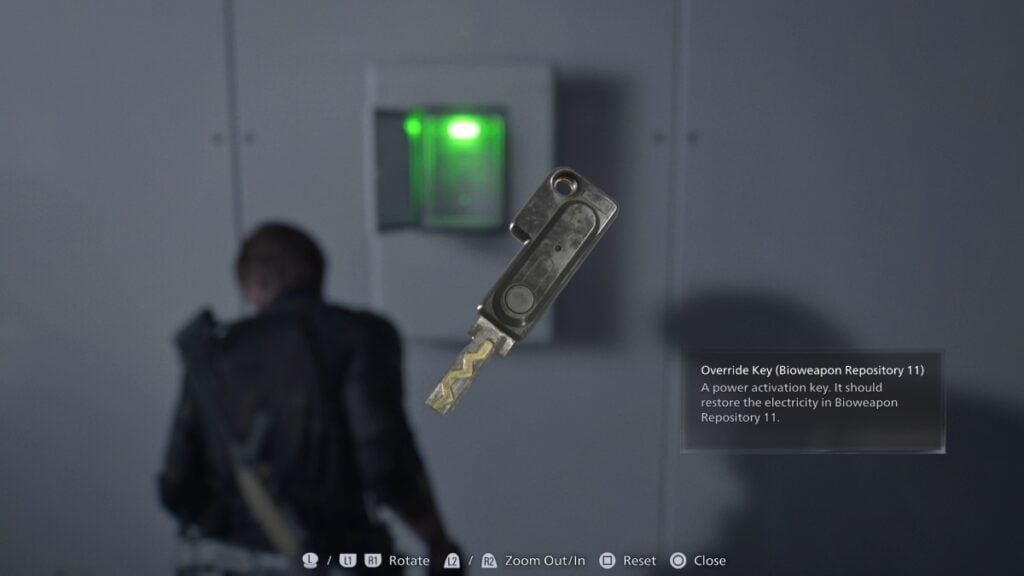
After going through the container maze, head to the stairs to grab the Override Key (Bioweapon Repository 11).
You’ll then have to survive against a few waves of enemies while you wait for the elevator, but all enemies are quite easy, especially if you saved some ammo. We got them all just by using our maxed-out rifle and staying in the corner.
Once the onslaught is over, enter the elevator and prepare for the grand finale.
Ending (Possible Spoilers Ahead)
While we’re trying to keep this walkthrough as spoiler-free as possible, you should know that there are two endings, but only one is canon.
Basically, you will get the option to either Destroy or Release Elpis, which, at this point, you already know what it is. For the bad ending, select Destroy. This will trigger a cutscene, and once it ends, it will give you the option to reload your save to pick the other option.
For the good and canon ending, select Release Elpis, and once you do, it is time for the final boss fight.
As usual, we won’t spoil or show the final fight, but we’ll give you a couple of tips to beat it quickly, as this one can be pretty challenging.
Tips: The first phase is easy, and you should focus on parrying all attacks while using your shotgun or Requiem to wear the boss down. When you see the ground getting full of sparks, this is your cue to run away, as the electricity will damage you and knock you back.
The second phase can be cheesed a bit by parrying the gigantic attacks because, well, that’s how parrying logic works. The big difference here is the bulbs that will appear on the boss. Shoot them with any gun; even your handgun works here. After you get all of them, a bunch of bulbs will appear on the ground; one grenade can take them all out. Repeat this at least three times, and you’ll beat the boss.
And believe it or not, you’ve reached the end of Resident Evil Requiem, and of this walkthrough. Now, all that’s left is checking what you unlocked and, if you dare, try the game on the new difficulty mode, which is pretty fun, assuming you don’t mind reliving the nightmare, but with more challenging parts.

As always, remember to check our individual guides in case you want to go straight to codes, solutions, or post-game unlocks.


")