

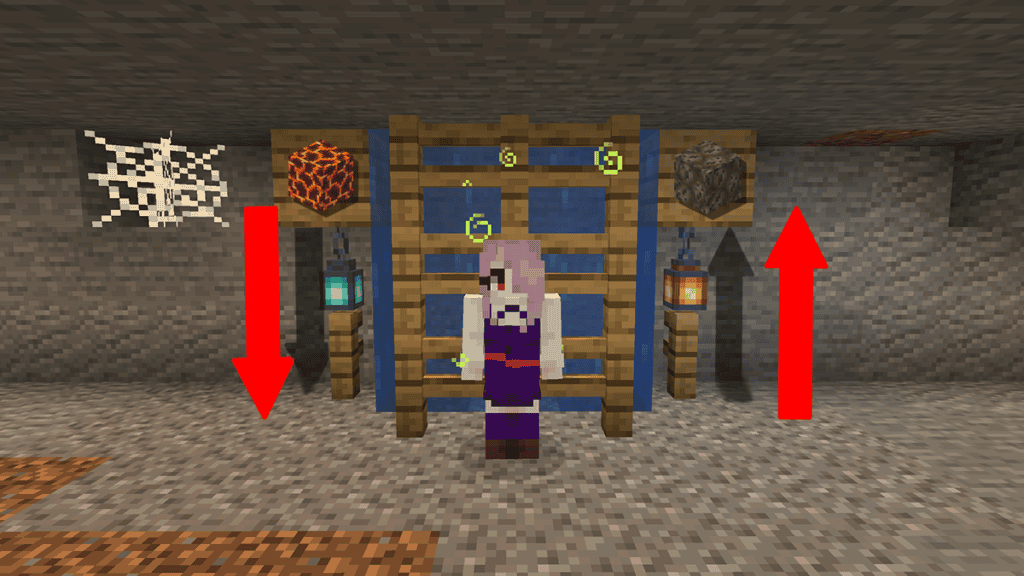
Whether you’re ascending an End City tower, constructing a lofty observatory, or digging in a straight line downward, verticality is a major aspect of Minecraft. Navigating your way up and down is possible with Ladders, Staircases, or simply stacking random or natural blocks in a stairway-like manner. Once you get the endgame Elytra and craft a ton of Fireworks, getting around the world’s verticality becomes much easier. Until then, though, water-powered elevators will be actually a pretty fast and efficient means of vertical transportation in Minecraft.
[Updated on April 17 – The content was revised to be more detailed, and the imagery was replaced.]
How To Easily Build a Water Elevator in Minecraft

To construct a working elevator using vertical water currents in Minecraft, you’ll need the following:
| Blocks/Resources | Description |
|---|---|
| Water Bucket | The Water Bucket will be used to create the column-shaped “lift” you’ll use to go either up or down. |
| Kelp | When planted along the column of your water elevator, the Kelp will turn each water block into a “source block,” which is necessary for the left to function. |
| Fences | Fences can actually be replaced with any block, but I found them to be an ideal building block because you can easily move between them if they’re placed diagonally adjacent. |
| Soulsand | The Soulsand is used to propel your character upward when in the water. |
| Magma Block | The Magma Block will pull you downward to the bottom of your elevator. |

For reference’s sake, I’ll briefly go over where you can get the natural resources required for your Minecraft elevator:
| Resources | Description |
|---|---|
| Kelp | Kelp is a plentiful resource in all Ocean Biomes except the Frozen or Warm variants; I recommend grabbing a couple dozen, depending on how many blocks tall your elevator will be. |
| Soulsand | Soulsand can only be found in The Nether, but don’t get it confused with Soul Soil, which is the same color but doesn’t have spooky faces in its texture. |
| Magma Block | Magma Blocks are also a common sight in The Nether. However, you can also come across these blocks in Oceans near underwater ruins or ruined portals. Either way, you’ll eventually find this block while searching for Soulsand and Kelp. |

Now that you’ve all the materials you need, it’s time to get started on constructing your easy Minecraft elevator:
- Dig out one block in the center of a 3×3 square, and then place your Fences around it. Make sure there’s space diagonally where you can slip through.
- After you’ve reached a satisfactory height with your lift, place a block at the top, after which you’ll use your Water Bucket underneath it to create the water column. Don’t use Sand or Gravel, as those’ll react to gravity. I recommend using Scaffolding to easily reach the top of the elevator.
- Go back down to ground level and enter the pillar of water, planting Kelp at the bottom and as you go up.
- Return back to the bottom for the last time, break the block holding the Kelp, and replace it with a Soulsand block (or a Magma Block, if you want to descend from above).
Within just a few minutes of building, you should now be able to ascend or descend with your Minecraft elevator.

As I said above, the Fences can be replaced with any block of your choice, even naturally generated blocks like Stone or Dirt. For instance, by digging straight down, I found an underground mineshaft to explore that I wanted to return to easily from the surface. Using a Water Bucket at the hole’s opening topside, I could descend to the tunnel below. Next, I used Fences at the bottom of the elevator to keep the water column in a single-block vertical line.

I did the process of “source block replacement via Kelp” described above and placed Soulsand at the bottom to finish the lift. I repeated the steps with another hole next to it, but this time, I used a Magma Block to easily go down. Of course, you can simply use a puddle of water to cushion your fall instead of a “descending elevator,” but to each their own.