Close Menu
  • Gaming
    • Platforms
      • Nintendo
      • PC
      • PlayStation
      • Xbox
  • Entertainment
    • Movies
    • TV
    • Royals
  • Celebrity
    • Hollywood
  • Human Interest
  • Astrology
  • More
    • Reviews
Facebook X (Twitter) Instagram LinkedIn YouTube
  • About Us
  • Join Our Team
  • Meet the Team
  • Privacy Policy
  • DMCA Policy
  • Contact Us
  • Terms of Use
  • Sitemap
  • Editorial Guidelines
  • Advertising Policy
The Nerd Stash
  • Gaming
  • Celebrity
  • Hollywood
  • Human Interest
The Nerd Stash
Home»Gaming»How To Complete Lost and Found in Gray Zone Warfare

How To Complete Lost and Found in Gray Zone Warfare

A war’s memento.

Julio La PineBy Julio La PineMay 1, 20242 Mins Read
Lost and Found Task
Image Source: Madfinger Games via The Nerd Stash
This article is over 2 years old and may contain outdated information.

One of the many tasks Lab Rat will give you in Gray Zone Warfare is Lost and Found. After running around whichever your starting area is for medicine, you’ll now have to seek a missing person in this chaotic warzone. Thankfully, if you’ve been doing all tasks in order, you won’t have to take a big detour. As long as you know where the Lumberyard and Water Tower are, you’ll be on your way to finding this civilian.

Gray Zone Warfare: Lost and Found Walkthrough

Lost and Found Medallion Location
Image Source: Madfinger Games via The Nerd Stash

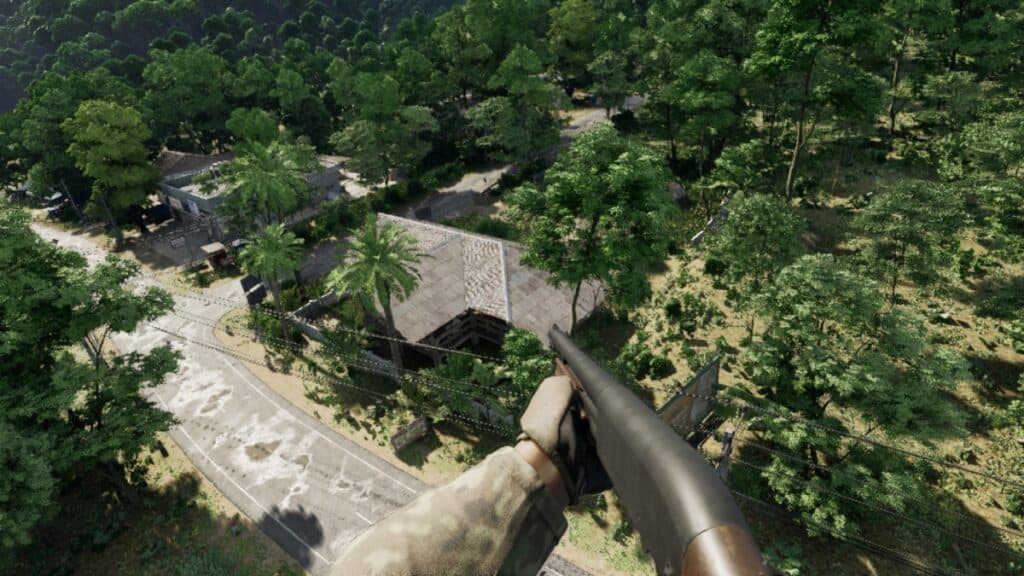
After accepting the Lost and Found task in Gray Zone Warfare, you must head to the construction site near the Water Tower. If you’re doing Gunny’s first task, you’ll reach this location eventually. To find the construction site, you can use the above image as a reference. Remember that this zone is heavily guarded, so we recommend defeating the enemies around the Water Tower and Lumberyard first. Once you do that, head to the construction site and enter the building.

Kanoa Medallion Location
Image Source: Madfinger Games via BenSticks YouTube

You’ll find Kanoa inside the clerk’s office, which is in the middle of the building. While you won’t be able to save this clerk, you can bring proof of identity back to your camp. The second part of this quest won’t appear immediately, which might make some players miss the objective. To avoid this, after you locate Kanoa, stay there and look at the medallion next to his head. Grab it, and you’ll complete the objective.

Related:

Best Settings for Gray Zone Warfare

Like other tasks, all you have to do now is return to your base camp and hand it in. You’ll receive a SurKit, $2,700, 400 experience, and 100 reputation with Lab Rat. One thing to keep in mind when doing Lost and Found in Gray Zone Warfare is that we did this objective as part of the Lamang faction. However, other factions have a similar spawn point and locations for this quest, meaning you can use the images we included as a guide as well.
Related Topics
Gray Zone Warfare Guide
Share. Facebook Twitter LinkedIn Reddit Email
Julio La Pine
  • Website

News/Guide Writer for The Nerd Stash. When not working, you'll find him playing Final Fantasy 14, any good JRPG, and modding Project Zomboid.

SUGGESTED READS

Gears of War E-Day All Act 5 Collectibles
Gaming

All Act 5 Collectibles in Gears of War: E-Day

9
Gaming

Star Wars: Galactic Racer Review – Takedowns Are a Path to The Dark Side

Gears of War E-Day Act 4 All Collectibles
Gaming

All Act 4 Collectibles in Gears of War: E-Day

Gears of War E-Day All Collectibles
Gaming

All Collectibles in Gears of War: E-Day and Where to Find Them

March of Giants MOBA
Gaming

March of Giants Is What the MOBA Genre Needs Right Now

Gears of War E-Day All Act 3 Collectibles
Gaming

All Act 3 Collectibles in Gears of War: E-Day

The Nerd Stash
Facebook X (Twitter) Instagram YouTube LinkedIn
  • About Us
  • Join Our Team
  • Meet the Team
  • Privacy Policy
  • DMCA Policy
  • Contact Us
  • Terms of Use
  • Sitemap
  • Editorial Guidelines
  • Advertising Policy
© 2026 The Nerd Stash. All Rights Reserved.

Type above and press Enter to search. Press Esc to cancel.