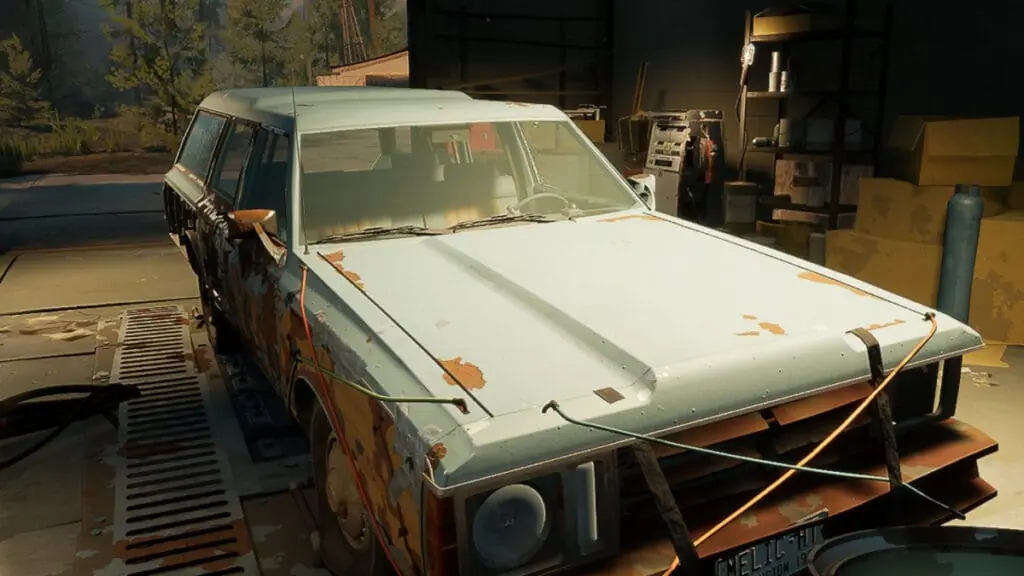
Before you even try to hit the dangerous roads of Pacific Drive, you should know that this game has many in-depth mechanics that might be confusing. This entry has some of the most original survival mechanics that instead of pitting you against supernatural enemies, it puts you behind the wheel to brave the wilderness of a zone full of anomalies. With that in mind, you’ll need to plan each trip carefully. So, if you’re a bit afraid of stepping on the pedal, we have a few tips to make those first miles easier.
Pacific Drive Starter Guide: Your First Hours in the Olympic Exclusion Zone
If you didn’t know, Pacific Drive is a survival game with a new take on the genre. Instead of relying on base-building and hunger and thirst mechanics, you still need to care for your vehicle. This trusty station wagon is a mobile base and the only protection you’ll have while exploring. Furthermore, you also have a HQ in the form of a garage you need to equip with facilities to make your trips easier. Since this sounds a bit bloated, having a starter guide for your first hours in Pacific Drive will make the ride smoother.
Understanding the HUD
Initially, the game’s HUD might seem cluttered, but it’s easy to grasp after a few minutes. You should know that regarding the HUD, the one you have on foot works differently than the one inside your car. We’ll start with the former.
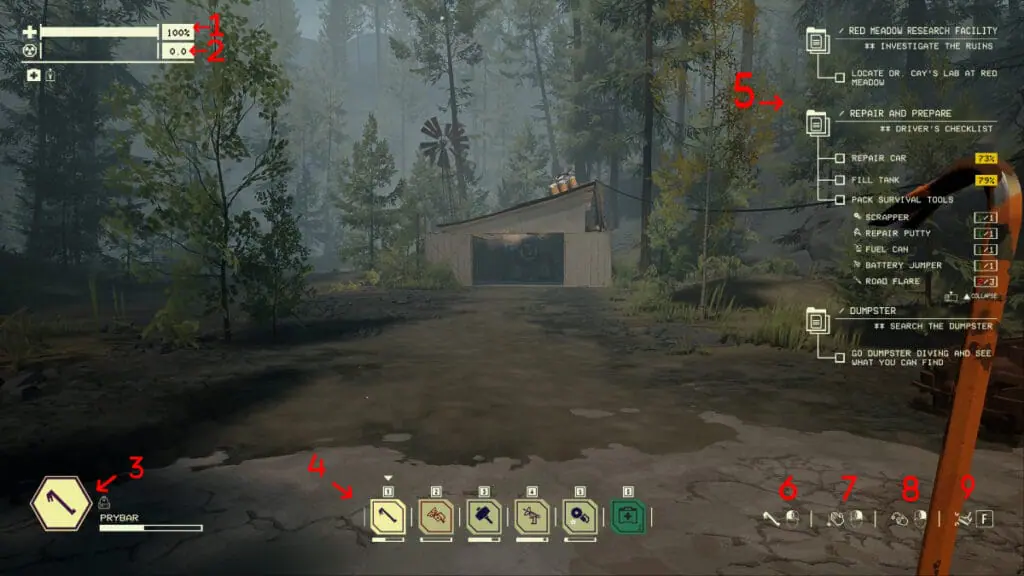
- Health Bar: Indicates your current HP.
- Radiation Levels: Shows the radiation levels in the vicinity. The higher they are, the faster you’ll lose HP over time.
- Currently equipped item: This icon shows your equipped item and its durability.
- Action Bar: Shortcuts to equipped items.
- Objective’s List: Shows your current objectives.
- Primary Action: Shows the item’s primary action.
- Drop Button: Indicates an item can be dropped.
- Throw Button: Allows you to throw an item. Hold the button to increase your throwing distance.
- Kick Button: Press to kick objects in front of you. Certain objects in the world can be destroyed with a kick.
Vehicle’s HUD
While the normal HUD is easy to understand, the one you’ll see in your vehicle is a bit different and more immersive. You’ll need to behave as if you were in a real vehicle to turn around and select several things from the dashboard or other gizmos you’ve installed.
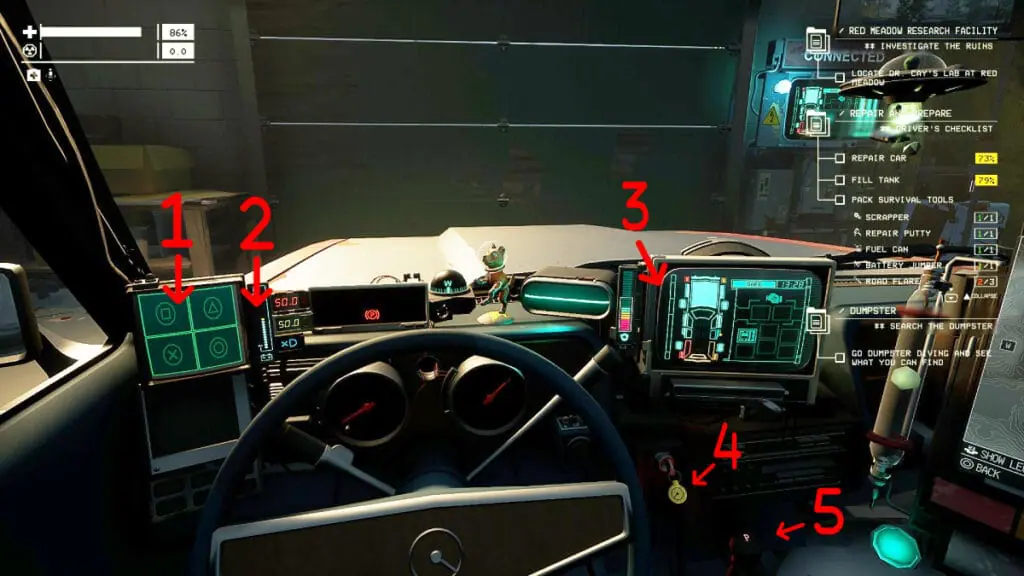
- Car Abilities: You can activate them by pressing the corresponding buttons.
- Car Battery: This shows the car’s current battery percentage.
- Car Protection: Indicates the car’s health. You can upgrade it by installing new parts.
- Ignition Key: Press and hold E to start the car. Press E once to turn it off.
- Transmission Stick: It has two functions: park and drive. The former stops the car; the latter allows it to move.
Important note: You can also select the headlights and wiper sticks manually, but it is faster to remember the hotkeys. Press Z to use headlights and press C to activate the wipers.
Vehicle’s Map
We thought it’d be a good idea to add a small section for the car’s map in this starter guide for Pacific Drive. Contrary to other titles, you don’t have to press a button to open a map. You only need to turn the camera to your right to see it. This is great and immersive, but remember, this is the only way to see the map. If you want to look at it while on foot, you must return to your vehicle.
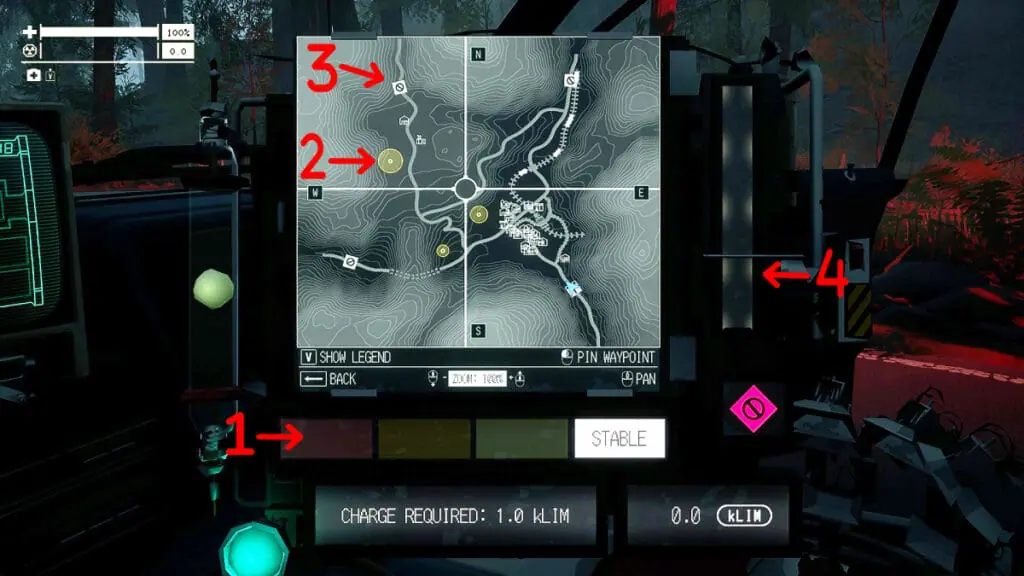
- Zone’s Stability: It indicates how stable (dangerous) a zone is. The higher the level, the more dangerous it is.
- Anchor Location: The location of an Anchor. You must gather the required amount of them to leave the area.
- Road Access: It shows the access to new roads. If unlocked, it’ll appear orange; when locked, it’ll appear white.
- Energy Level: It indicates the ARC’s energy levels. You must gather anchors to charge it and escape the area.
Preparing for a Road Trip
After a short tutorial, you’ll see the gameplay loop in Pacific Drive, which is easy enough to guide you to the first hours. You should understand that the game is all about preparing your vehicle with parts and tools and choosing a route to explore to gather materials and return to your garage to upgrade your car. With that in mind, let’s discuss the first step before hitting the road: preparing your car.
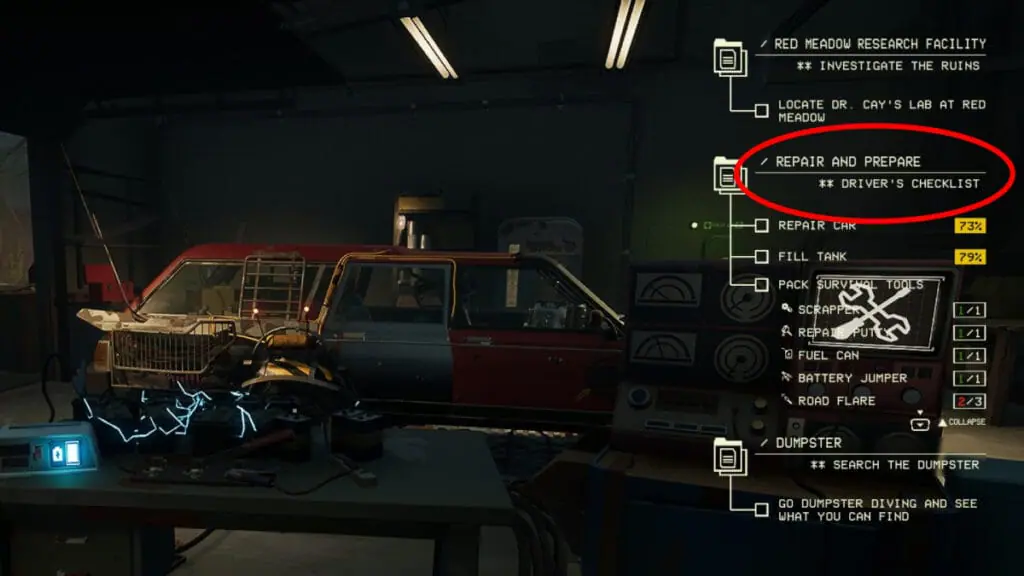
The first thing you should always do before and after a road trip is check your Driver’s Checklist. You can access it by heading to the panel in front of your vehicle inside the garage and pressing E to enable it. This list always indicates the recommended things you should do before hitting the road and includes the following:
- Repair Car: It shows the current HP percentage of your vehicle.
- Fill Tanks: This indicates the current percentage of fuel in your car.
- Pack Survival Tools: This shows the recommended tools you should pack before hitting the road.
- Dumpster: This is an optional step but a highly recommended one. Always check the dumpster outside of the garage for free materials or parts.
The list will get shorter once you start doing any of the recommended steps. This is a great set of objectives to tackle between runs because it shows how well-prepared your car is for the ride ahead.
Choosing a Junction
Destinations, or as the game calls them, Junctions, are the places you’ll scavenge every time. These places change constantly due to the roguelike and procedural nature of the game. Each time you enter a new zone, its conditions, enemies, loot, and layout will change. To pick one, you must head to the garage’s map and select a route.
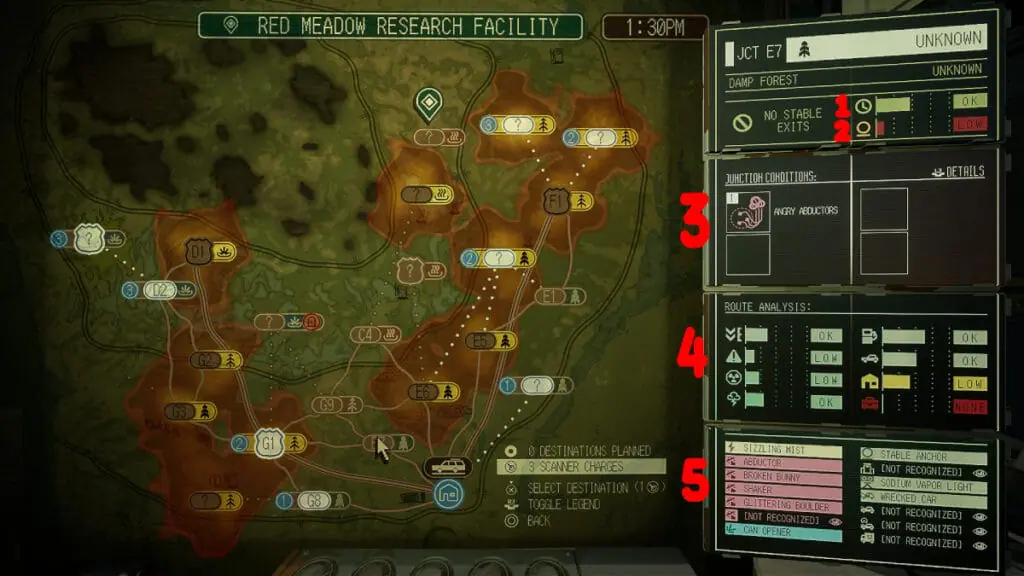
Route Map
- Zone Stability: This shows how stable a zone is. The more unstable, the more dangerous and full of anomalies.
- Anchor Amount: This indicates how many anchors you may find when exploring.
- Junction Conditions: This shows the variants of a route. You must face these anomalies or conditions first before they register on the map.
- Route Analysis: This shows the loot and conditions you might face. From top to bottom and left to right, we have the following:
- Atmospheric Shifts: How easily the atmosphere and weather can change.
- Anomaly Density: This indicates how many anomalies (enemies) you may find.
- Radiation Levels: It shows how much radiation you’ll encounter in the zone.
- Zone Storm: How fast the storm will close into your position.
- Fuel Density: It shows how many gas stations or containers you might find with fuel.
- Vehicle Density: It indicates how many scrap vehicles you can find to salvage.
- Building Density: This shows how many buildings you can find in the area.
- Material Density: This one indicates how many materials you can find outside of buildings.
- Zoner Overview: Finally, this menu shows the things you’ll encounter. The ones that appear there are because they have been scanned. If you want to get a safer route, scan anomalies and objects and return to the garage to uncover them in the overview.
After you choose your route, hold your left mouse button to scan it and uncover the above things. This will allow you to see what a destination has to prepare before hitting the road. Also, if you want to unlock further routes, we have a guide to help you with that.
Exploring a Junction
Once you’re inside a new zone, the loop is almost always the same: loot buildings, evade anomalies, gather anchors, and open the portal. Since every Junction is different, there isn’t a guide on how to explore zones in Pacific Drive; nevertheless, we have a few tips to make each journey easier.
- Mark Anchors first: As soon as you enter a new area, head for the Anchors to fill your ARC device. This will allow you to loot the area more peacefully, and if the storm closes in, you can activate the portal and drive to it.
- Carry all tools with you: When you leave your car, always carry a Prybar, an Impact Hammer, an Electrician’s Kit, and a Scrapper. These tools will allow you to enter every building and scrap objects for materials. If you have enough inventory space, bring two of each.
- Stick to roads: The safest way to explore a map is by following roads until you get better tires. It is paramount to keep your car safe, and for that, it is better to leave it parked on the road and run on foot to the building you want to loot.
- Plan your exit: When you open a portal, it’ll always open one that is far away from you. Try to position yourself on the map in such a way that you have a straight shot of the portal.
Returning to the Garage
Once you reach the garage, you must unload your car’s trunk and inventory and start crafting. We have a guide on which upgrades you should unlock first, so be sure to read it to keep your garage stocked and with the right facilities. After that, you’re free to repeat the loop again in a more difficult Junction.
Pacific Drive F.A.Q
Before we finish this starter guide for Pacific Drive, we thought it’d be great to answer some of your burning questions.
Does Pacific Drive Have Multiplayer Options?
No. Pacific Drive is a single-player game in its entirety.
Is Pacific Drive on Xbox or Game Pass?
As of now, the game isn’t on Game Pass or
Does Pacific Drive Have Cross-Platform Progression?
As of now, there isn’t confirmation about this feature.
Can You Play Pacific Drive on Steam Deck?
Pacific Drive isn’t verified for Steam Deck. If you want to play it on Steam, you must do so on a PC.
For more information regarding Pacific Drive, don’t forget to read our other articles in this starter guide to help you through your first hours in the Olympic Exclusion Zone.

