Close Menu
  • Gaming
    • Platforms
      • Nintendo
      • PC
      • PlayStation
      • Xbox
  • Entertainment
    • Movies
    • TV
    • Royals
  • Celebrity
    • Hollywood
  • Human Interest
  • Astrology
  • More
    • Reviews
Facebook X (Twitter) Instagram LinkedIn YouTube
  • About Us
  • Join Our Team
  • Meet the Team
  • Privacy Policy
  • DMCA Policy
  • Contact Us
  • Terms of Use
  • Sitemap
  • Editorial Guidelines
  • Advertising Policy
The Nerd Stash
  • Gaming
  • Celebrity
  • Hollywood
  • Human Interest
The Nerd Stash
Home»Gaming»How To Complete The Oakle’s Navel Cave Crystal in Zelda Tears of the Kingdom

How To Complete The Oakle’s Navel Cave Crystal in Zelda Tears of the Kingdom

A tricky navel, for sure

Nerd Stash StaffBy Nerd Stash StaffJune 8, 20232 Mins Read
The Oakles Navel Cave Crystal completion
Source: Nintendo via YouTube Trophygamers
This article is over 3 years old and may contain outdated information.

[Updated on August 28, 2024, to revise outdated formatting and improve readability.]

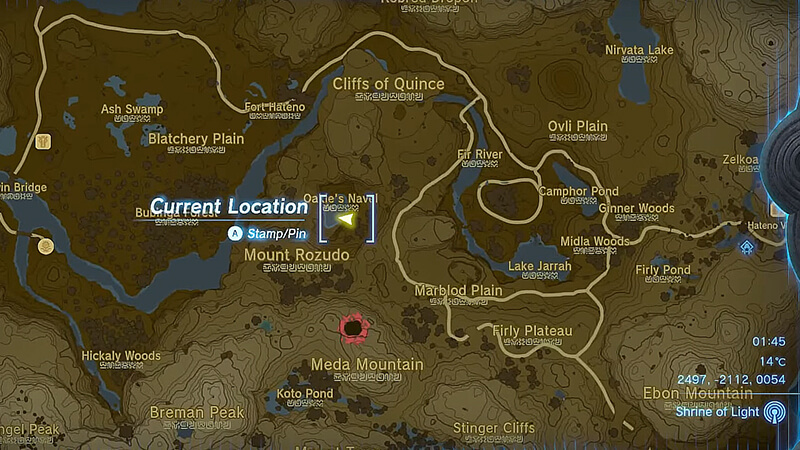
The Oakle’s Navel Cave Crystal quest in Zelda Tears of the Kingdom differs from similar quests since you first need to find Crystal, not Shrine. So head to the Necluda region. North of Meda Mountain Chasm, you can locate Oakle’s Navel Lake. And next to it, you will find the Oakle’s Navel Cave entrance. For convenience, you can use these coordinates:

  • 2504, -2107, 0007
The Oakle's Navel Cave Crystal map
Source: Nintendo via YouTube Trophygamers

Entering the Cave, you will need to run past a Shock Like. Then you will reach the green Crystal. Interact with it to start your challenge. After that, a green beam will appear pointing at Shrine, and massive doors will open before you.

Related:

Creative Fan Builds Amusement Park in Zelda Tears of the Kingdom

However, you can’t just bring Crystal to the Shrine, as several obstacles await you. So follow these simple steps to complete The Oakle’s Navel Cave Crystal quest in Tears of the Kingdom:

  1. Take the Crystal in your hands and go straight.
  2. Watch out for the rocks on the right. They fall along a particular path, and you can safely stand between them.
  3. Similarly, you can pass through the falling stones on the left.
  4. Then keep walking until you reach a narrow corridor.
  5. Put the Crystal at the beginning of the corridor and wait for the giant boulder to start rolling towards you.
  6. Use your Recall ability on the boulder to make it roll back.
  7. Pick up the Crystal and go through the corridor.
  8. After that, all you have to do is reach the end of the cave to complete the quest and unlock the Tokiy Shrine.
Related Topics
Guide Legend of Zelda Tears of the Kingdom
Share. Facebook Twitter LinkedIn Reddit Email
Nerd Stash Staff
  • Website

SUGGESTED READS

Sony Just Put Another Nail in Physical Games' Coffin by Repurposing Its Disc Factory: 'A Direct Impact on Production'
Gaming

Sony Just Put Another Nail in Physical Games’ Coffin by Repurposing Its Disc Factory: ‘A Direct Impact on Production’

Star Fox Nintendo Switch 2 Review
9
Gaming

Star Fox Review – The Crew Is Back

PlayStation Physical Discs Gone
Gaming

The End of an Era: PlayStation to End Physical Disc Production in 2028

$99 Price Tag Isn't Scaring Gamers as GTA 6 Preorders Top PlayStation Store Charts Worldwide
Gaming

$99 Price Tag Isn’t Scaring Gamers as GTA 6 Preorders Top PlayStation Store Charts Worldwide

GTA 6 Launch Issues
Gaming

The Launch Of GTA 6 Might Be In Danger as Rockstar Games Could Go On Strike

The Crew Motorfest Season 10 Interview With Julien Hummer
Gaming

The Crew Motorfest Interview With Julien Hummer: The 10-Season Milestone, Long-Format Events, and More

The Nerd Stash
Facebook X (Twitter) Instagram YouTube LinkedIn
  • About Us
  • Join Our Team
  • Meet the Team
  • Privacy Policy
  • DMCA Policy
  • Contact Us
  • Terms of Use
  • Sitemap
  • Editorial Guidelines
  • Advertising Policy
© 2026 The Nerd Stash. All Rights Reserved.

Type above and press Enter to search. Press Esc to cancel.