Skip To...
There’s no mistake that Valve’s PC gaming launcher is the most popular gaming storefront in the world, breaking concurrent user records each year. However, the PC application is not without any flaws. Most users agree that the Steam client webhelper process often runs with high memory usage, causing discomfort even when you’re not playing any game. Not to worry, as these 7 simple tricks can cut the Steam app RAM usage down and fix the memory leak issue.
1. Restart the Steam App
More often than not, memory leak issues can be resolved by simply restarting Steam. Make sure the Steam icon no longer appears in the taskbar to properly restart the application. If after restarting it still becomes a memory hog, continue to the next step.
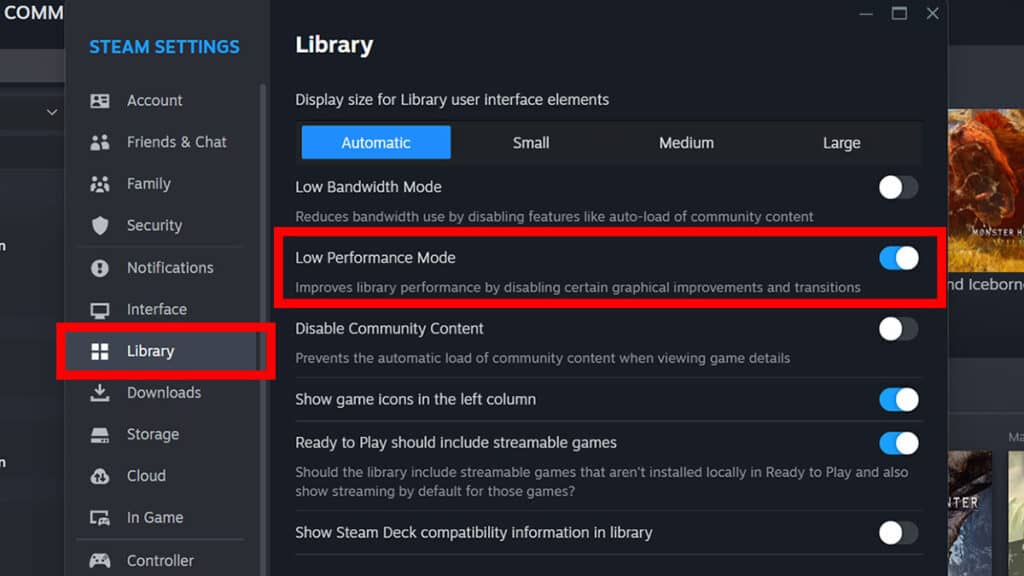
2. Disable Certain Steam Library Settings To Fix Client Webhelper High Memory Usage
Changing some settings in the Library menu can help reduce the high memory usage of the Webhelper. Try tweaking the Low Bandwith Mode, Low Performance Mode, and Disable Community Content options. In our case, turning on the Low Performance Mode decreases the Steam Client Webhelper processes by 100MB to 360MB in Task Manager.

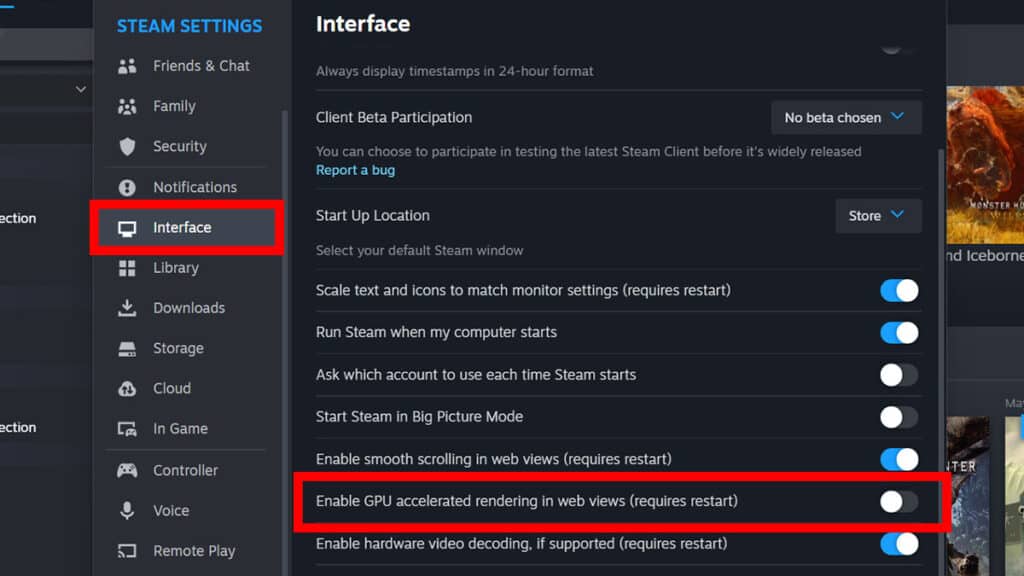
3. Restart Steam with GPU Acceleration Disabled To Fix Client Webhelper High Memory Usage
Specific driver releases can end up having trouble rendering Steam web content if utilizing GPU acceleration. Turn off the option in Settings > Interface to restart Steam with GPU acceleration disabled. Do note that permanently disabling GPU acceleration in the Steam Interface settings will affect UI performance.
4. Update GPU Drivers
If turning off GPU Acceleration fixes the Steam client webhelper high memory usage, then you should update your GPU driver. That could mean there is a problem with your current GPU driver as it causes memory leaks when being paired with your CPU processes.

5. Restart Steam with Browser Sandboxing Disabled
Browser sandboxing is a security feature that isolates individual browsers from each other and from local resources on your computer. Try adding the
-no-cef-sandbox
launch command to your Steam shortcut. Right-click on the desktop shortcut, select Properties, and add the command to the Target box. This should fix the high memory usage problem with your Steam client webhelper.
Nevertheless, it’s not recommended to run in this mode for long periods and it will be automatically reenabled the next time you run the app. Since isolating the Steam browser means any discovered exploit can’t affect other apps out of the sandbox. Turning off the sandbox should be done when diagnosing a problem with the browser itself.

6. Restart steamwebhelper.exe
The last method you could try is to open Task Manager and manually restart steamwebhelper.exe. Doing so will restart only the rendering components of Steam and could fix the client webhelper high memory usage.
7. Launch Steam with Only the Library Section To Fix Client Webhelper High Memory Usage
The memory leak feature has been fixed but do you still want to cut Steam’s memory usage? There is a simple way to turn its process to just 170-180MB. Just add the
-no-browser +open steam://open/minigameslist
command to your Steam shortcut. However, doing this will disable all Steam’s features, from Store to Community tabs, except your Library. Now you are running Steam in a DIY lite mode!
Those are the guaranteed methods to fix Steam Client Webhelper when it has high memory usage. In case you’re having issues with specific games instead, we also have a guide on how to get a refund on Valve’s ever-popular storefront.


