The conclusion to the Myths of the Realm series is finally here. After waiting for some months, Final Fantasy 14‘s first original alliance raid in a while is ending, and players are clamoring to enter the last gates of The Omphalos. While this raid isn’t as hard as those in the Savage or Unreal tiers, it’s still challenging and requires careful planning and memorizing most of the bosses’s abilities. If you want to pass this raid with flying colors, here’s a guide for the latest Thaleia Alliance Raid in FFXIV 6.5.
How To Clear the Thaleia Alliance Raid in FFXIV
Before you try to enter this raid, you must fulfill three prerequisites:
- Complete the previous instances, Aglaia and Euphrosyne.
- Head to Mor Dhona and pick “The Heart of the Myth” quest to unlock Thaleia; we have a guide here.
- Equip a minimum item level of 625, meaning you might have to upgrade your gear before entering.
After following the above steps, you’ll enter the new instance, which is one of the most beautiful the team behind this MMO has made. In it, you’ll face the following encounters in the following order. As a disclaimer, spoiler warning! This guide will show you the conclusion to this raid, so you’ve been warned.
- Serpent of Thaleia x6
- Triton of Thaleia x2
- Water Sprite x6
- Thaliak
- Llymlaen
- Oschon
- Eulogia
Each run should take you anywhere between 30 to 40 minutes, depending on your alliance’s damage and if you avoid dying. With that out of the way, let’s break down each fight.
Trash Mob #1: Serpents and Tritons
The first encounter serves as a warm-up and doesn’t require much planning. We recommend you stick to AoE skills and spells and avoid burning your cooldowns, especially those on the 2-minute window. While it can be hectic, try to have a tank from each Alliance to tank a cluster of mobs to split the damage and defeat the enemies. Here are the notable attacks you must watch out for:
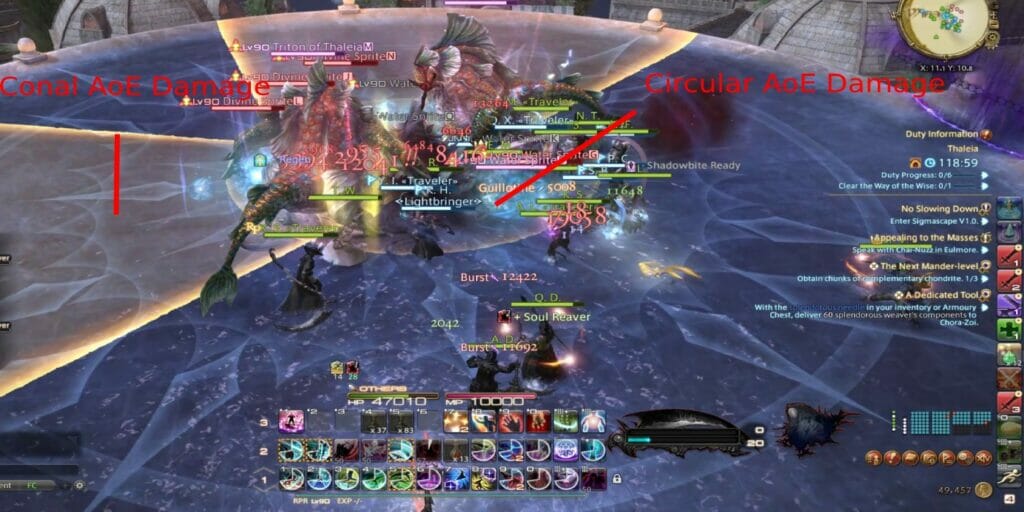
- Water III: Circular AoE damage.
- Pelagic Cleaver: Conal AoE damage.
- Flood: Circular AoE damage.
Boss Fight #1: Thaliak
Here’s where the fun begins. Thaliak is a challenging boss with many mechanics that can make even the most experienced group wipe in seconds. Thankfully, this is only for the first run, and other tries should be easier. The biggest gimmick here is his attacks with triangles that can throw off many players. Yet, we’ll help you with all the mechanics here. We’ll start with the easy ones and break down the most complicated ones.
- Katarrakes: Raid-wide damage; heal and shield as necessary.
- Thlipsis: Stack mechanic. Run to the boss and stack together to split the damage.
- Left and Right Bank: Thaliak will attack on his left or right side and move to the opposite side to avoid damage.
- Hydroptosis: AoE circles on several players. Spread as necessary.
- Rhyton: Tankbuster. Tanks must stay away from other players.
Rheognosis
The first difficult mechanic is Rheognosis. Here, Thaliak will summon a clone that will point at a knockback. Move to that side to avoid being knocked out of the arena.
Tetraktys
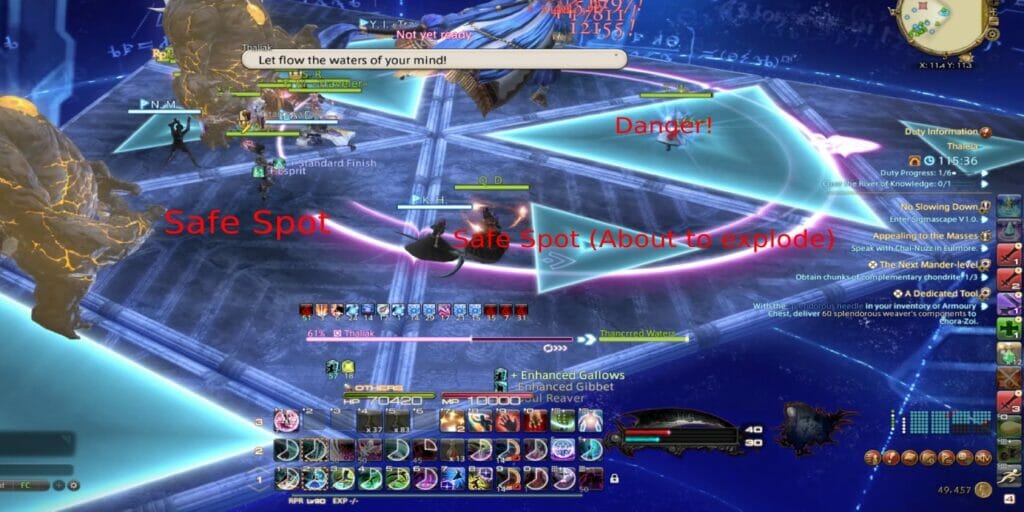
This is the triangle mechanic we mentioned. Here, Thaliak will summon triangles that will explode and do damage. You must move to the places where there are no triangles or where there are small ones. The latter are charging and will go off after the first set of triangles blow up.
Tetraktys Kosmos
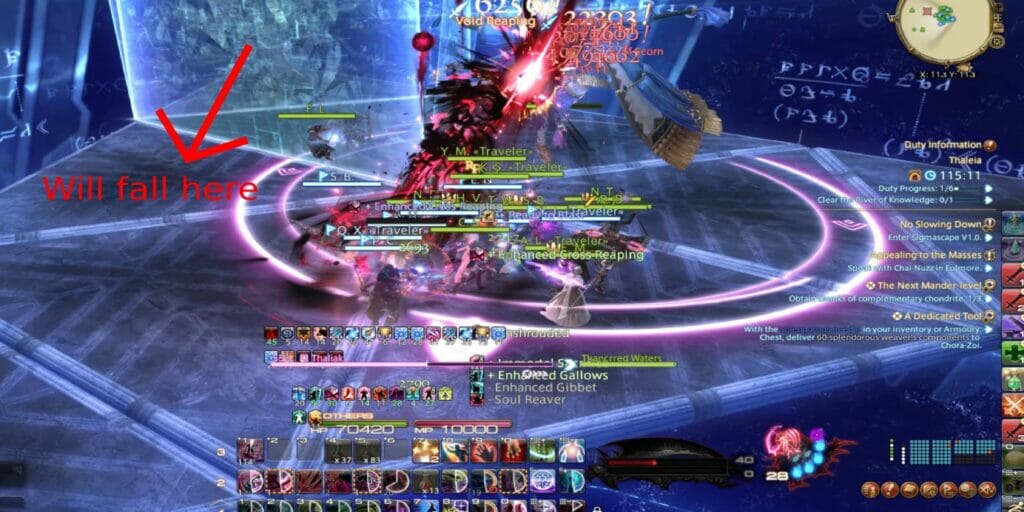
This one summons prisms that open and deal damage at a certain point in the arena. Stay where the prism has no walls, and avoid moving inside the prism, as it’ll damage you, too.
Hieroglyphica
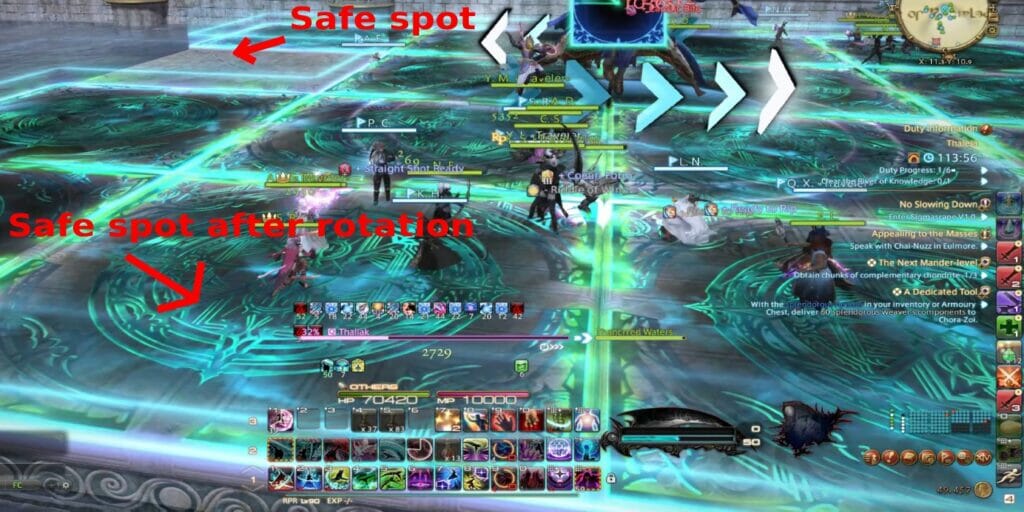
This one is challenging, but for those who remember the Zodiark fight in FFXIV, you might have it easy in the latest Thaleia raid. Thaliak will mark the arena with green squares, signaling which squares will explode. However, two squares will be empty; these are the safe spots. At the same time, the boss will get a rotation marker. You must find the safe spot by identifying where the safe spot will land after rotating. During the boss’s final phase, he will add a left or right blank, meaning you must find the safe spot and also the safe side to avoid damage.
Related:
How To Get Mobile Garden Stairs in FFXIV
Llymlaen
The Navigator. The one who watches over all Limsa Lominsa residents; yes, even the weird ones. She’s eager to fight and is excited to give players a fight they won’t forget, which is true in this alliance raid. If you think the first encounter was challenging, hold on to your hats because you’re in for a nautical beating.
- Temptest: Raid-wide damage. Heald and shield.
- Seaform Spiral: Donut AoE damage. Stay under the boss.
- Navigator’s Trident: The boss attacks both sides of the arena. She’ll mark them first to signal the same spot. You must move to the opposite side fast to avoid damage.
- Left or Right Strait: Same as Thaliak. Watch for her attack and move to the opposite side. If it’s right, move left.
- Deep Dive: Stack damage.
- Denizens of the Deep: Two serpents attack specific areas of the arena. Watch for the bubble portals on the walls to avoid damage.
Surging Wave
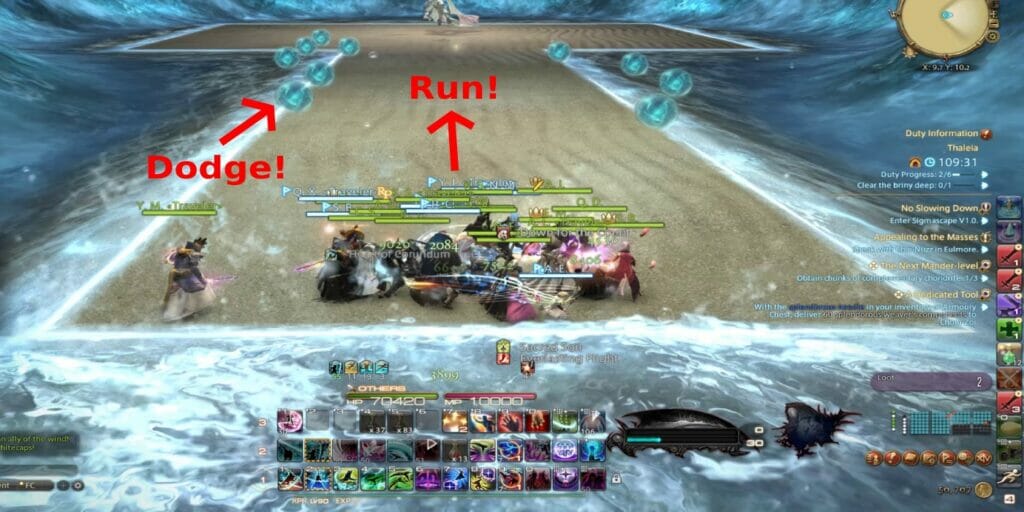
This is going to be one of the fight’s hardest mechanics. Llymlaen will open a path on the water walls before pushing the players back to this new corridor. You must position yourself in front of her and wait for the pushback. After a few seconds, a huge wave will try to crush you. You must run back to the arena while avoiding the bubbles that explode on contact, launching you into the air and leaving you exposed to the wave.
Oschon
You’ve made it. The final deity. The Wanderer: he who blesses those who follow their heart and travel wherever the road takes them. At first, it might seem like the raid’s final fight, but don’t let it fool you; this is just a warm-up before finishing Thaleia in FFXIV 6.5, so let’s check the guide for this boss.
First Phase
The fight has two phases, and the first one will see Oschon moving friendly in the arena. It will require you to dodge and learn many mechanics, such as these:
- Sudden Downpour: Raid-wide damage.
- Flinted Foehn: Stack damage. Hits 6 times.
- Soaring Minuet: Stand behind the boss to avoid damage.
- Downhill: AoE markers on the ground. Find a safe spot.
- Climbing Shot: Damage with knockback. Happens at the same time as Downhill. Find the safe spot to avoid the AoE markers as you’re pushed back.
- Lofty Peaks: Phase transition.
Trek Shot
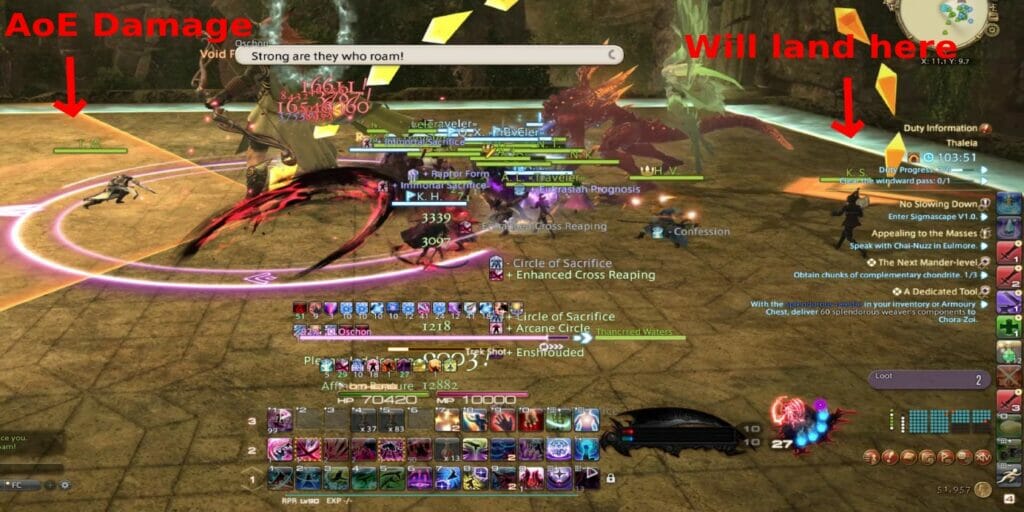
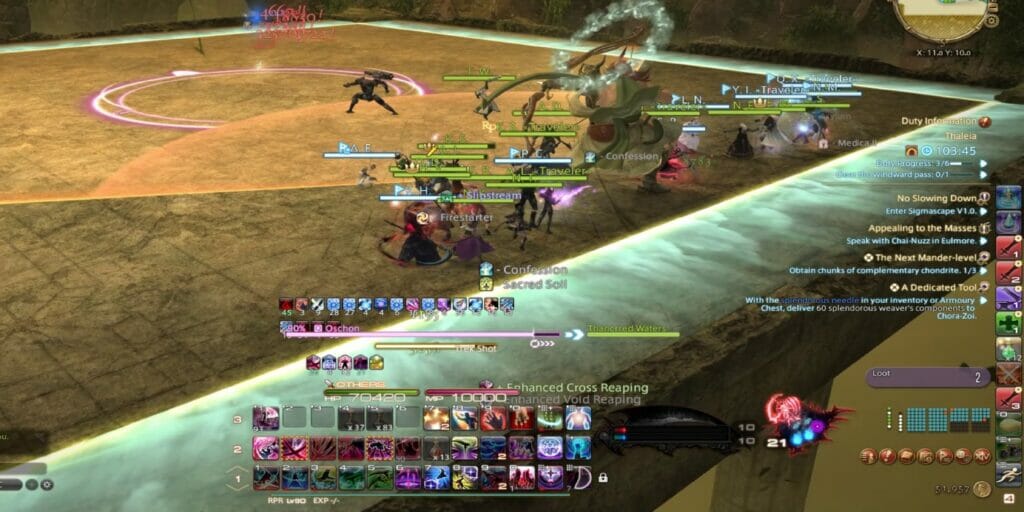
This mechanic is difficult for many as Oschon marks an area with a conal AoE marker and summons a curved arrow marker showing where he’ll land. In the above image, it shows where the AoE damage marker begins and where the boss will position himself after a few seconds. You need to run where the boss will land to avoid the damage. The below image shows the safe spot after the attack.
Second Phase
The second phase will see Oschon grow and position himself on one side of the arena. This will make targeting him easier but will introduce new mechanics.
- Pitton Pull: Oschon launches two chains and sticks them in the ground. They will explode when the cast goes off. Find the safe spot. You can locate it by looking at the ground that has the arena’s normal color. It’s usually in the corners.
- Altitude: AoE markers appear to signal where they’ll explode. Memorize the safe spot and move to them as the circles disappear and explode with delay.
- The Arrow: Large tankbusters.
Wandering Shot
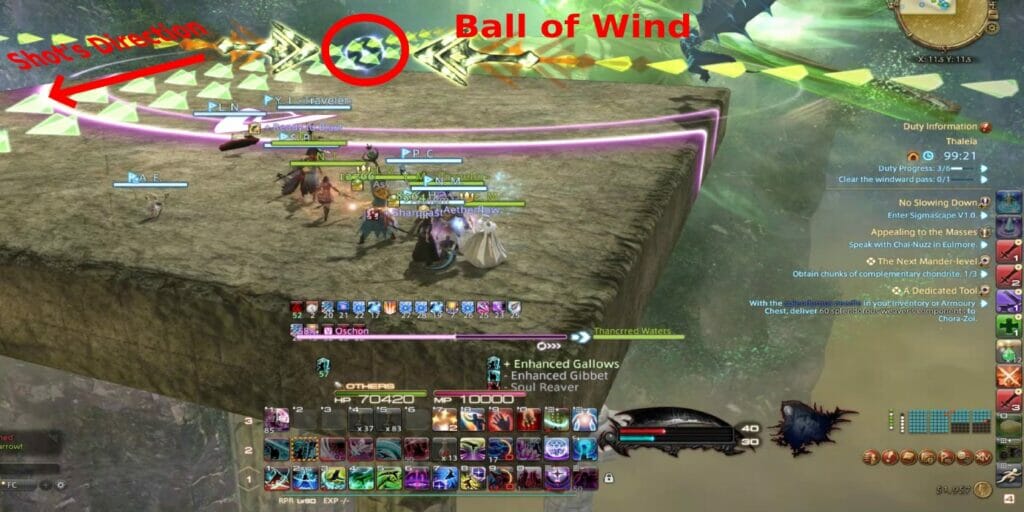
This mechanic will spawn markers showing a path where the shot will travel. At the same time, a ball of wind will spawn at one side of the arena, where it’ll damage half of it, closer to where it spawned, of course. Find where the shot won’t travel and the half of the arena that doesn’t have the ball of wind.
Related:
How To Get the Axolotl Mount in FFXIV
Eulogia
The final boss of the Thaleia raid in FFXIV is Eulogia, who — drum rolls please — is the fusion of all twelve deities in the game, hence why a guide is important. This means players will face mechanics from the previous raids here and a few new ones to keep everyone on their toes. So, to end this on a high note, let’s see how to beat the raid’s final boss.
Quintessence and Forms
Eulogia will begin the fight with Quintessence, an attack that will go off after casting the First, Second, and Final Forms. These forms have different AoE patterns, and players need to learn them while finding the safe spot established by the blue lines; a guide for Thaleia in FFXIV 6.5 doesn’t seem too bad now.
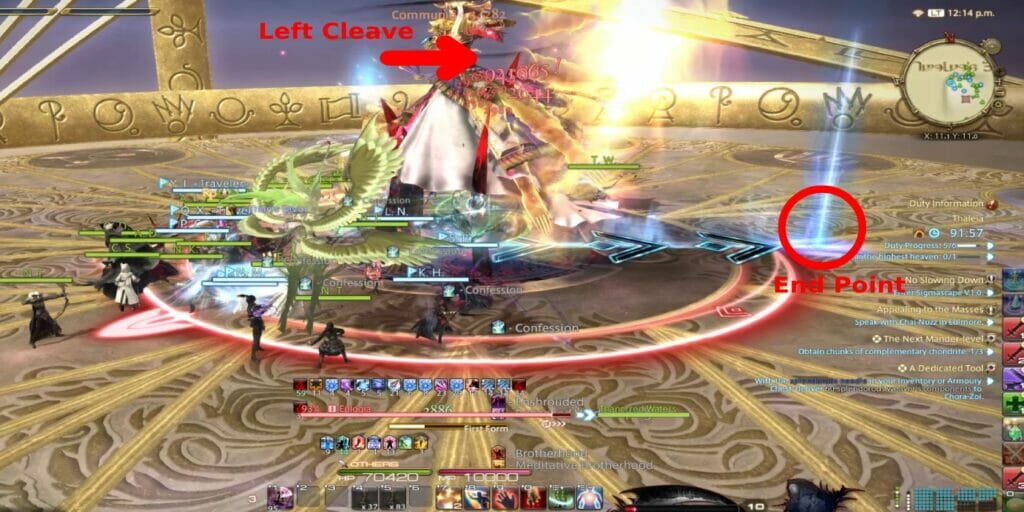
Of the three forms, you’ll see Eulogia raising their arms to the left or right side or spawning a circle-like shape. You need to memorize which form has which arms. The right one will cleave the right side of the arena, the left will do the opposite, and the circle shape will do a donut attack. It’s important to see where the blue arrow ends and where the cleave or donut attack will land.
The Twelve Combined
After this attack, the boss will mix it between some of the previous boss’s mechanics, not only from this raid, though, but from the other two Alliance Raids. Here are the ones you’ll find:
- Love’s Light: Four moons will launch line AoE attacks. They’ll go off as the moons become Full Moons.
- Solar Fans: Two fans will rotate around the arena. After four or five rotations, they will stop and launch a huge AoE marker, damaging everyone. Avoid them by looking at where they stop and moving to the middle.
- Hieroglyphica: The one from Thalik’s fight. You can find it above in this Thaleia guide for FFXIV 6.5.
- Hand of the Destroyer: The boss will punch a red or blue circle to spawn a big arm and cleave half of the arena. Move to the circle that the boss doesn’t punch.
- Byregot’s Strike: A blue marker with knockback will appear, and the boss will spawn a cross under it. Position yourself next to the blue marker and on the sides of the cross that are empty to avoid damage.
- As Above, So Below: Red and Blue markers appear with AoE damage that moves. Look at the color that the boss is casting and avoid those markers.
- Wandering Shot: The one from Oschon’s second phase.
Related:
All New Diadochos Gear in FFXIV (Patch 6.5 Crafted Gear)
That wraps up our guide for Thaleia in FFXIV 6.5. While it seems long, the fights can be easy if you memorize the newest mechanics. Most require you to move a lot, but once you know which direction to take, you’re good to go. If you prefer a more visual guide, here’s a video by SamsonGrey, who has the full fight with all mechanics, too.

